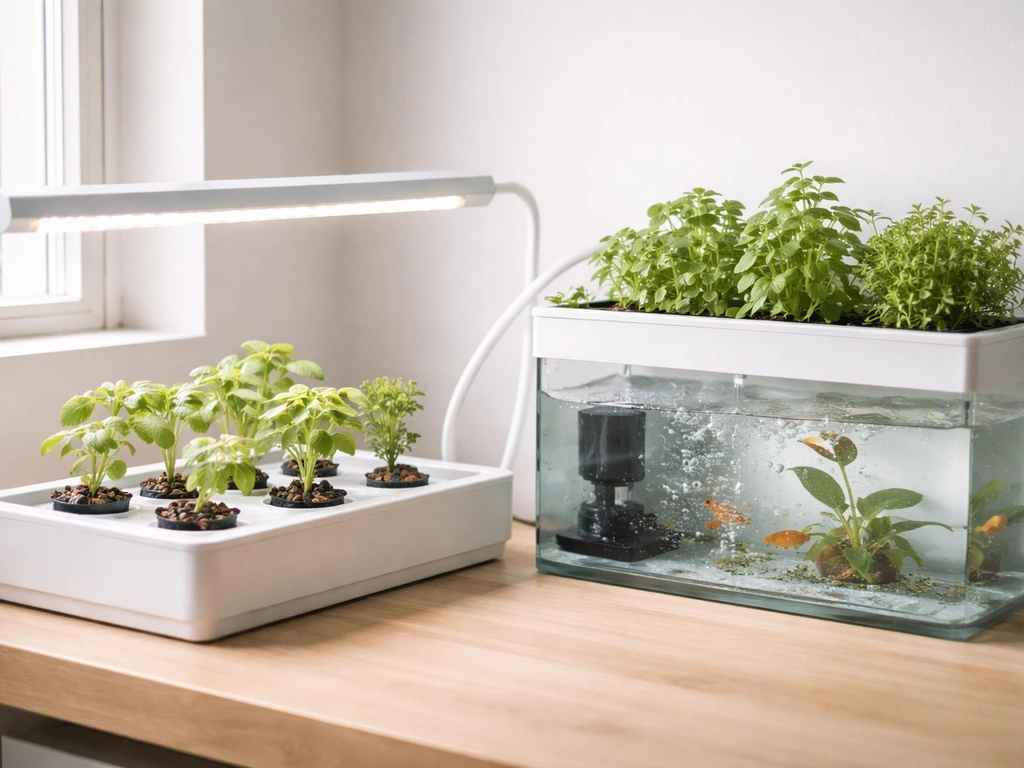
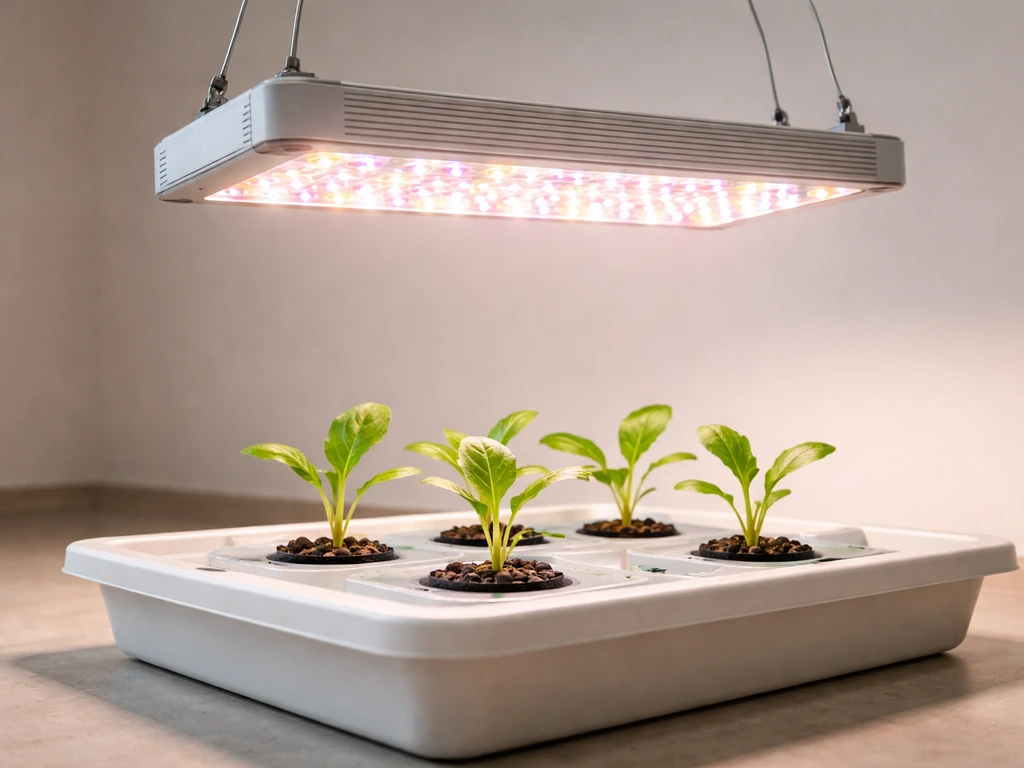
You can grow real, edible food in water right now using one of three approaches: hydroponics (plants in nutrient-rich water, no soil), aquaponics (fish waste feeds the plants, plants clean the water), or semi-aquatic beds where roots sit in a wet zone. Of the three, a basic hydroponic deep water culture (DWC) setup is the fastest and cheapest way to get started, and you can have lettuce or herbs ready to harvest in 3 to 5 weeks from seed. You do not need a greenhouse, a big yard, or expensive equipment. A 5-gallon bucket, an air pump, net pots, and a bottle of liquid nutrients is genuinely enough to grow your first crop.
How to Grow Food in Water: Hydroponics and Aquaponics for Beginners

Marcus Holloway
6 Jun 2026
What 'growing food in water' actually means
People use this phrase to mean several different things, and choosing the right one up front saves a lot of frustration. Here is how the main approaches break down in plain terms.
Hydroponics
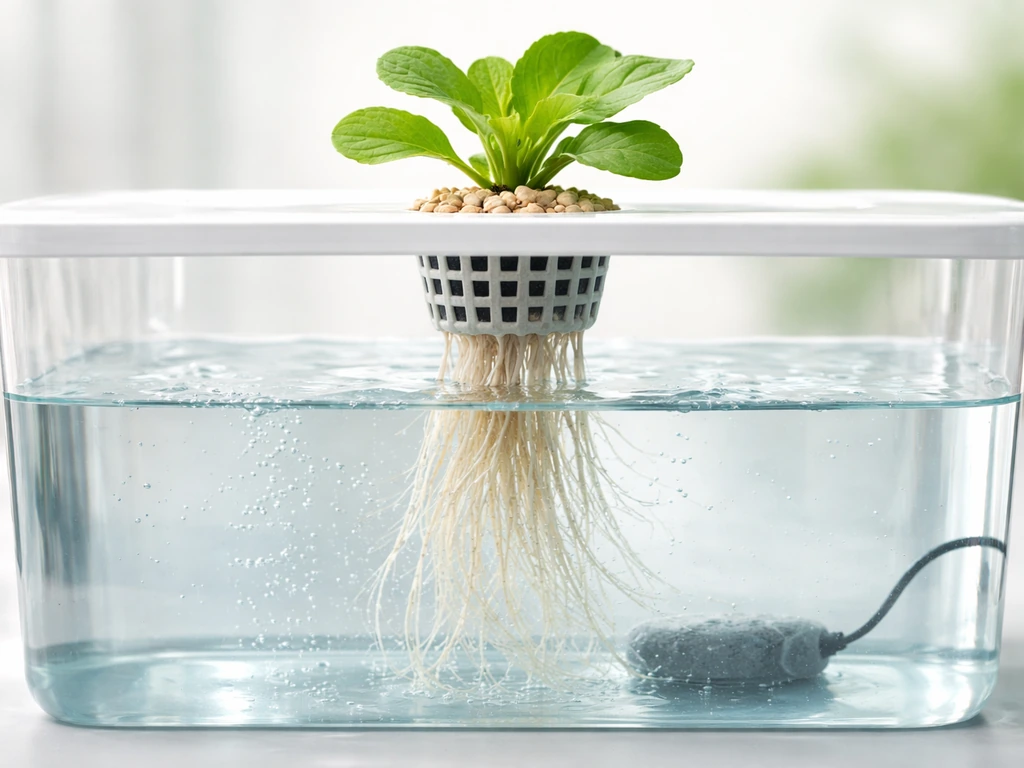
Roots are held in an inert medium (or suspended in air) and constantly or periodically bathed in a water-based nutrient solution. You control exactly what the plant eats. There are no fish, no soil microbes, just plants and water chemistry. Oklahoma State University describes it well: an air pump pushes air through an air stone into the reservoir to keep that nutrient solution oxygenated. Without oxygen at the roots, plants drown even in water. This is the system most beginners start with because it is the most predictable.
Aquaponics
This combines a fish tank with a hydroponic grow bed. If you want to grow water plants in a fish tank, aquaponics is the approach that combines fish waste with a grow bed to feed the plants. Fish produce ammonia-rich waste, beneficial bacteria convert that waste to nitrates, and the plants absorb those nitrates as fertilizer while cleaning the water for the fish. It sounds like a lot of moving parts, and honestly, it is.
Aquaponics is more complex to balance, but it produces two food outputs (plants and fish or crustaceans) and can be deeply satisfying once it stabilizes. It takes longer to cycle (4 to 6 weeks to establish the bacterial colony) before you can grow food reliably.
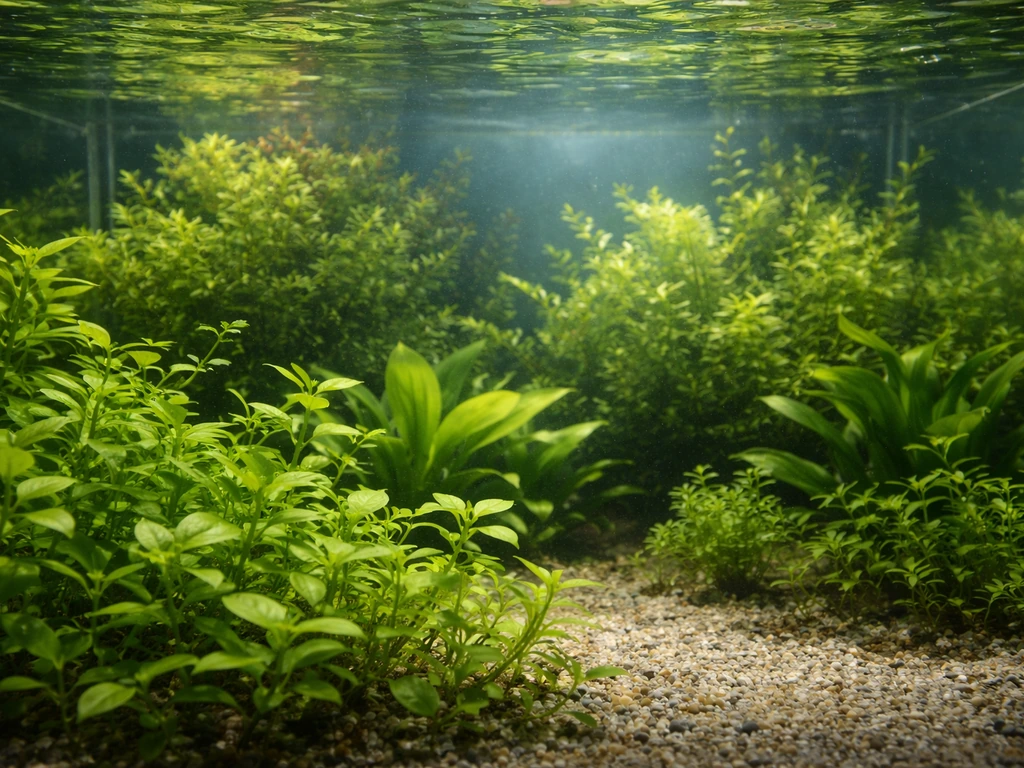
Semi-aquatic and water garden food growing
Some edibles grow at the water's edge or with roots partially submerged: watercress, water spinach, taro, and similar plants. These can go into a water garden bed, a stock tank, or even a lined raised bed with a wet bottom zone. It is a lower-tech approach but limits what you can grow. If you want a broader crop range, a full hydroponic or aquaponic system gives you more flexibility. If you want a reliable way to learn how to grow water plants at home, start with a small water garden or a beginner-friendly hydroponic setup and then expand once you see healthy growth.
Pick your system: size, budget, and skill level
The honest answer is: start smaller than you think you need. I made the classic mistake of building a 4-channel NFT (nutrient film technique) system my first time out, and I spent more time troubleshooting pump failures than actually growing food. A single DWC bucket taught me more in one season than that whole NFT build.
| System | Best for | Startup cost (approx.) | Complexity | Crop range |
|---|---|---|---|---|
| DWC (Deep Water Culture) | Beginners, fast results, indoors | $30 to $80 | Low | Greens, herbs, small fruiting plants |
| Kratky (passive DWC) | True beginners, no pump needed | $15 to $40 | Very low | Lettuce, herbs |
| NFT (Nutrient Film Technique) | Intermediate, multiple plants | $100 to $300 | Medium | Greens, strawberries, herbs |
| Aquaponics (media bed) | Fish + plant producers, more space | $200 to $800+ | High | Greens, herbs, fish/shrimp |
| Semi-aquatic bed/water garden | Outdoor, low-maintenance edibles | $50 to $200 | Low | Watercress, water spinach, taro |
For a first system, choose DWC or Kratky. DWC uses an air pump to oxygenate the reservoir continuously, giving roots plenty of oxygen. Kratky is passive: you leave an air gap between the water surface and the net pot lid, and roots draw oxygen from that gap as the water level drops. Kratky works beautifully for lettuce and herbs and requires zero electricity for aeration. If you want to grow larger plants or fruiting crops, go DWC or NFT.
Equipment and environment checklist
Here is what you actually need to get a basic DWC system running. Most of it is available at hardware stores or online.
The core hardware
- Reservoir: an opaque 5-gallon bucket or tote (light-proof to prevent algae). Rubbermaid totes work great for multi-plant setups.
- Net pots: 2-inch or 3-inch cups that sit in holes cut in the lid and hold the plant and growing medium.
- Air pump, airline tubing, and air stone: a cheap aquarium pump (around $10 to $15) is enough for a single bucket. Bigger reservoirs need a stronger pump.
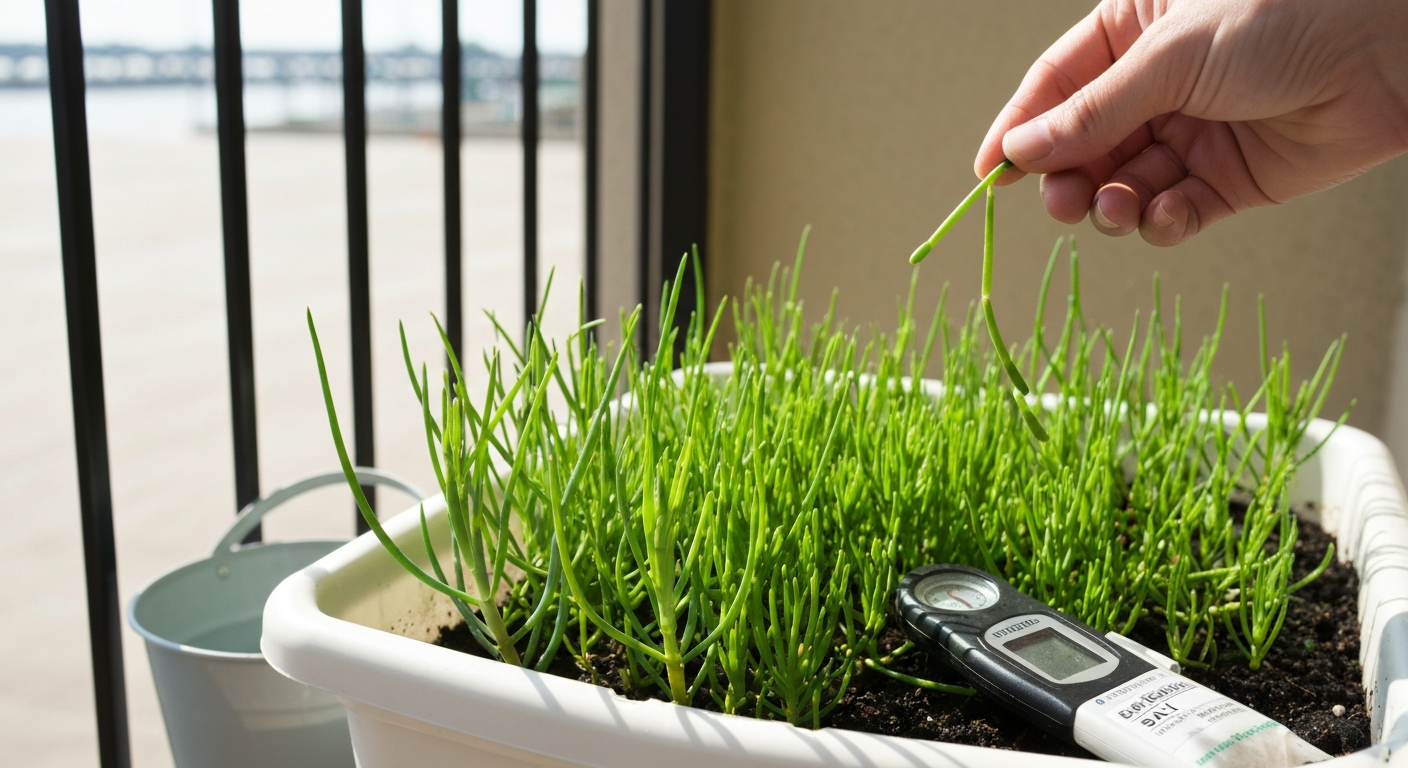
- pH meter or test kit: this is non-negotiable. A digital pH pen ($15 to $25) is more accurate than strips.
- EC/TDS meter: measures nutrient concentration. Usually sold bundled with pH meters.
- Hydroponic nutrients: a two- or three-part liquid formula designed for hydroponics. General Hydroponics Flora Series and similar products are widely available.
- pH Up and pH Down solutions: you will use these every few days to keep the solution in range.
- Growing medium: hydroton (clay pebbles), rockwool cubes, or perlite to support roots in net pots.
- Thermometer: to track water temperature (and air temperature if indoors).
Lighting (indoors)
If you are growing indoors, a full-spectrum LED grow light is the single biggest factor in your yield. For leafy greens, 20 to 30 watts of actual LED power per square foot is sufficient. For fruiting crops like tomatoes or peppers, plan for 30 to 50 watts per square foot. Run lights 16 hours on and 8 hours off for most food crops during vegetative growth. A simple mechanical outlet timer handles this automatically.
Water quality targets
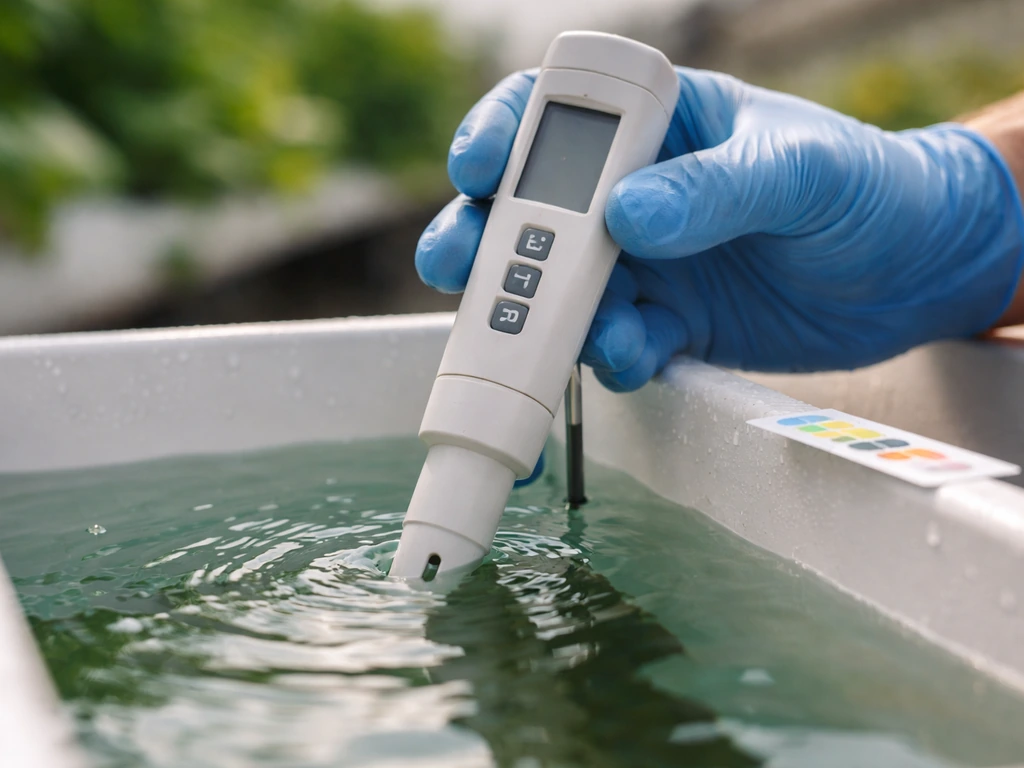
These numbers matter more than almost anything else in your system. Get them right and plants grow fast. Get them wrong and you will spend weeks trying to figure out why leaves are yellow. Aim for a pH of 5.
5 to 6. 5, with the sweet spot being 5. 8 to 6. 2.
Oklahoma State University recommends a pH of 5. Oklahoma State University also reports that for hydroponic culture the recommended pH is 5. 0 to 6. 0 and EC should be 1.
5 to 3 dS m−1 recommended pH of 5. .
0 to 6. 0 for hydroponic culture, with EC in the range of 1. 5 to 3. 0 dS/m (which is the same as mS/cm on most meters).
For leafy greens and seedlings, keep EC lower, around 1. 0 to 1. 6. Fruiting plants and mature vegetables can handle 2.
0 to 3. 0. Water temperature should stay between 65°F and 72°F (18°C to 22°C). Warmer water holds less oxygen and encourages root rot and pathogens.
Planting and getting your first crop started
Seeds vs. cuttings
Both work well in water systems. Seeds are cheaper and give you more variety options. Start them in small rockwool cubes or rapid rooter plugs, keep them moist (not soaking) under a humidity dome, and they typically germinate in 3 to 7 days. Once the root tip is visible and the seedling is about 1 inch tall, transplant the cube into your net pot. Cuttings (clones) from herbs like basil, mint, or rosemary root directly in a cup of plain water in 1 to 2 weeks, then move to the system. Cuttings give you a head start and skip the germination uncertainty.
Setting up net pots and growing medium
Rinse hydroton or clay pebbles thoroughly before use because the dust will cloud your reservoir and clog air stones. Fill net pots about two-thirds full, place the rockwool cube or root plug in the center, and pack the medium loosely around it. The bottom of the net pot should just touch or be slightly above the nutrient solution when the system is new. As roots develop and extend into the reservoir, the water level can drop a bit, which for Kratky systems creates the necessary air gap. In DWC, keep the solution level about 1 inch below the net pot bottom once roots have extended into the reservoir.
Mixing your first nutrient solution
Fill your reservoir with water, then add nutrients according to the product label, starting at half strength for seedlings. Measure pH after adding nutrients (nutrients shift pH), then adjust with pH Up or pH Down. Mix well and let it settle for a minute before taking a final pH reading. Always target 5.8 to 6.2. Then check EC to confirm you are in the right range for your crop stage. For a commonly used beginner hydroponics target, aim for veg EC about 1.0, 1.6 and a pH range of roughly 5.5, 6.5 (ideal around 5.8, 6.2) Then check EC. Log what you added: this makes future adjustments much faster.
Daily and weekly care routine
Water-based systems require consistent attention, but not hours of it. About 5 to 10 minutes a day is all it takes once everything is running.
Daily tasks
- Check water level: top up with plain pH-adjusted water (not nutrient solution) when the level drops. Plants consume water faster than nutrients, so topping up with plain water keeps EC from climbing too high.
- Check pH: measure and adjust as needed. pH drifts daily, especially in active systems. Correct it before it goes outside your range.
- Visually inspect plants: look for yellowing leaves, wilting, unusual spots, or signs of pests. Catching problems early is the entire game.
- Check the air pump: make sure it is running and bubbling. A failed air pump overnight can kill an entire crop.
Weekly tasks
- Check EC: if it has climbed more than 0.5 above your target, do a partial reservoir refresh by removing some solution and replacing with fresh nutrient mix.
- Full reservoir change: every 2 to 3 weeks, drain the entire reservoir, rinse it out, and mix a fresh batch of nutrients. This prevents salt buildup and pathogen accumulation.
- Clean air stones and tubing: rinse with plain water to prevent biofilm buildup.
- Inspect roots: healthy roots are white to cream-colored and bushy. Brown, slimy, or bad-smelling roots signal a problem.
- Adjust light height and duration as plants grow: canopy distance from LED lights typically stays 12 to 24 inches depending on the light's intensity.
Temperature and light targets at a glance
| Parameter | Target range | Notes |
|---|---|---|
| Water temperature | 65°F to 72°F (18°C to 22°C) | Below 60°F slows growth; above 75°F promotes root rot |
| Air temperature | 70°F to 80°F (21°C to 27°C) | Most food crops prefer this range |
| pH | 5.5 to 6.5 (ideal 5.8 to 6.2) | Check daily; adjust before feeding |
| EC (seedlings/greens) | 1.0 to 1.6 mS/cm | Start low; increase as plants mature |
| EC (fruiting/mature plants) | 2.0 to 3.0 mS/cm | Monitor closely; excess causes tip burn |
| Light (greens/herbs) | 14 to 16 hours on, 8 to 10 off | Full-spectrum LED recommended |
| Light (fruiting crops) | 16 to 18 hours vegetative, 12/12 for flowering | Depends on crop type |
The best foods to grow in water and what to expect
Not every food crop does equally well in water systems. Leafy greens and herbs are the undisputed champions for beginners, with fruiting crops being very achievable once you have a season or two of experience.
Easiest wins: greens and herbs
- Lettuce (all varieties): 3 to 5 weeks from transplant to first harvest. Grows incredibly fast in DWC or Kratky. Harvest outer leaves continuously for weeks.
- Spinach: 4 to 6 weeks. Prefers slightly cooler water, around 65°F to 68°F. Great for indoor winter growing.
- Kale and Swiss chard: 4 to 6 weeks to first harvest. Larger plants need bigger net pots and more space.
- Basil: 3 to 4 weeks from transplant. Keep water warm (68°F to 72°F). Harvest tips regularly to prevent bolting.
- Mint: root cuttings in plain water in 10 to 14 days, then move to a nutrient solution. Grows aggressively. Give it its own container.
- Cilantro and parsley: 4 to 6 weeks. Cilantro bolts quickly in heat, so keep the environment cool.
- Watercress: a natural semi-aquatic plant that thrives in hydroponic and water garden systems. Ready in 3 to 4 weeks. A good choice if you are exploring semi-aquatic setups.
Intermediate options: fruiting and root crops
- Strawberries: excellent in NFT or DWC. Use runners or plugs rather than seeds. First harvest in 8 to 12 weeks from established plants. Ongoing production for months.
- Cherry tomatoes: need strong support, pollination (manual or by fan-generated airflow indoors), and higher EC (2.0 to 3.5). Expect first fruit in 8 to 12 weeks from transplant.
- Peppers: similar care to tomatoes but slower. 10 to 14 weeks to first harvest. Worth it for continuous production.
- Cucumbers: fast-growing and high-yielding. Need trellising and warm temperatures (72°F to 80°F air). 6 to 8 weeks to first harvest.
Semi-aquatic and aquaponic specialty crops
If you move toward a water garden or aquaponic system, options expand to include water spinach (rau muong), taro, and edible lotus. Aquaponics adds the possibility of harvesting fish like tilapia or catfish, or freshwater shrimp alongside your greens. These systems take longer to establish but produce a diverse, interconnected food supply that many growers find deeply rewarding. Growing watercress in aquaponics in particular is a natural pairing because it thrives in the nutrient-rich, flowing water that aquaponic systems provide.
Troubleshooting: when things go wrong
Most problems in water systems come back to three things: pH out of range, oxygen starvation at the roots, or light getting into the reservoir. Fix those three consistently and you eliminate the majority of failures.
Yellow leaves
Yellowing is the most common complaint and has several possible causes. If yellowing starts on older (lower) leaves and moves upward, it usually signals a nitrogen deficiency, often caused by pH being too high (above 6.5), which locks out nitrogen uptake. Bring pH back to 5.8 to 6.2. If new leaves are yellowing while old leaves stay green, check iron and manganese availability, again usually a pH problem. If the entire plant looks pale and washed out, EC is probably too low: increase nutrient concentration gradually.
Root rot
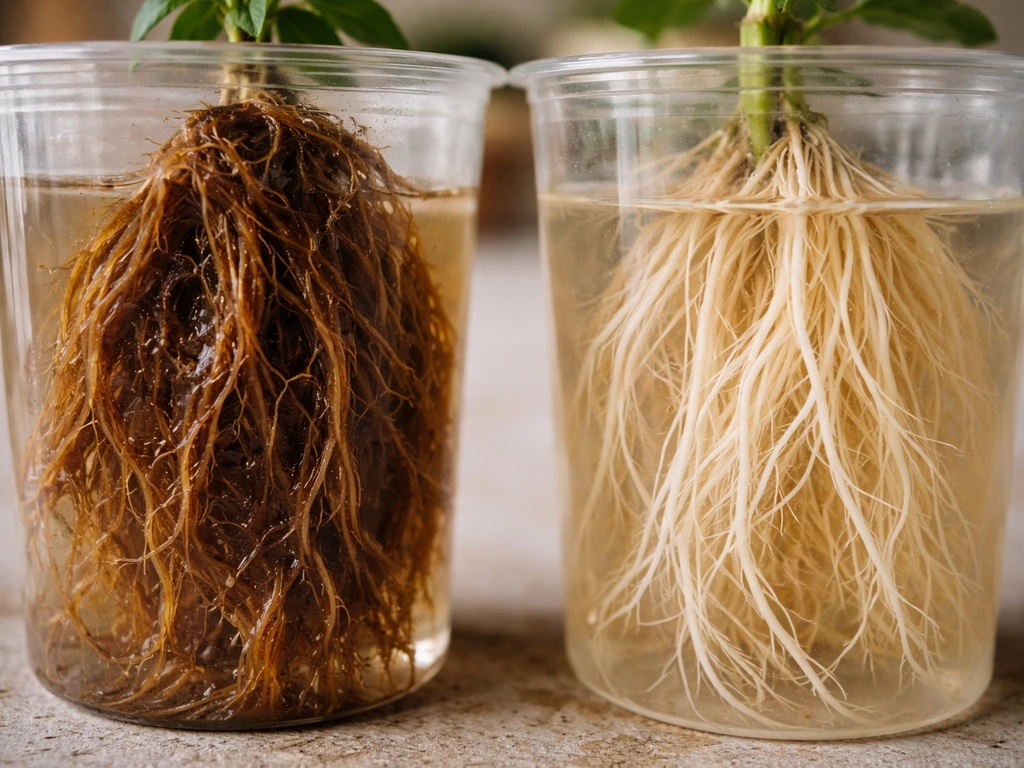
Brown, slimy, foul-smelling roots with a mushy texture are root rot, caused by pythium and other water molds that thrive in warm, low-oxygen water. Lower the reservoir temperature below 70°F, increase aeration immediately by adding a stronger air pump or second air stone, and consider adding beneficial bacteria products (like Hydroguard) to outcompete the pathogens. If caught early, plants recover. If the entire root mass is brown and slimy, the plant is usually lost. Prevention is always easier than treatment: keep water cool and well-oxygenated from the start.
Algae
Green slime or filmy growth in the reservoir or on the net pots means light is getting into your nutrient solution. Algae competes with plants for nutrients, clogs air stones, and can harbor pathogens. The fix is simple: block all light. Wrap your reservoir in black plastic, tape over any gaps around net pots, and use opaque materials throughout. Once algae is established, drain the system completely, scrub with a dilute hydrogen peroxide solution (3 percent), rinse thoroughly, and refill.
Clogged lines and pumps
In NFT or drip systems, roots and mineral deposits clog emitters and channels over time. Flush lines with plain water weekly. Do a full hydrogen peroxide flush between crop cycles. Use a filter sock or mesh on the pump intake to catch debris. Check air stones monthly: a simple visual inspection with the pump running tells you if bubbles are still flowing freely.
Pests
Fungus gnats are the most common pest in indoor hydroponic setups because they lay eggs in moist growing media. Let the top of your growing medium dry slightly between waterings (or switch to hydroton, which dries faster than rockwool). Yellow sticky traps catch adults. For serious infestations, a drench of diluted hydrogen peroxide (1 to 2 teaspoons of 3 percent H2O2 per gallon of water) kills larvae. Aphids and spider mites can appear on leaves. A strong spray of water knocks them off. Neem oil or insecticidal soap handles heavier infestations without harming your nutrient solution if applied to leaves only.
Nutrient toxicity
Brown leaf tips, crusty white residue on net pots, and plants that look burned despite correct pH usually mean EC is too high. Drain the reservoir, flush roots with plain pH-adjusted water for 24 hours, then refill with a fresh, lighter nutrient solution. This is why starting at lower EC with seedlings and increasing gradually is always the right approach.
Harvest, sanitation, and scaling up
Harvesting continuously and safely
For leafy greens and herbs, cut-and-come-again harvesting extends each plant's productive life significantly. For lettuce, harvest outer leaves and leave the growing center intact. For basil, cut stems just above a leaf node to trigger branching. For fruiting crops, harvest as soon as fruit is ripe to encourage continued production. Always wash harvested produce in clean water before eating, even though water-grown food is generally very clean. Avoid harvesting into containers that have been used for chemicals or nutrients, and dry produce before refrigerating to prevent mold.
Sanitation between cycles
Between crop cycles, empty and scrub the entire system. A 10-minute soak with a dilute hydrogen peroxide solution (around 5 ml of 3 percent H2O2 per liter of water) is effective and leaves no harmful residue. Rinse thoroughly with plain water before refilling. This prevents biofilm buildup, which is a thin bacterial layer that forms on wet surfaces and can harbor plant pathogens. Never let the reservoir sit stagnant with no pump running for more than a few hours.
Safe nutrient handling
- Always add nutrients to water, never pour water onto concentrated nutrients.
- Wear gloves when handling pH Down (usually phosphoric acid) and pH Up (usually potassium hydroxide). Both can irritate skin.
- Store nutrients in a cool, dark location. Concentrated liquid nutrients can crystallize or degrade in heat.
- Never mix concentrated nutrients together before adding them to the reservoir. Add each part separately to avoid locked-out chemical reactions.
- Dispose of old nutrient solution by diluting heavily with water before pouring down a drain, or use it on outdoor non-edible plants as a dilute fertilizer.
Scaling up from one bucket to a real system
Once you have one successful DWC run under your belt, scaling is straightforward. Once you understand what system fits your goals, you can start learning how to grow a stream-style setup with the same water, oxygen, and nutrient fundamentals. The next step is a multi-bucket DWC system where all buckets share a central reservoir, making water and nutrient management much simpler. After that, NFT channels or vertical towers increase plant density dramatically for greens and herbs.
If you want to add the fish and plant symbiosis of aquaponics, or expand into outdoor semi-aquatic and water garden growing, those are natural progressions that build on the same core skills: managing water chemistry, aeration, and light. Each step up adds complexity but also reward, and the fundamentals you learned in your first bucket carry forward to every system you build after it.
FAQ
How quickly will my hydroponic plants suffer if the air pump stops? (DWC)
If the air pump fails, plants in DWC can be damaged quickly because roots lose oxygen. Keep a spare air stone and air pump ready, and consider a simple backup plan like an inexpensive battery air pump for outages. For emergencies, increase aeration immediately and move the roots to a fresh, well-oxygenated reservoir if you have one.
Can I grow food in water outdoors, and how do I handle temperature swings?
Yes, but you must still manage water temperature and oxygen. In colder weather, target 65 to 72°F (18 to 22°C) using an aquarium heater or insulating wrap, and in hotter weather use shading and evaporation controls, then re-check dissolved oxygen by watching root health and algae levels. Do not rely on ambient temperatures alone.
What should I check first if my plants look unhealthy but my pH seems “in range”?
Treat it as a signal of imbalance rather than a single problem. If leaves look pale, washed out, or slow, check EC first, then confirm pH after nutrients are added. Also confirm the light is strong enough and that you have not allowed algae growth, which competes for nutrients and can clog aeration.
Can I combine aquaponics and hydroponics in the same setup?
Yes, but only if the system stays clean and you can keep fish waste from destabilizing nutrient levels. Fish-based aquaponics requires a biofilter and bacterial cycling time, while a “no soil” hydroponic setup does not. If you mix approaches, you can create unstable pH and ammonia problems, so keep the system type consistent.
How often should I change the nutrient solution, and how do I know my EC is drifting?
Best practice is to start at lower strength, then increase gradually based on crop stage and measured EC. Also change solutions on a schedule or when roots look tired, since nutrient ratios drift as plants consume different elements. For beginners, logging readings makes it obvious when you are gradually drifting out of the sweet spot.
What is the easiest way to prevent root rot during warm spells or summer nights?
For most systems, you do not need a heater blanket every time, but you do need a way to prevent the reservoir from staying warm overnight. A simple thermometer in the reservoir, plus insulation or a small temperature-control device, helps you avoid root rot caused by consistently warm water.
Can I use tap water straight from the faucet for hydroponics or aquaponics?
Avoid it. Tap water quality varies widely, and chlorine or chloramine can harm the biology in aquaponics and may affect plant response. If you use tap water, let it sit to off-gas chlorine when chlorine is the issue, or use a filter or dechlorinator when chloramine is present, then always re-check pH and EC after you add nutrients.
My net pots have white crust and plants are getting “burned.” Is it always an EC problem?
Salt and fertilizer buildup can appear as crusty white residue and burned leaf tips even if pH was once correct. Flush the root area with fresh, properly pH-adjusted water, then refill with a lighter nutrient mix, and resume feeding at a slightly lower EC. This prevents accumulating excess salts around net pots and roots.
How do I prevent fungus gnats in indoor hydroponics without chemicals?
To reduce fungus gnats, manage moisture where eggs are laid, not just the surface air. Let the top of the growing medium dry slightly between waterings, use sticky traps for adults, and keep the reservoir and plumbing covered or light-blocked to prevent algae that also attracts gnats.
What harvesting method increases yield for lettuce and basil in water-grown systems?
Use harvest timing and the plant’s growth pattern. For cut-and-come-again lettuce, harvest outer leaves and leave the center, and for herbs like basil, cut just above a leaf node so it branches instead of stretching. If you harvest all at once, you will usually shorten total harvest time dramatically.
Which is more forgiving for beginners, starting from seed or using herb cuttings?
If you are starting from seed, rockwool or similar plugs are usually the easiest route, but you still must keep them moist, not soaked, under high humidity. Once you see the first real growth and roots are visible, transplant carefully to avoid breaking the root tip. Cuttings can be faster, because you skip germination uncertainty.
Do I need to worry about food safety with aquaponics or hydroponics, and what should I do after harvest?
For food safety, wash produce in clean water every time, and avoid using containers that previously held chemicals. After washing, dry before refrigerating to slow mold growth, and if you are using aquaponics, keep fish health and water quality stable to avoid introducing off odors or contaminants.
What is the simplest next step after my first successful DWC bucket?
For scaling, the common mistake is changing too many variables at once. Upgrade one component at a time, such as adding buckets while keeping the same nutrient brand, measurement routine, and light schedule. A multi-bucket approach is easiest because you only need to manage one central reservoir and water chemistry.