You can germinate Adenium seeds in water, but the water is a starting tool, not a growing medium. Soak seeds in water for 12 to 24 hours to kick-start germination, then move them to a warm, well-draining mix where the actual growing happens. If you want the same idea applied to flowering plants, use the guide for how to grow flower in water to choose the right setup and timing. Desert roses are built for drought cycles, and their roots need air as much as moisture. Leave them waterlogged too long and you will get rot, not roots. Once you understand that the water phase is short and deliberate, the whole process becomes much more manageable.
How to Grow Adenium in Water: Seeds, Cuttings, Steps

Marcus Holloway
2 May 2026
Is growing Adenium in water actually feasible
Adenium (desert rose) is a caudiciform succulent, meaning it stores water in its swollen caudex and roots to survive long dry periods. That biology works against long-term water culture. North Carolina State University Extension recommends a sandy, sharp-draining potting mix for Adenium and specifically flags wet soil as a direct path to root rot. North Carolina State University Extension recommends a sandy, sharp-draining potting mix for Adenium and warns that wet soil can lead to root rot. The plant's roots need oxygen, and sitting in standing water cuts off that gas exchange quickly.
So: true hydroponic or full water culture for Adenium is not a realistic long-term setup. What is feasible, and what most people actually mean when they search this, is using water as a germination trigger for seeds, or as a short-term rooting medium for cuttings. Both work when done correctly and kept brief. Think of the water phase as a launch pad, not a home.
If you have experience growing other water-adapted plants and you are curious whether Adenium fits that niche the way water lettuce or watercress does, the honest answer is no. If you are specifically trying to grow watercress in a pond, it is best to set it up as a water-edge or submerged aquatic planting rather than using the kind of soaking approach described for other seeds. If you want to grow water lettuce in an aquarium, focus on stable light and nutrient levels so the roots can develop in the tank water water-adapted plants. It needs a transition to a well-aerated growing medium to thrive long term.
Seed vs cutting approach for water culture
There are two situations where water enters an Adenium growing process, and they work very differently.
| Approach | Water phase duration | Success rate | Best for |
|---|---|---|---|
| Seed soaking (pre-germination) | 12 to 24 hours | High when seeds are fresh and warm | Beginners, starting from scratch |
| Cutting rooted in water | 2 to 4 weeks max | Variable, rot risk is high | Experienced growers with close monitoring |
Seed soaking is the lower-risk, higher-reward option. You soak seeds briefly to soften the seed coat and trigger germination, then plant them in a warm, damp medium. Rooting cuttings in water is trickier because the cut stem is exposed to bacterial and fungal rot the entire time it sits in water. Forum reports on water-rooted Adenium cuttings range from complete success to complete failure, and the difference almost always comes down to oxygen management and how long the cutting stayed wet. If you are new to Adenium, start with seeds.
Step-by-step method to germinate Adenium seeds in water
Before you soak anything, check your seeds. Fresh Adenium seeds germinate far more reliably than old ones. If you bought from a reputable supplier who runs germination tests, great. If the seeds have been sitting in a drawer for more than a year, expect lower success and soak the full 24 hours.
- Prepare a 3% hydrogen peroxide solution (the standard brown bottle from any pharmacy). Soak your seeds in it for 15 to 20 minutes. This kills surface mold spores and bacteria before the water soak even begins. Rinse the seeds well with clean water afterward.
- Fill a small, clean container with room-temperature water. Avoid cold tap water straight from the faucet. Target 25 to 30°C (77 to 86°F), which falls in the optimal germination range documented for Adenium species. A seedling heat mat under the container works well here.
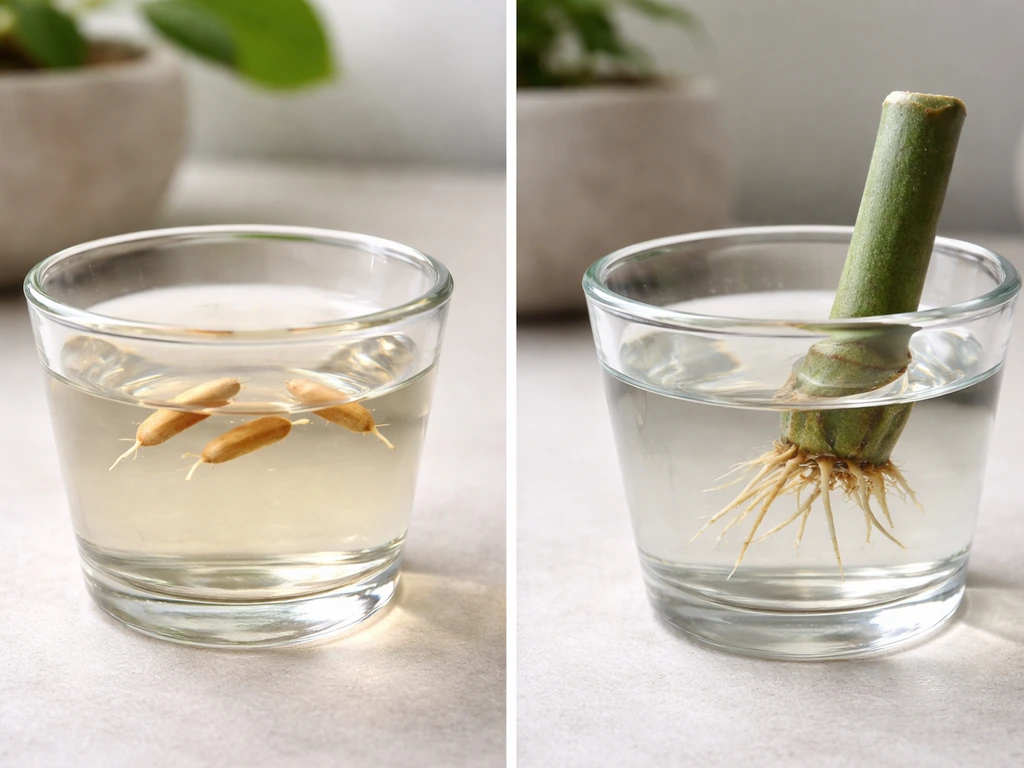
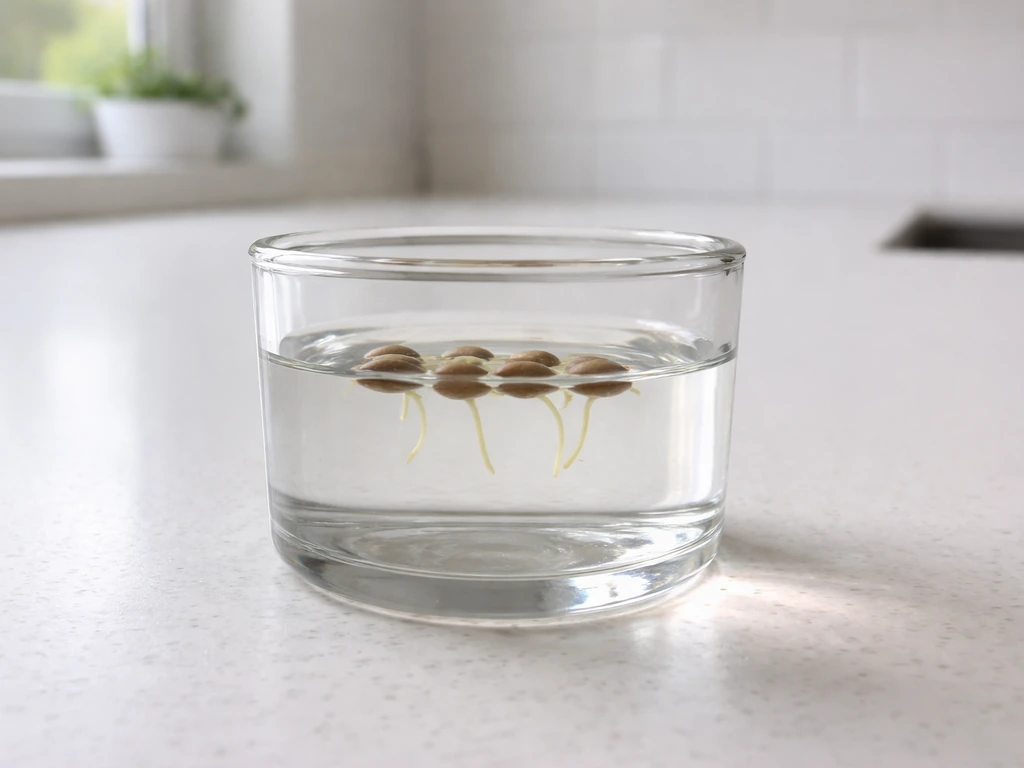
- Submerge the rinsed seeds and let them soak for 12 to 24 hours. Fresh seeds often show early radicle protrusion (a tiny white tip breaking through the seed coat) in as little as 6 to 12 hours. Older seeds need the full 24 hours. Do not exceed 24 hours or the seeds begin to deprive themselves of oxygen.
- After soaking, place seeds on a paper towel or directly onto your prepared germination medium (not back into water). Radicle emergence is your sign that germination is underway. That small white root tip is the measurable success marker at this stage.
- Plant the soaked seeds into a barely moist mix of perlite and coco coir or fine sand (more on the mix below), laying them flat with the radicle pointing downward if visible. Cover lightly, do not bury deep.
- Keep the tray warm (ideally 28 to 32°C / 82 to 90°F) and in bright indirect light. Most Adenium seeds begin emerging as seedlings within 7 to 10 days under these conditions. Some suppliers report emergence in as few as 5 days at the higher end of that temperature range.
How to set up and manage the water environment
For the soaking phase, your setup does not need to be complicated, but the details matter.
Container and water type
Use a small, clear glass or food-safe plastic container. Clear sides let you watch for radicle emergence without disturbing the seeds. Use filtered, distilled, or well-rested tap water. Adenium is sensitive to acidic water, and overly acidic conditions can promote rot even during a short soak. Aim for a neutral pH around 6.5 to 7.0 if you are testing. Hard chlorinated tap water is less ideal but acceptable if you let it sit uncovered for a few hours first to off-gas.
Temperature and placement
Keep the soaking container somewhere consistently warm, between 25 and 32°C. A spot near a heat mat, a warm windowsill in summer, or even on top of a refrigerator (where ambient heat collects) all work. Avoid cool rooms or air conditioning drafts. Temperature drop during soaking slows germination and increases rot risk.
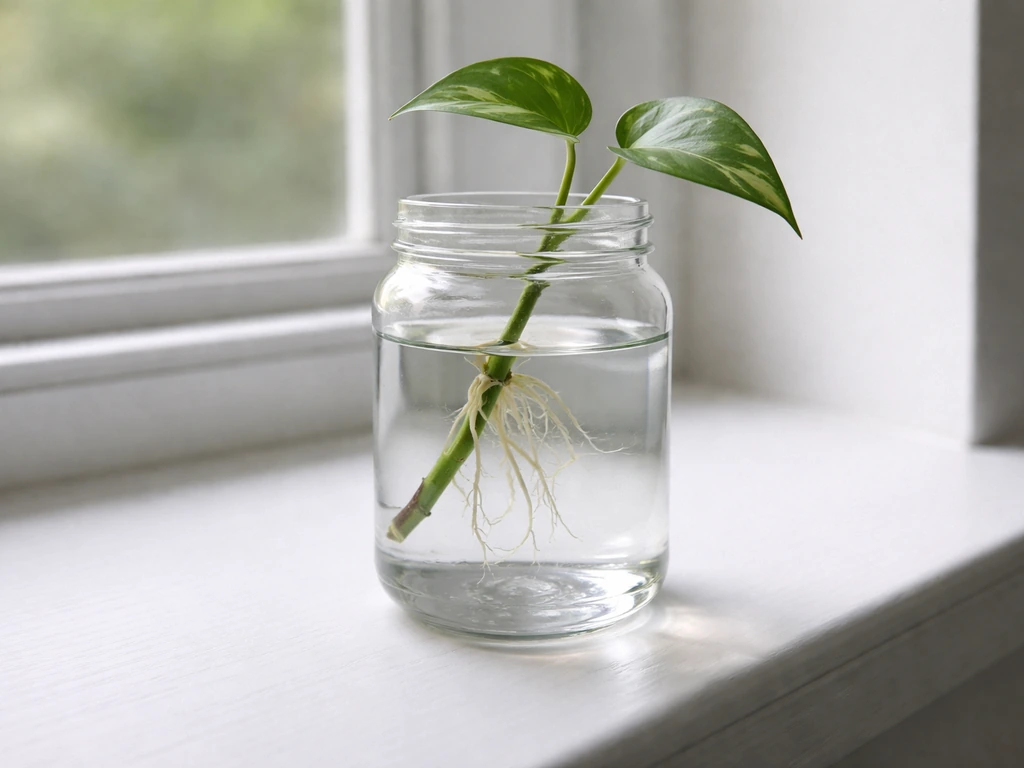
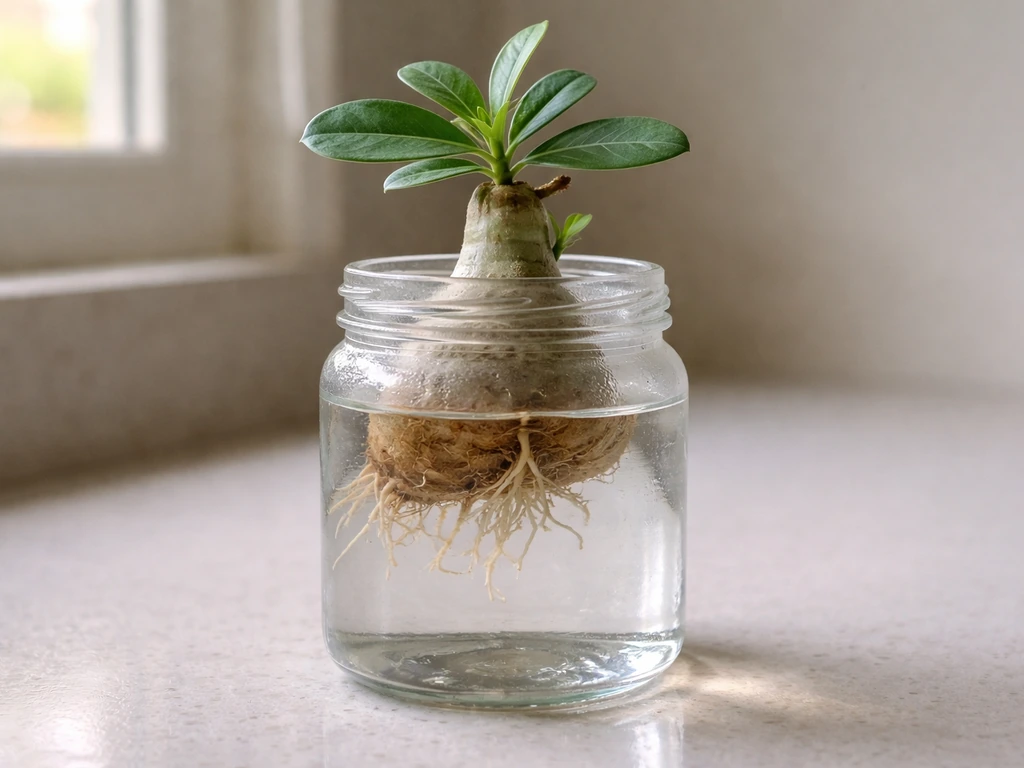
For cutting rooting in water (if you go that route)
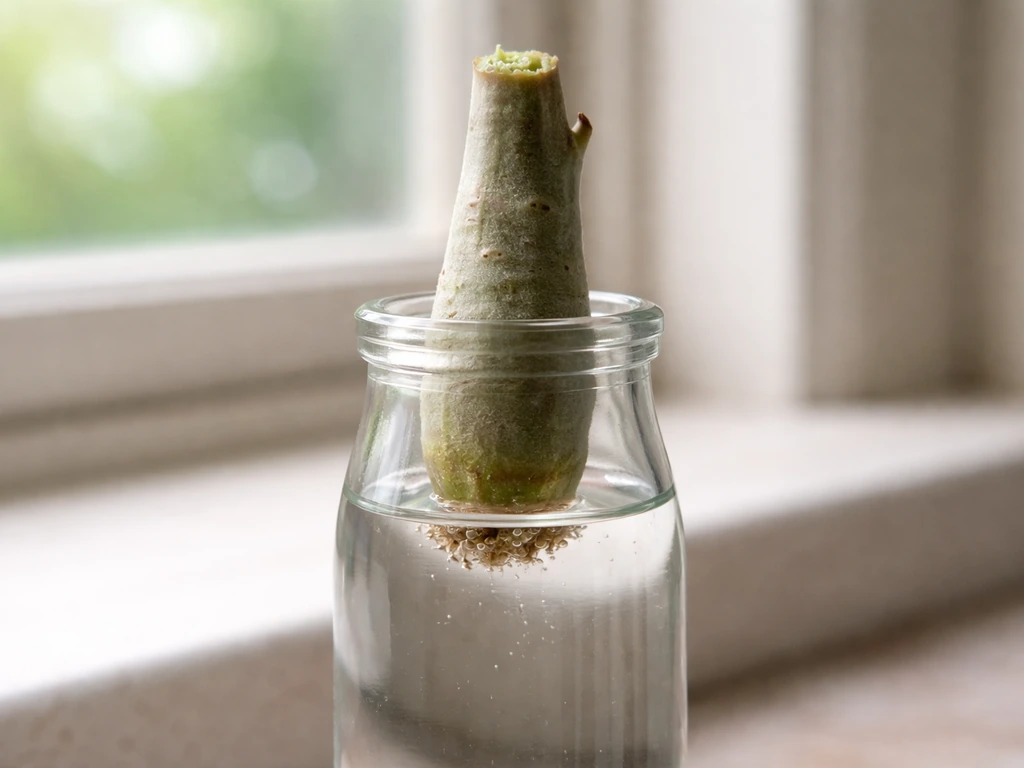
If you are attempting to root a cutting in water, use a narrow-necked container so only the very base of the cut end contacts water. Change the water every 2 to 3 days to prevent bacterial buildup. Keep the container in a bright, warm spot with no direct sun on the water itself (direct sun on water accelerates algae and bacterial growth). Some growers add a small air stone connected to an aquarium pump to oxygenate the water, which significantly reduces rot risk. Check roots daily after day 10 onward. Once roots reach 1 to 2 cm, move to soil immediately.
Rooting, transplant timing, and moving to soil
This is where most people lose their Adenium seedlings or cuttings. The transition from wet to well-drained conditions is the highest-risk moment, and rushing it or delaying it both cause problems.
For seedlings from the soaking method
Once you see the radicle tip (even just 1 to 2 mm), plant into your germination mix right away. Do not leave germinating seeds floating in water hoping for more development. If you want to grow water plants in a pond, focus on choosing the right species and keeping the water clean so their roots get oxygen how to grow water plants in pond. The radicle needs air and a medium to anchor into. Your germination mix should be roughly 50% perlite or coarse sand and 50% coco coir or fine potting soil, never standard dense potting mix on its own. Keep the mix barely moist, not wet, and mist the surface rather than pouring water that pools.
For water-rooted cuttings
Move cuttings to soil as soon as roots reach 1 to 2 cm long. Water roots and soil roots are structurally different, and the longer a cutting stays in water, the harder the adjustment to a drier medium. When you pot it up, use the same sharp-draining mix described above. After potting, leave the plant unwatered for 3 to 5 days. This sounds counterintuitive, but it allows any minor root damage from the transplant to callus and dry slightly, which dramatically reduces the chance of rot. This dry-down period after repotting is a standard step recommended by experienced Adenium growers.
What success looks like at transplant stage
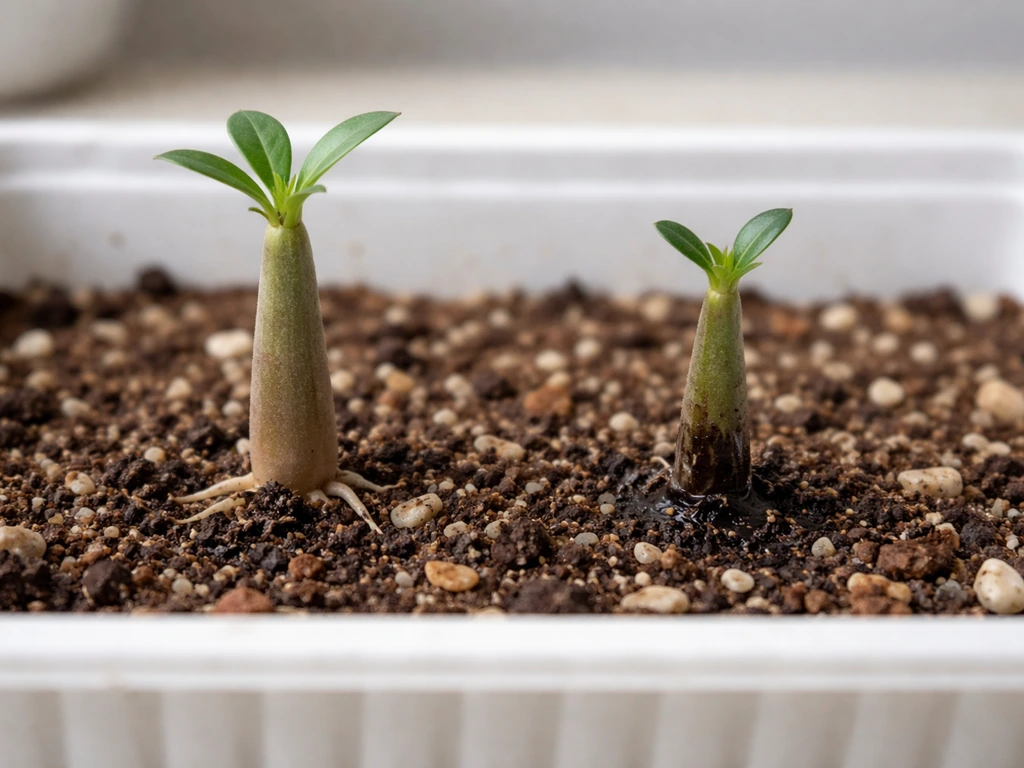
- Seedlings: first pair of true leaves appearing, stem firm and upright, not slimy or blackened at the base
- Cuttings: 1 to 3 roots visible at the base, white or tan in color, not brown or mushy
- Soil surface: barely moist after the first watering post-transplant, drying out within 2 to 3 days
Troubleshooting common water-culture problems
Here are the problems you are most likely to run into and how to fix them.
| Problem | Likely cause | Fix |
|---|---|---|
| Seeds not sprouting after 24 hours | Old or non-viable seeds, water too cold | Extend to 24 hours max, verify water temp is above 25°C, source fresher seeds if repeated failure |
| Mold or fuzzy growth on seeds during soak | Skipped H2O2 pre-treatment, dirty container | Always do the 3% H2O2 soak for 15 to 20 minutes before water soaking; start over with clean container |
| Algae in soaking water | Direct sunlight on container, soak lasting too long | Keep container out of direct sun, never exceed 24 hours in water |
| Cutting base turning black or mushy | Bacterial rot from too-long water exposure or no water changes | Change water every 2 to 3 days, use air stone, move to soil immediately if rot starts at base |
| Roots look brown and slimy instead of white | Rot in progress, water temperature too low or stagnant | Remove cutting, trim to clean tissue, let cut end dry for 24 hours, restart or move directly to dry soil |
| Seedlings growing tall and thin with pale color | Insufficient light after transplant | Move to full sun or supplement with a grow light; Adenium needs the equivalent of 5,000 to 8,000 foot-candles to grow compact and healthy |
| Seedling stem collapses at soil level (damping off) | Too much moisture at soil surface after transplant | Improve drainage in mix, mist rather than pour, ensure good air circulation around seedlings |
Care after transplant: watering, light, and growth expectations
Once your Adenium is in well-draining soil and past the transplant dry-down period, care becomes more straightforward. The main thing to internalize is that this plant is designed to experience drought, so your instinct to water frequently is the enemy.
Watering cadence
Water thoroughly when the top 2 to 3 cm of soil is completely dry. In warm months with good light, that might mean watering every 5 to 7 days for a small pot. In cooler or cloudier conditions, stretch that to 10 to 14 days. When the plant drops its leaves and goes dormant, stop watering almost entirely until new growth appears. Watering a dormant Adenium in cold or dark conditions is the fastest way to kill it. Root rot in cool, wet soil is the number one cause of Adenium death.
Light requirements
Adenium wants a lot of light. Outdoors, aim for a spot that gets 6 or more hours of direct sun. Indoor growers should place plants in the brightest south or west-facing window available and consider a supplemental grow light if natural light is limited. Low light causes etiolation: the stems grow long and weak reaching for light, flowering stops, and the plant becomes more vulnerable to rot because it cannot photosynthesize and dry out properly between waterings.
What growth to expect and when
From a germinated seed, you can expect your first true leaf pairs to appear within 2 to 3 weeks of transplanting. Caudex swelling (the fat base that makes desert roses distinctive) becomes visible in seedlings within a few months under good conditions. First flowering from seed typically takes 1 to 3 years depending on species, light, and temperature. Water-rooted cuttings from a mature plant will often flower in their first or second season if the parent was already blooming. The main growth period is spring through summer when temperatures are above 20°C, with a noticeable slowdown or dormancy in cooler months.
If seeds do not germinate after two rounds with the correct temperature and H2O2 pre-treatment, the most likely culprit is seed viability, not your technique. American Adenium’s seed instructions recommend soaking Adenium seeds in a 3% hydrogen peroxide solution for 15, 20 minutes before further germination steps H2O2 pre-treatment. Order from a supplier who runs germination tests and states viability percentages. Fresh Adenium seed is the single biggest variable in whether the water-soak method gives you results quickly or leaves you frustrated.
FAQ
Can I keep adenium in water long-term, like a hydroponic setup?
For adenium, no. Even if roots survive briefly, standing water quickly limits oxygen and raises rot risk. Treat water as a short phase for soaking or rooting, then move the plant into an airy, sharp-draining mix where the soil can dry down between waterings.
What water type is safest for soaking adenium seeds in water?
Use neutral, low-contaminant water. Filtered, distilled, or well-rested tap water is the safest choice. If you use tap water, let it sit uncovered for a few hours to off-gas chlorine, and if you can test pH, aim for about 6.5 to 7.0.
How will I know if the water soak is going wrong during seed germination?
Watch for cloudiness, sour or rotten odor, and seed browning or sliminess. Any of these suggest rot is starting even during soaking. In that case, discard the water, refresh with clean neutral water, keep the soak warm and brief, and move seeds to the germination mix as soon as the radicle appears.
Should I add anything to the soaking water, like hydrogen peroxide (H2O2)?
It can help some growers reduce microbial activity, but it should not replace basic timing and warmth. If your earlier attempts included a peroxide step and still failed, the next most common cause is seed viability, not the additive. Use only mild, product-recommended concentrations and do not extend the soak beyond what you are using for your protocol.
My seeds sprouted radicles in water, but growth stalled after potting. What’s the usual cause?
The most common cause is delaying potting after radicle emergence or keeping the germination mix too wet. Adenium radicles need air and an anchoring medium. Plant immediately when the tip is visible and keep the mix barely moist, misting instead of pooling water.
Can I germinate adenium seeds without soaking first?
Yes, but soaking typically improves consistency by softening the seed coat. If you skip soaking, be prepared for slower and less uniform germination. Warm temperature is still essential, and you still must transfer to the airy germination mix once radicles appear.
How deep should adenium seeds be placed after soaking?
Place them shallow enough that the radicle can settle while the seed itself stays close to the surface, then keep the medium barely moist. If seeds are buried too deep in a dense mix, they can struggle to emerge and stay wet longer, increasing failure risk.
I rooted adenium cuttings in water, but they got mushy. What went wrong?
Mushy tissue usually means rot began at the wetted stem area. The risk rises with how long the cutting stays submerged and with poor oxygenation. Use a narrow container so only the very base touches water, change water every 2 to 3 days, keep warmth and brightness, and consider adding an air stone for oxygen.
Do I need an air stone to root adenium cuttings in water?
It is optional, but helpful if you tend to keep water stationary or cannot monitor quickly. Oxygenation reduces bacterial growth, which often determines whether water-rooted cuttings succeed. Even with an air stone, the key is limiting time in water and moving to soil once roots reach about 1 to 2 cm.
How quickly should I switch from water to soil after rooting cuttings?
Do it as soon as roots reach roughly 1 to 2 cm. Leaving cuttings longer in water makes the roots adapt to a wet environment, so transplant shock and rot risk increase in drier, aerated soil. Once roots are that length, pot immediately.
Why does adenium recommend not watering immediately after potting a water-rooted cutting or newly potted seedlings?
A short dry-down lets minor root damage callus and reduces rot risk before the plant resumes normal water uptake. After potting a cutting, avoid watering for about 3 to 5 days. Then restart with a careful, dry-down-based watering schedule.
What potting mix is best after the water phase?
Use a sharp-draining mix, roughly 50% perlite or coarse sand and 50% coco coir or fine potting soil. Avoid dense, standard potting mixes on their own, because they stay wet longer and deprive roots of oxygen.
How do I prevent algae or bacterial slime in the water during cuttings or soaking?
Limit direct sun on the water itself, keep the setup warm but not overheated, and refresh water on schedule. For cuttings, changing every 2 to 3 days is a practical baseline. For seed soaking, use clean neutral water and move seeds promptly when radicles show.
If my seeds fail twice, does it mean my method is wrong?
Not necessarily. If temperature and water steps are correct, the most likely culprit is low seed viability, especially with seeds older than a year. The most effective next step is to get fresh seeds from a supplier that runs germination tests and reports viability percentages.