Growing hydro means growing plants without soil, using water enriched with dissolved nutrients to feed roots directly. That's it. No mystery, no complicated chemistry degree required. In the hydroponics world, "growing hydro" is shorthand for setting up a soilless system where water does the work that dirt normally does, delivering minerals straight to the root zone so plants grow faster and more efficiently than they would in a garden bed.
How Do You Grow Hydroponic Plants: Step-by-Step Guide

Marcus Holloway
4 Apr 2026
Hydro vs hydroponics: what "hydro grow" actually means
Let's clear up the terminology first, because it trips people up. Hydroponics is soilless plant cultivation using mineral nutrient solutions dissolved in water. That's the textbook definition, and it's accurate. When someone says they "grow hydro," they almost always mean hydroponics, not hydrology (the study of water cycles). The confusion is common for beginners, but the concept is simple: water + dissolved nutrients + a structure to hold your plants = a hydroponic system.
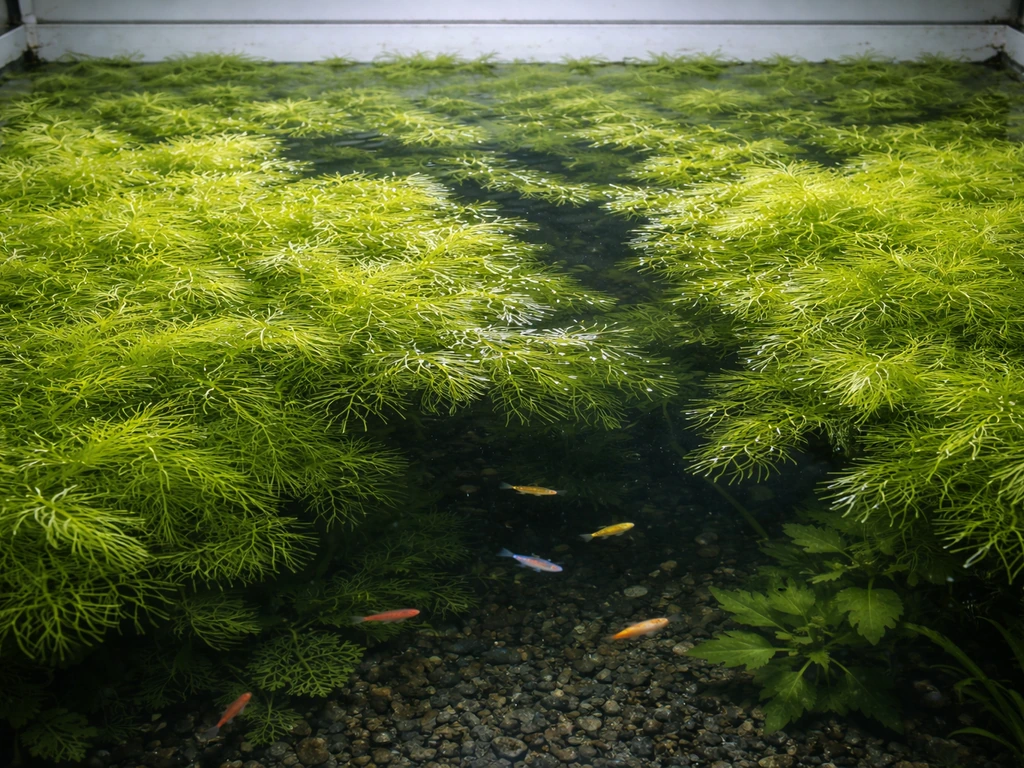
There's a related method called aquaponics, where fish or other aquatic life are raised alongside the plants. The fish produce waste, bacteria convert that waste into plant-available nutrients, and the plants clean the water for the fish. It's a closed loop. Both hydroponics and aquaponics fall under the broader "hydro grow" umbrella because both use water as the primary growing medium, but they work differently and suit different goals. This guide focuses mainly on hydroponics, with aquaponics noted where relevant.
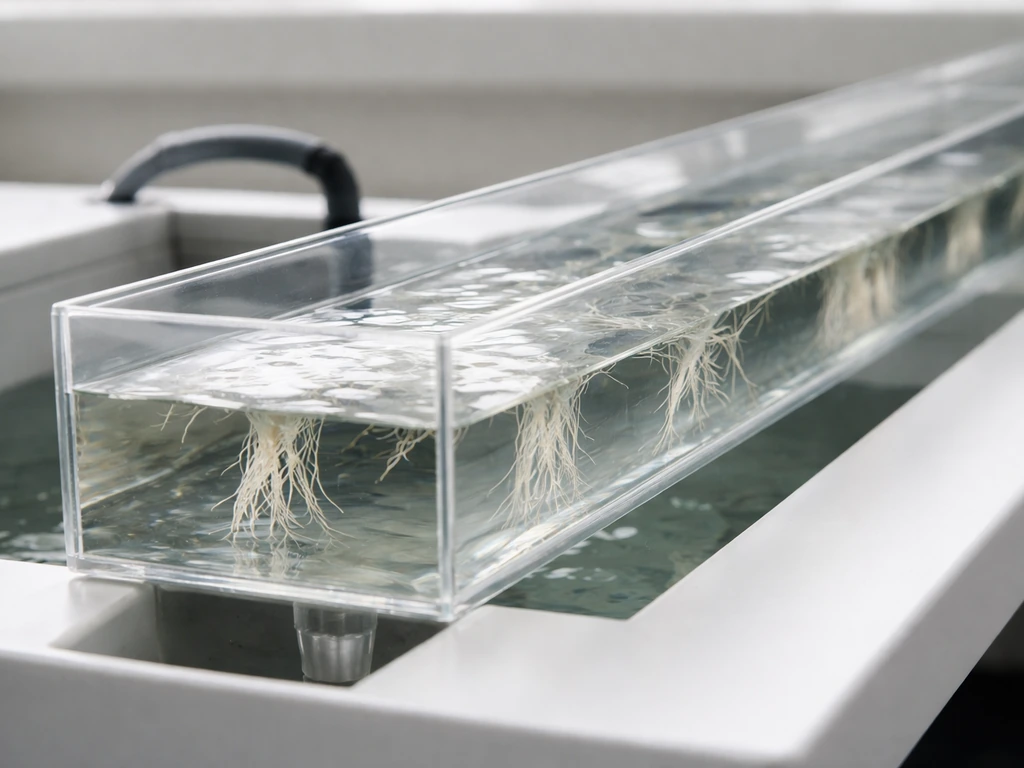
Picking your system: DWC, NFT, ebb/flow, wick, and aquaponics compared
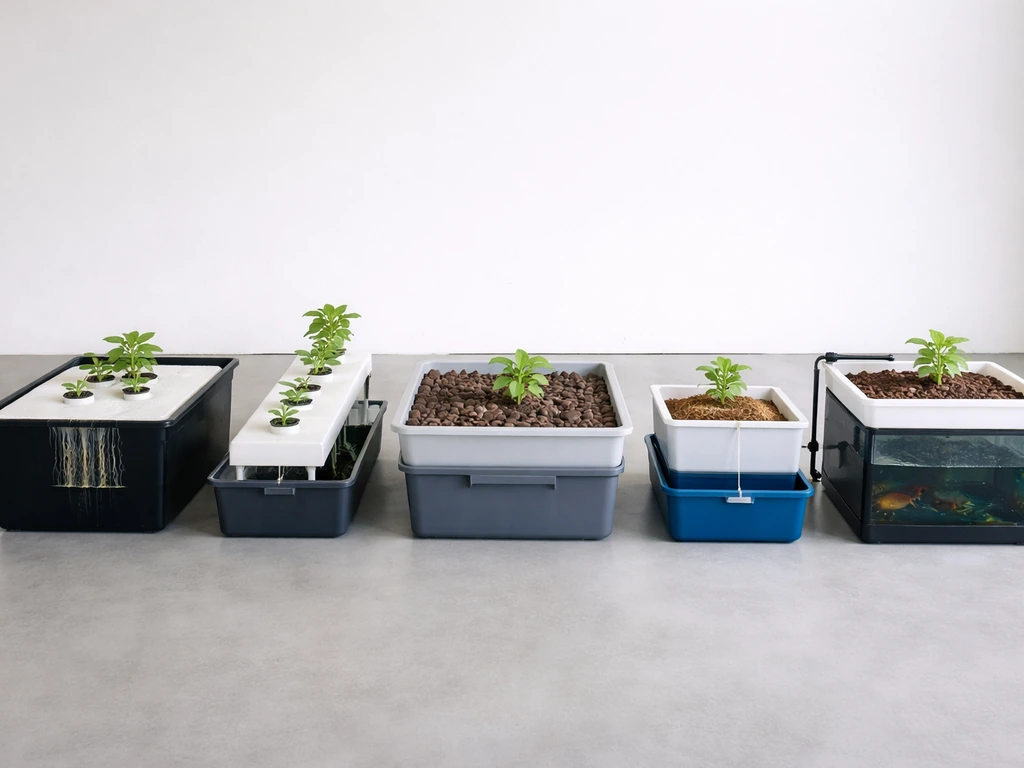
The system you choose shapes everything else: your equipment list, your maintenance schedule, how forgiving mistakes are. Here's a straight comparison of the main options.
| System | How It Works | Best For | Difficulty | Key Watch-Out |
|---|---|---|---|---|
| Deep Water Culture (DWC) | Roots hang directly in aerated, nutrient-rich water | Leafy greens, herbs, fast crops | Beginner | Oxygen levels must stay above 6 mg/L; pump failure = root death |
| Nutrient Film Technique (NFT) | Thin film of nutrient solution flows over roots in sloped channels at ~1–2 L/min per channel | Lettuce, herbs, strawberries | Beginner–Intermediate | Roots dry out fast if pump stops; channel length should stay under 10–15 m |
| Ebb & Flow (Flood & Drain) | Tray floods with nutrient solution on a timer, then drains back to reservoir | Larger plants, root vegetables, versatile setups | Intermediate | Don't flood above 75–80% capacity; timing errors cause oxygen issues |
| Wick System | Wicks passively draw nutrient solution from reservoir to growing medium | Small herbs, microgreens | Easiest | Slow delivery; doesn't scale well for larger or thirstier plants |
| Aquaponics | Fish waste feeds plants via bacterial conversion; plants filter water for fish | Herbs, leafy greens alongside fish/crustaceans | Intermediate–Advanced | Balancing fish load, bacterial colony, and plant demand takes time to dial in |
My honest recommendation for a first build: DWC. You need a reservoir, an air pump, air stones, and net pots. That's basically it. The system is transparent (you can see the roots and the water level), failures are obvious, and the learning curve is the shortest of any method. Once you understand how roots behave in oxygenated water, every other system makes more sense.
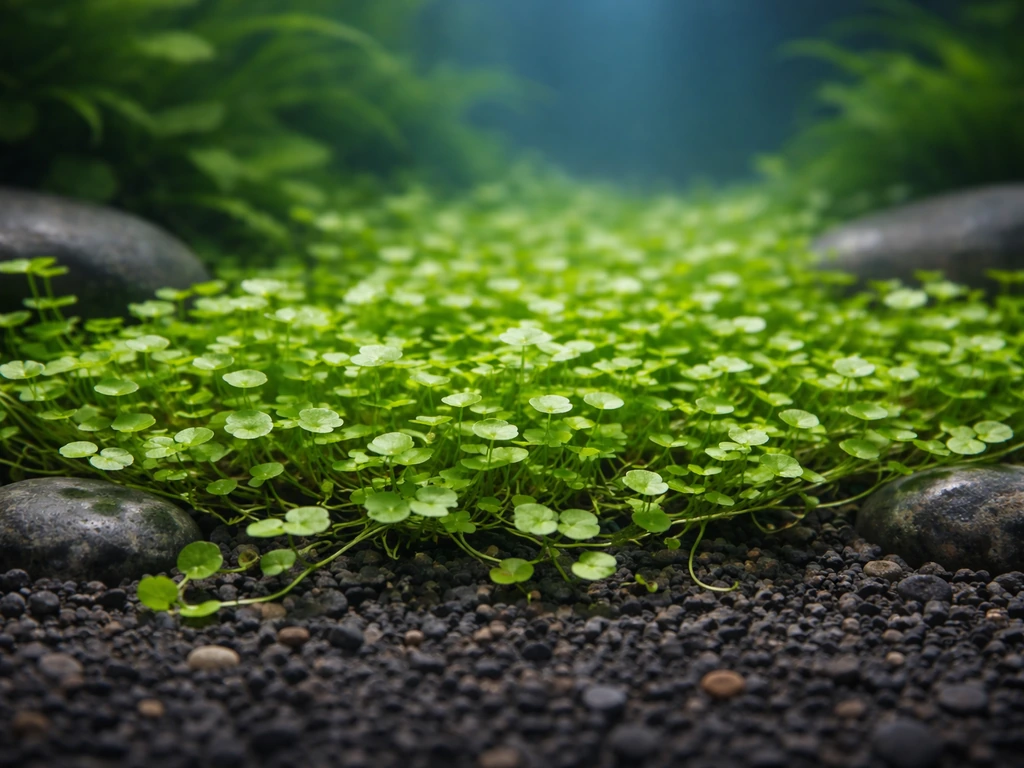
What to grow first: easy crops that actually work in water
Leafy greens are the go-to starting point for hydro growing, and there's a real reason for that: they have short cycles, low nutritional complexity, and they'll show you results fast. Lettuce, for example, can be ready to harvest in about 4 to 5 weeks under good conditions. That quick feedback loop is invaluable when you're still learning the system.
Here are the crops that consistently perform well for beginners and suit the water-based growing environment this site covers:
- Lettuce and salad greens: the classic hydro starter crop, forgiving on nutrients, fast to harvest
- Basil and mint: grow aggressively in DWC or NFT, great for testing your nutrient dosing
- Spinach and kale: slightly more demanding on nutrients but still beginner-friendly
- Watercress: a natural fit for hydro since it's semi-aquatic by nature; if you want a deep dive on this one, the guide on how to grow watercress hydroponically covers it in detail
- Fenugreek: an underrated herb that adapts well to water-based systems; check out the specifics on how to grow fenugreek hydroponically once you have your setup running
- Wasabi: more advanced but achievable; it actually thrives in cool, flowing water environments, which makes it a natural for experienced hydro growers looking at how to grow wasabi hydroponically
One thing worth noting: some plants people assume are purely soil-dependent can actually do surprisingly well in water systems. Aloe is a good example. If you're curious about experimenting on the edges of what hydroponics can handle, exploring whether you can grow aloe hydroponically is a fun side project once your main system is stable.
Your equipment list and how to set it up
This is the gear you actually need to get started. I'll frame this around a basic DWC build since that's what I'd recommend to anyone starting from zero.
Core equipment
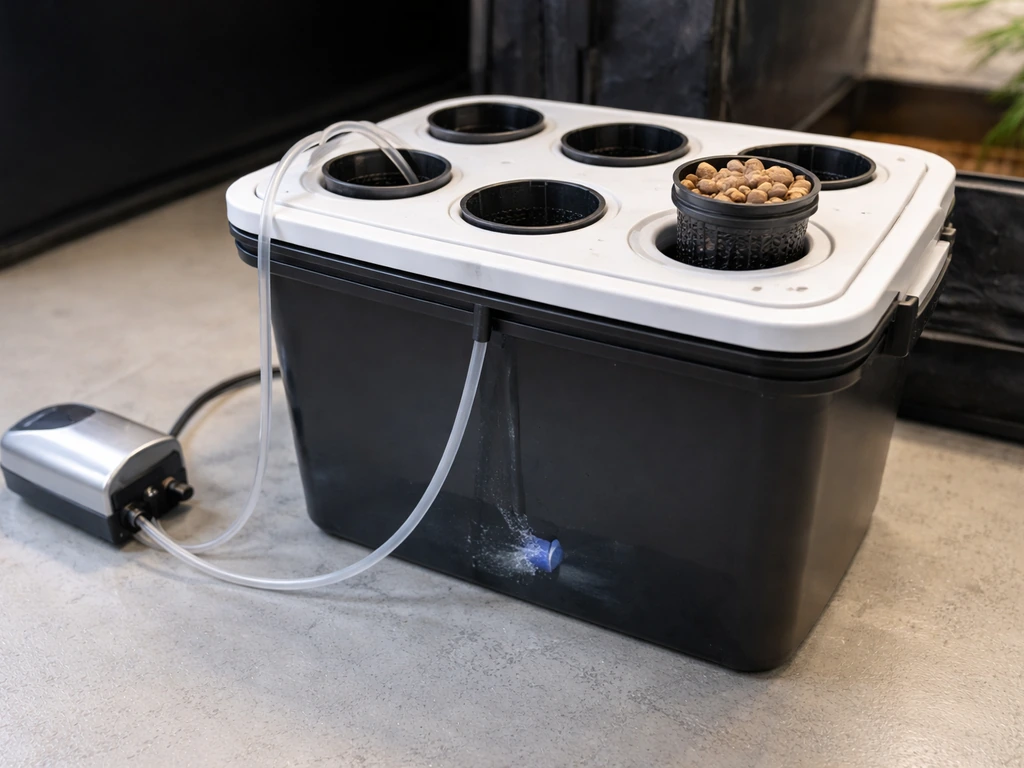
- Reservoir: an opaque container (5–20 gallons depending on plant count); opacity is non-negotiable because light triggers algae growth in nutrient solution
- Air pump and air stones: sized to your reservoir volume; you need one air stone per plant site minimum, connected to the pump via airline tubing
- Net pots (2-inch or 3-inch): these sit in holes cut into your reservoir lid and hold your growing medium and plant
- Growing medium: hydroton (clay pebbles), rockwool cubes, or coco coir; rinse hydroton thoroughly before use
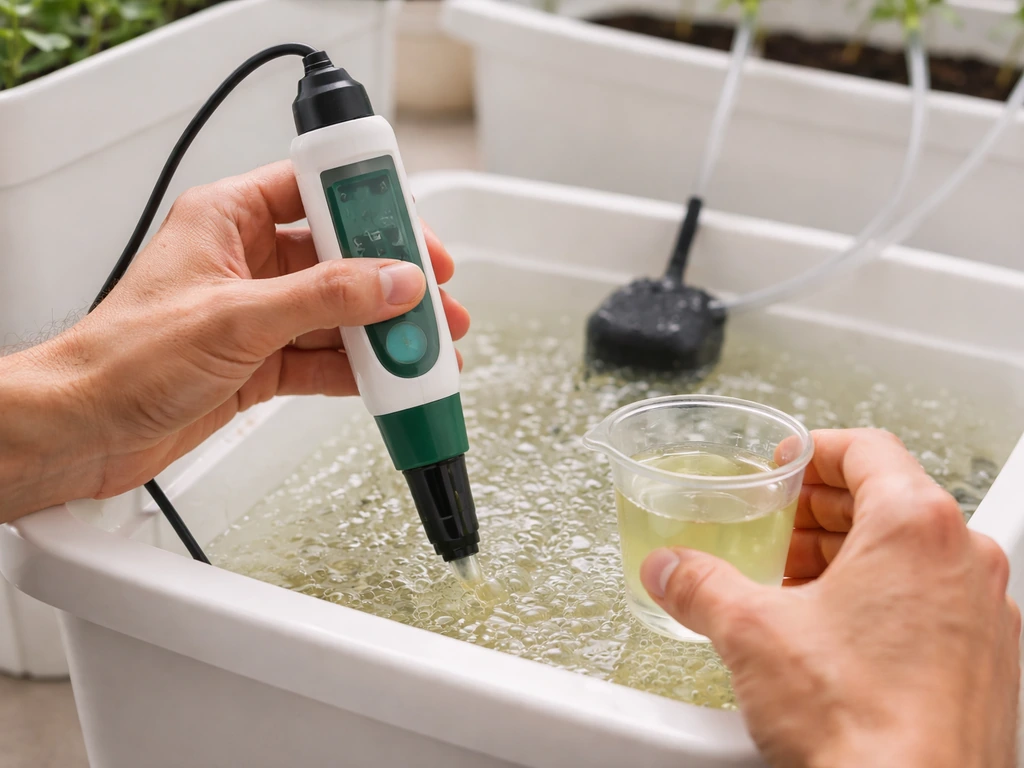
- pH meter and EC/TDS meter: non-negotiable; you cannot grow hydro reliably without measuring both
- pH Up and pH Down solutions: for correcting nutrient solution acidity
- Hydroponic nutrients: a multi-part system like a 3-part (FloraMicro, FloraGro, FloraBloom) or a simpler 2-part A/B formula gives you flexibility across growth stages
- LED grow light or T5 fluorescent: sized for your grow area
- Timer for lights
- Thermometer (air and water)
Setup steps
- Cut net pot holes in your reservoir lid, evenly spaced to allow root expansion without crowding
- Install air stones at the bottom of the reservoir, run airline tubing up and out to the air pump (the pump must sit above water level or have a check valve to prevent back-siphoning)
- Fill the reservoir with clean water, leaving a 1–2 inch air gap between the water surface and the bottom of your net pots; roots need that gap to access oxygen
- Mix your nutrients into the water (always add nutrients to water, not the reverse), then test and adjust pH to your target range
- Place filled net pots with seedlings or germinated seeds into the holes
- Turn on the air pump, confirm bubbling at all stones, and start your light timer
- Check water level, pH, and EC every 1–2 days for the first week
Nutrient plan and dosing: pH, EC, and water changes
Your nutrient solution is everything in hydroponics. Plants can't pull minerals from soil because there is no soil, so if the solution is wrong, the plant gets nothing useful. Here's how to get it right.
pH targets
Keep your nutrient solution pH between 5. 5 and 6. 5 for most crops. Lettuce specifically performs best at 5.
5 to 6. Lettuce performs best in hydroponic nutrient solutions with a pH range of 5. 5 to 6. 5, where nutrient solubility and uptake are maximized (MDPI, Water) [pH 5 to 6](https://www.
mdpi. com/2073-4441/17/17/2637). 5 in vegetative growth. If pH drifts outside this window, nutrient lockout happens, meaning the nutrients are physically present in the water but chemically unavailable to the plant.
pH drift is one of the most common beginner problems, and it's caused by things like inconsistent nutrient additions, variable source water chemistry, and algae activity. Check pH daily at first. Always follow the specific product instructions when using pH Up or pH Down because concentration and dosing vary by brand and formulation.
EC targets by growth stage
EC (electrical conductivity) measures nutrient concentration in your solution. The principle is simple: start low, increase as the plant grows. For lettuce seedlings, target 0.5 to 0.7 mS/cm EC. Once plants hit the vegetative stage, you can push EC up to 1.2 to 2.4 mS/cm. If your EC reads higher than the target, dilute with plain water and retest. Don't try to "just run it" at too high an EC, because salt stress stunts growth and burns roots. The stage-dependent approach applies to most crops: seedlings always want lower EC, mature plants tolerate more.
Water changes
Top off with plain pH-adjusted water between full reservoir changes to compensate for evaporation and plant uptake. Do a full reservoir change every 7 to 14 days, or sooner if EC or pH becomes erratic and hard to stabilize. When you change the reservoir, clean the container and rinse all components before refilling. This prevents salt buildup and keeps pathogens from establishing.
Lighting, temperature, airflow, and keeping roots healthy
Leafy greens and most beginner hydro crops need 12 to 14 hours of light per day. Use a timer so the photoperiod stays consistent; irregular light schedules stress plants and can trigger premature bolting in lettuce. LED panels are the current standard for indoor hydro grows because they run cooler and consume less power than older HID systems. Position lights according to the manufacturer's recommended distance to avoid bleaching or insufficient intensity.
Water temperature is something beginners often overlook until they have a problem. Warm water holds less dissolved oxygen, and low oxygen at the root zone is a direct pathway to root rot. Keep your nutrient solution between 65°F and 72°F (18–22°C). If your grow room runs warm, consider a small aquarium chiller for the reservoir, or at minimum, keep the reservoir away from direct heat sources. Air temperature in the grow space should stay between 68°F and 77°F for most leafy crops.
Dissolved oxygen in the nutrient solution should stay above 6 mg/L. This is the threshold below which root stress begins. Air stones and an appropriately sized air pump are your primary tools for this. If you want to monitor DO precisely, a dissolved oxygen sensor (calibrated before use) gives you a real number rather than a guess. Good airflow around the plant canopy, provided by a small oscillating fan, also reduces humidity-related problems like fungal issues above the waterline.
The growth cycle from seed to harvest
Starting seeds or clones
You have two options for starting: seeds or clones (cuttings from a mother plant). Seeds are cheaper and more accessible. Germinate in rockwool cubes or rapid rooter plugs kept moist (not soaking) at around 70–75°F. Once the taproot is 0.5 to 1 inch long and you see the first set of true leaves, the seedling is ready to move into the system. Clones skip the germination stage but require a clean cut, rooting hormone, and a humid environment until roots develop, usually 7 to 14 days.
Transplanting into the system
Place the germinated seedling or rooted clone into the net pot, surrounded by your chosen growing medium. Make sure the bottom of the net pot is close enough to the water that the medium stays moist through capillary action, but the crown of the plant (where stem meets root) stays above the waterline. Start nutrient solution at seedling EC (0.5 to 0.7 mS/cm for most greens) and pH 5.5 to 6.0.
Vegetative growth and harvest
Over the next 2 to 3 weeks, you'll see rapid growth as roots expand into the nutrient solution. Gradually increase EC to the vegetative target as plants develop. Monitor pH every 1 to 2 days and correct drift early rather than waiting for it to become a big swing. Lettuce is typically ready in 4 to 5 weeks total from transplant under good conditions. Harvest leafy greens by cutting outer leaves (cut-and-come-again method) to extend production, or pull the whole plant and replant fresh. Fruiting crops like tomatoes or peppers require a separate bloom-stage nutrient profile and longer timelines, so they're better tackled after you've run at least one successful leafy green cycle.
One thing that helped me early on: treating the system like it needed daily check-ins, not just weekly maintenance. Five minutes a day, eyes on the roots, a quick pH and EC check, water level topped up. That habit alone will prevent 80% of the problems beginners hit.
When things go wrong: troubleshooting common hydro problems
Root rot (brown, slimy roots)
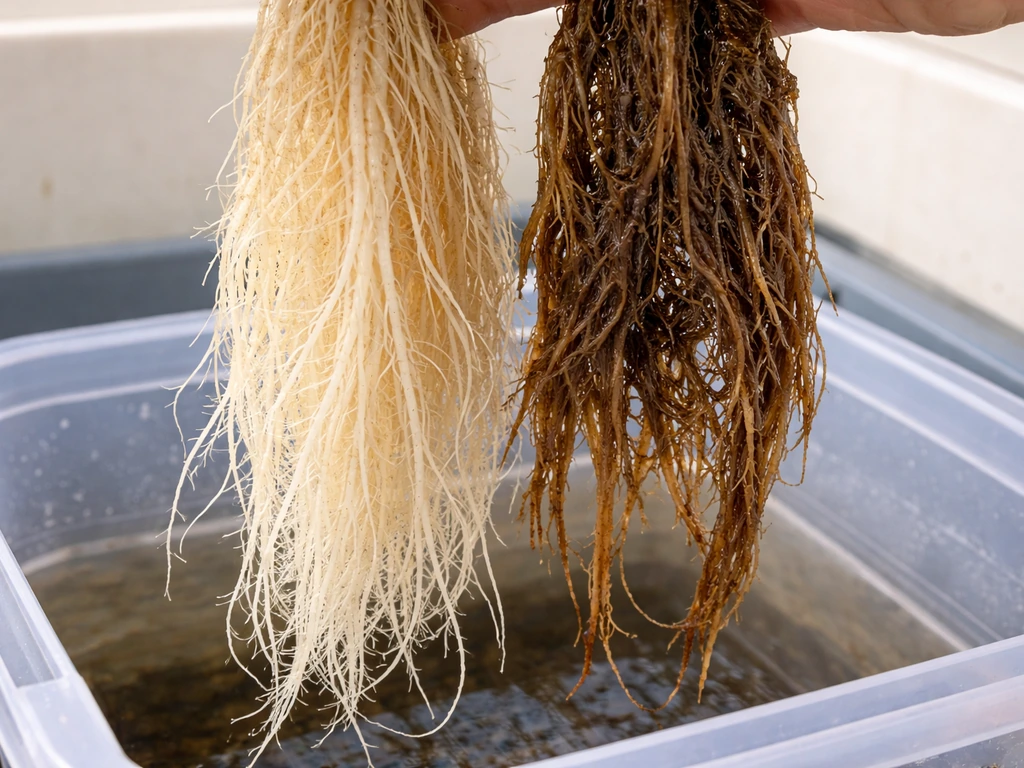
Brown, slimy roots that smell bad are almost always root rot, typically caused by Pythium or similar waterborne pathogens. The root cause is almost always low dissolved oxygen and/or warm water temperatures. First steps: check your DO (it should be above 6 mg/L), lower the water temperature to the 65–72°F range, add more aeration, and do an immediate full reservoir change with clean, properly dosed solution. If you catch it early, healthy white roots can recover.
If the entire root mass is brown and mushy, the plant usually won't recover. The most useful thing you can do is prevent it by keeping oxygen up and temperature down. If you want to go deeper on this, understanding how to grow aloe vera in water without roots offers an interesting window into how root development works in water-based environments and what baseline conditions plants actually need before roots establish.
pH drift
If your pH keeps swinging despite corrections, you're dealing with an underlying instability in the system. Common causes include source water with high mineral content, inconsistent nutrient additions, or algae in the reservoir consuming CO2 and pushing pH upward. Fix it by checking your source water quality first, keeping nutrient additions consistent, and eliminating algae by blocking all light from reaching the solution. Use opaque containers and cover any gaps in the reservoir lid.
Nutrient deficiencies (yellowing, spotting, slow growth)
Yellow lower leaves typically signal nitrogen deficiency. Interveinal yellowing (yellow between green veins) on newer leaves often points to iron or manganese lockout, which is almost always a pH problem rather than a missing nutrient. Before adding more nutrients, check pH first. If pH is in range and EC is low, bring EC up incrementally. If EC is already at target, you may need to do a full reservoir change and start fresh, because old solution can have skewed nutrient ratios even at the right EC reading.
Algae buildup
Green slime on reservoir walls or around net pots means light is getting into your nutrient solution. Algae competes with plants for nutrients, causes pH swings, and clogs pumps and lines. The fix is physical: block all light. Wrap reservoirs in reflective tape or use fully opaque containers. Cover any gaps around net pots with light-blocking material. Once algae is present, drain and scrub the system, because algae left in place will keep cycling back.
Pump and oxygen failures
If plants suddenly wilt or roots go from white to tan overnight, check the air pump immediately. Pump failure in a DWC system is an emergency because roots have almost no buffer once oxygen drops. Always keep a backup pump on hand. For NFT and ebb/flow systems, a failed water pump means roots dry out (NFT) or flood cycles stop (ebb/flow). Set up a basic timer alarm or check the system morning and evening so failures don't go unnoticed for 12-plus hours.
Slow or stunted growth
If plants are alive but not growing, run through this checklist in order: light hours (are you hitting 12 to 14 hours for greens?), light intensity (is the fixture too far away or underpowered for the space?), water temperature (too cold slows metabolism just like too warm does), EC (too low means the plant is hungry), pH (out of range means nutrients are locked out even if EC reads fine), and dissolved oxygen (too low creates root stress that looks like nutrient deficiency). Most slow-growth situations trace back to one of those six variables. Fix the variable, give the plant 3 to 5 days, and reassess.
FAQ
What should I focus on first if I’m switching from one leafy green to a different crop?
Start with leafy greens, and for each new crop use a short “trial window” (for example, one lettuce cycle). Keep the same system and only adjust one variable at a time, usually EC first, then pH. This prevents you from chasing multiple changes at once when growth slows or looks off.
How do you handle constant pH drift without overcorrecting?
If pH keeps drifting, don’t keep making repeated big corrections. Do small step adjustments, then wait 12 to 24 hours and retest, because temperature changes and measurement timing can create the illusion of a new problem. Also confirm you’re testing with the same calibration state each time (buffer solutions for your meter), and rinse the sample cup between tests.
What’s the right way to correct EC when it’s too high or too low?
If EC is low, increase nutrients gradually (small increments) and mix thoroughly before retesting. If EC is high, dilute with plain pH-adjusted water and retest after mixing. Avoid “matching a number” without considering plant stage, because salt stress shows up faster than growth changes if you overshoot.
When is it better to do a full reservoir change instead of continued topping-up and spot corrections?
Replace reservoir solution on schedule, but do it sooner when readings get erratic (pH swings, EC jumps, or frequent corrective dosing). A practical trigger is when you’ve corrected pH more than a couple times in 24 to 48 hours or when EC no longer behaves predictably after mixing.
What are the best ways to prevent algae in a hydroponic reservoir?
For DWC, keep the reservoir covered or opaque, and keep any access openings sealed when possible. Light hitting the nutrient solution fuels algae, which then causes pH instability and nutrient draw. If you see algae starting on the net pot or walls, scrub early and block light before it spreads into the entire system.
Can I use regular tap water, or do I need special water for hydroponics?
Yes, you can use non-direct source water like softened tap or well water, but you must measure. High mineral or sodium content can push EC higher than expected and change nutrient availability. Test your source water pH and baseline EC first, then adjust your nutrient dosing and consider filtration if you see big differences across days.
How do I avoid damping-off when starting seeds in rockwool or plugs?
You can use rockwool or similar media, but aim for “moist, not saturated” during germination. Over-saturation deprives seeds and early roots of oxygen and can cause damping-off. Once in the net pot, keep the crown above the waterline so stem tissue does not stay wet, which reduces rot risk.
After I correct pH, EC, or temperature, how long should I wait to judge whether it worked?
Give the plant time after corrections. A common mistake is changing pH and EC repeatedly in one week, which stresses roots. Plan for a 3 to 5 day adjustment period after you fix one key variable, then evaluate new growth before making another change.
What should I do first when I see brown or slimy roots in hydroponics?
If roots turn brown and mushy, assume root rot and act immediately. Check dissolved oxygen and water temperature first, then do an immediate full reservoir change with properly dosed solution and increased aeration. If only a small portion is affected and you catch it early, some plants can recover, but once the root mass is extensively mushy, recovery is unlikely.
How can I monitor dissolved oxygen reliably, and how often should I check it?
Do not rely on a single “day’s reading.” Dissolved oxygen and temperature can swing with room conditions and light cycle. If your numbers are borderline, monitor more often during the warmest part of the day, and ensure your air pump and air stone are sized for the reservoir volume.
What’s the best way to prevent catastrophic failure if my air pump stops?
Keep a backup air pump for DWC, because pump failure can stress roots quickly. For extra safety, choose a pump that exceeds your current air stone demand, and use an air line with secure connections so tubing slips or kinks don’t reduce airflow.
How do I troubleshoot light problems like slow growth or pale leaves?
Ensure lights are on a consistent timer and position them to hit the recommended distance for your fixture. If your greens look pale or bleached, you likely have too much intensity or too much exposure time; if growth is slow and leaves stretch, intensity is likely too low. Make one change at a time, then reassess after several days.