Yes, you can grow a yam in water, but the first thing you need to sort out is what kind of "yam" you actually have. That one detail changes everything about how you proceed. Most people searching this have an orange, grocery-store tuber sitting on their counter and are ready to drop it in a jar. That is going to work great, but probably not for the reason you think.
How to Grow a Yam in Water: Step-by-Step Guide
Marcus Holloway
11 Apr 2026

"Yam" vs. Sweet Potato: What's Actually in Your Kitchen?
Here is the honest truth: what grocery stores in the United States label as "yams" are almost always sweet potatoes (Ipomoea batatas). True yams belong to the genus Dioscorea (family Dioscoreaceae) and are a completely different plant from a different botanical family. Sweet potatoes are Ipomoea batatas, part of the morning glory family (Convolvulaceae). The Library of Congress, the Encyclopaedia Britannica, and pretty much every botanist you could ask all confirm this mix-up is widespread and has been for decades.
Why does it matter for growing in water? Because Ipomoea batatas is a prolific, reliable sprouter in water and produces the "slips" (rooted vine cuttings) that most home growers actually want. True Dioscorea yams are much harder to source outside of specialty markets, grow differently, and are not well-suited to the jar-of-water method at all. So if your tuber came from a U.S. supermarket and is orange inside, treat it as a sweet potato. If you actually sourced a true Dioscorea yam from a Caribbean, West African, or Asian market, the water-start process is different and limited, and I will cover that distinction below.
Pick the Right Planting Material
For sweet potatoes (the common "yam")
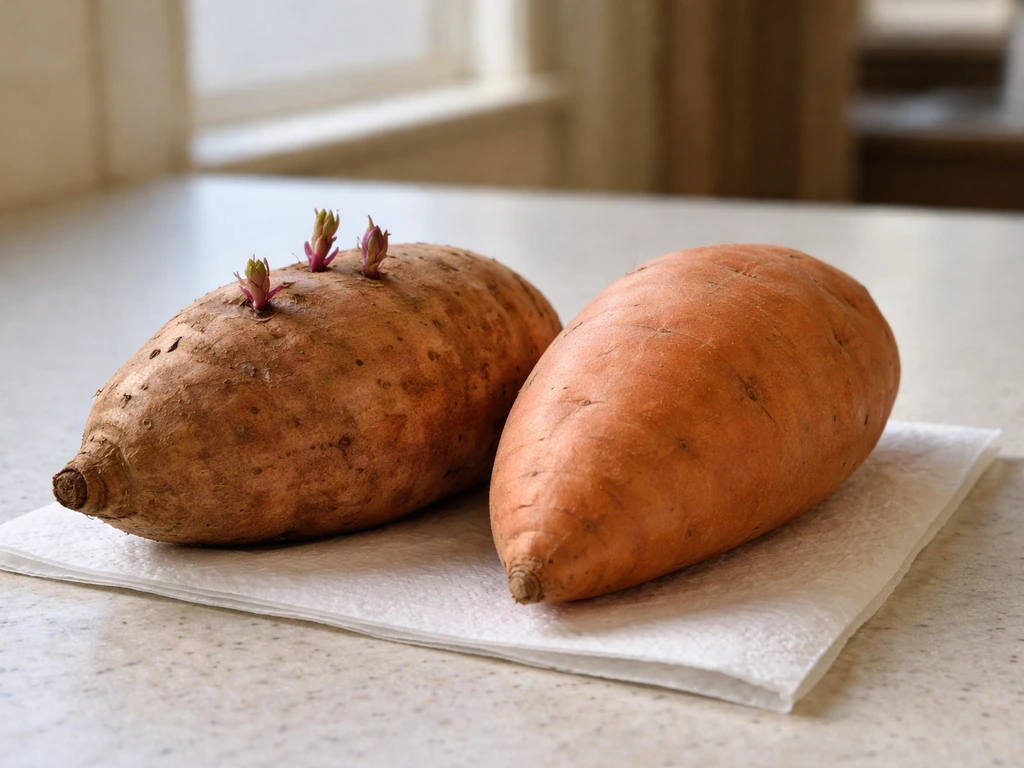
Pick an organic sweet potato if you can. Conventionally grown ones are often treated with a sprout inhibitor, and I have wasted several weeks waiting on tubers that never moved. Organic avoids that problem. Look for a tuber that is firm, smooth, and free of soft spots, cuts, or mold. Size does not matter much, but a medium tuber (roughly the size of a large fist) is easiest to work with in a standard jar. The ends of the tuber matter: the "root end" (more tapered, often has tiny root nubs) and the "sprout end" (rounder, where the eyes and shoots emerge) should be identifiable. You will suspend the tuber so the sprout end faces up.
For true Dioscorea yams
True yams are propagated from "setts" (cut pieces of tuber, each with at least one viable bud/eye) or from bulbils (small aerial tubers that form on the vines). Water is used for initial hydration to encourage sprouting, but true yams are not suited to a long-term water-only system. You can use a shallow tray of water to encourage setts to chit (pre-sprout), but they need to move to soil or a well-draining grow medium once shoots emerge. Keep this in mind if you are working with a true yam purchased at a West African or Caribbean grocery.
Choose a Water-Culture Method That Actually Works
There are two realistic approaches for growing in water, and they serve different goals.
| Method | Best For | How Long in Water | End Goal |
|---|---|---|---|
| Suspended jar/glass (partial submersion) | Sweet potato slip production | 3 to 6 weeks until slips root | Harvest rooted slips, transplant to soil or hydro media |
| Deep water culture (DWC) tub | Extending hydro growth of rooted slips | Full grow cycle possible | Vine/leaf production; tuber yield is low without media |
| Shallow tray chitting | True Dioscorea yam setts | 1 to 2 weeks only | Pre-sprout, then transplant to soil immediately |
| Kratky passive hydro | Rooted sweet potato slips | Full grow cycle | Vine production, some tuber development in net pots |
For most readers, the suspended jar method is the starting point. It is simple, free of pumps, and works consistently. If you want to push further into hydroponics after slips root, a Kratky or DWC setup extends the experiment. Keep expectations realistic: sweet potatoes in full water culture produce excellent leafy vines but modest tubers. If a true harvest of tubers is the goal, the water phase is a starting step, not the finish line.
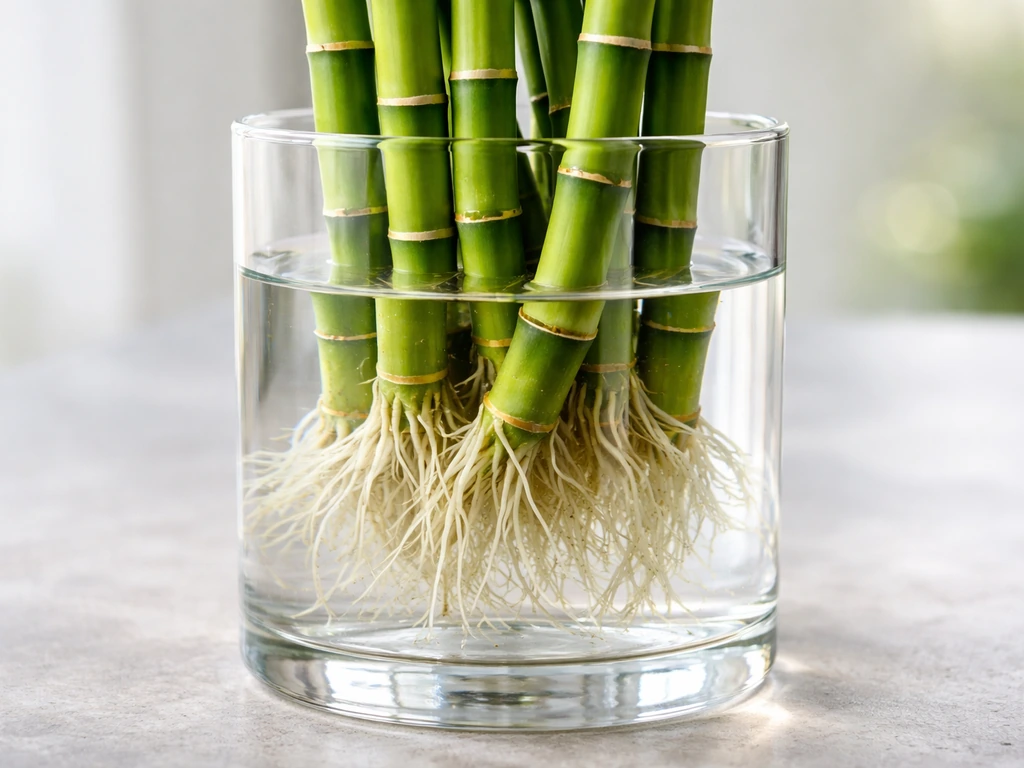
This water-rooting approach is actually very similar to how you would start a bamboo plant in water, where the goal is getting strong roots established before transitioning to a more permanent setup.
Set Up Your Containers, Water, and Oxygen
Container choice
For the jar method, use a wide-mouth quart jar or any vessel that holds the tuber so roughly the bottom third is submerged and the rest hangs above the water line. Mason jars are classic. Dark-colored jars or wrapping your jar in foil reduces algae growth, which is worth doing. For a DWC or Kratky setup with rooted slips, a 5-gallon opaque bucket or tote works well per plant, with a net pot lid to hold the slip in place while roots grow into the reservoir.
Water depth and quality
For the tuber-in-jar method, keep water covering only the bottom third of the tuber, roughly 1 to 2 inches. Do not submerge the whole thing. The upper portion needs air exposure to avoid rot. For a DWC reservoir with rooted slips, maintain water level so the bottom of the net pot is just touching or barely submerged (Kratky method) or keep it 1 to 2 inches below the net pot and use an air stone to oxygenate. Use filtered, dechlorinated tap water or let tap water sit out 24 hours before use. Target a pH of 5.8 to 6.5 for hydroponic phases. Use a cheap pH test kit or digital meter to check every few days.
Oxygenation
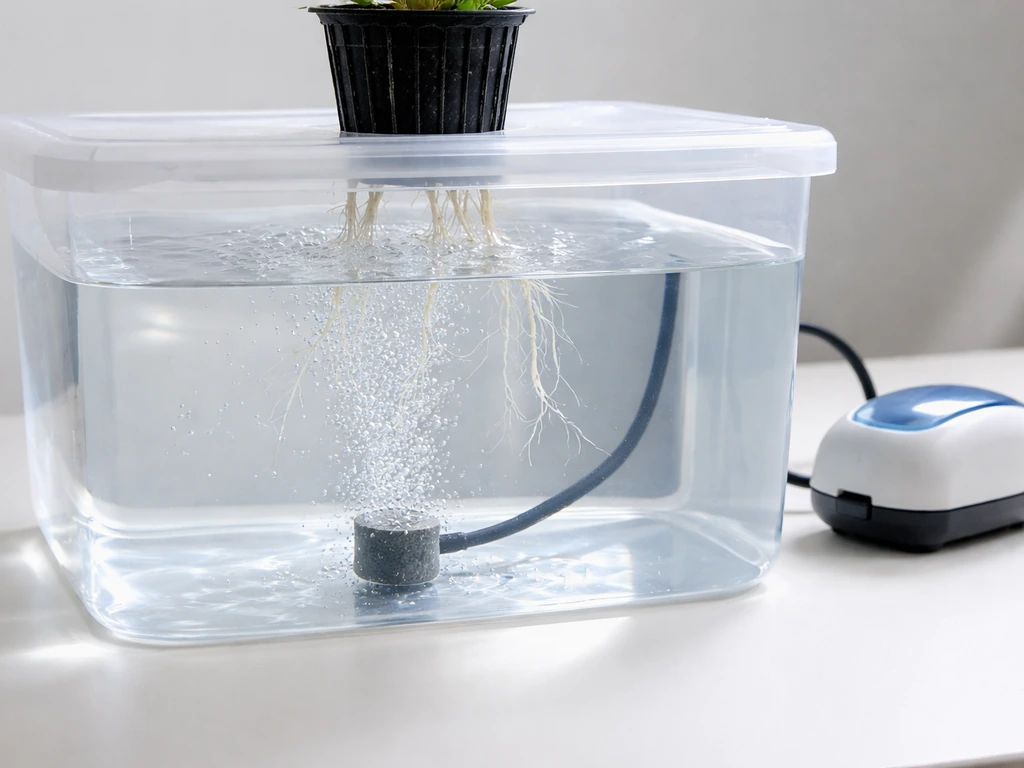
In the simple jar setup, oxygen is not a major issue as long as you change the water every 3 to 5 days. Stagnant water leads to rot fast. In a DWC tub, run a small aquarium air pump with an air stone to keep dissolved oxygen levels up. This is not optional in a full hydro setup. Poor oxygenation is one of the top reasons slips rot before they establish.
Step-by-Step: Start Your Slips or Chits and Get Them Growing
- Select a firm, organic sweet potato tuber. Rinse it under cool water and pat it dry. Do not scrub off the skin.
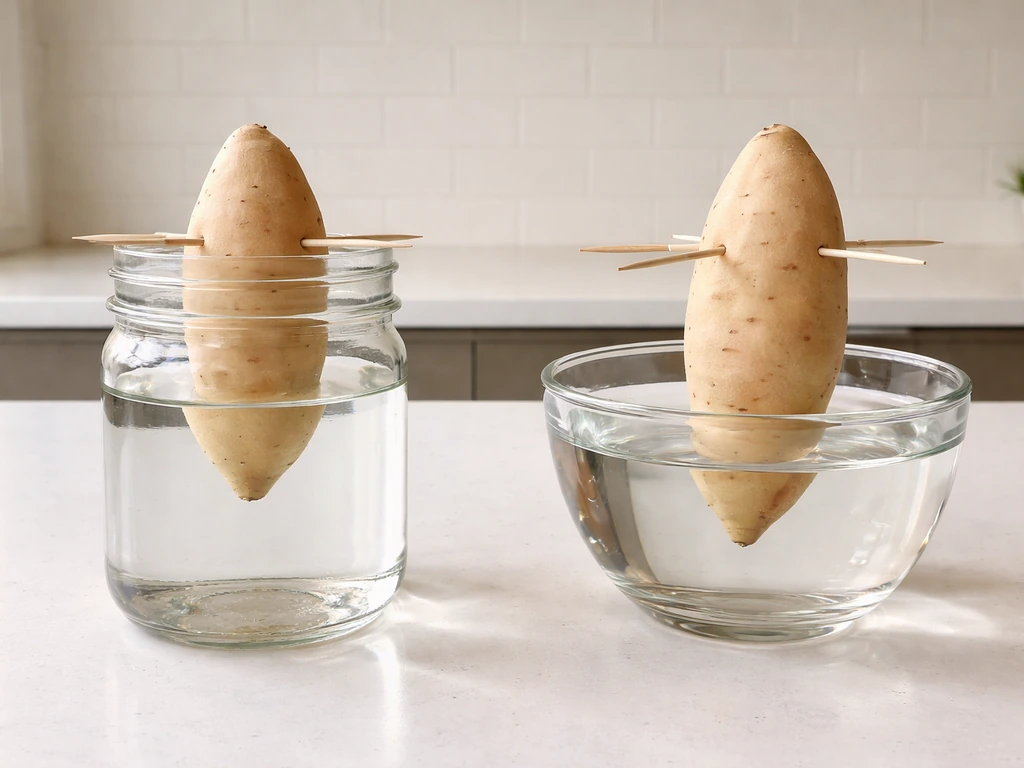
- Poke 3 to 4 toothpicks horizontally around the middle of the tuber at equal spacing. These act as a shelf to suspend the tuber in the jar.
- Place the tuber sprout-end up in the jar. The toothpicks should rest on the rim so the bottom third of the tuber sits in water.
- Fill the jar with room-temperature dechlorinated water up to just below the toothpicks, so water contacts the lower portion of the tuber.
- Set the jar in a warm spot (70 to 80°F is ideal) with bright indirect light. A windowsill with southern exposure works well.
- Change the water completely every 3 to 5 days. Do not skip this. Stagnant water is how rot starts.
- Watch for small pink or white bumps to appear on the tuber surface within 1 to 2 weeks. These are the precursors to sprouts.
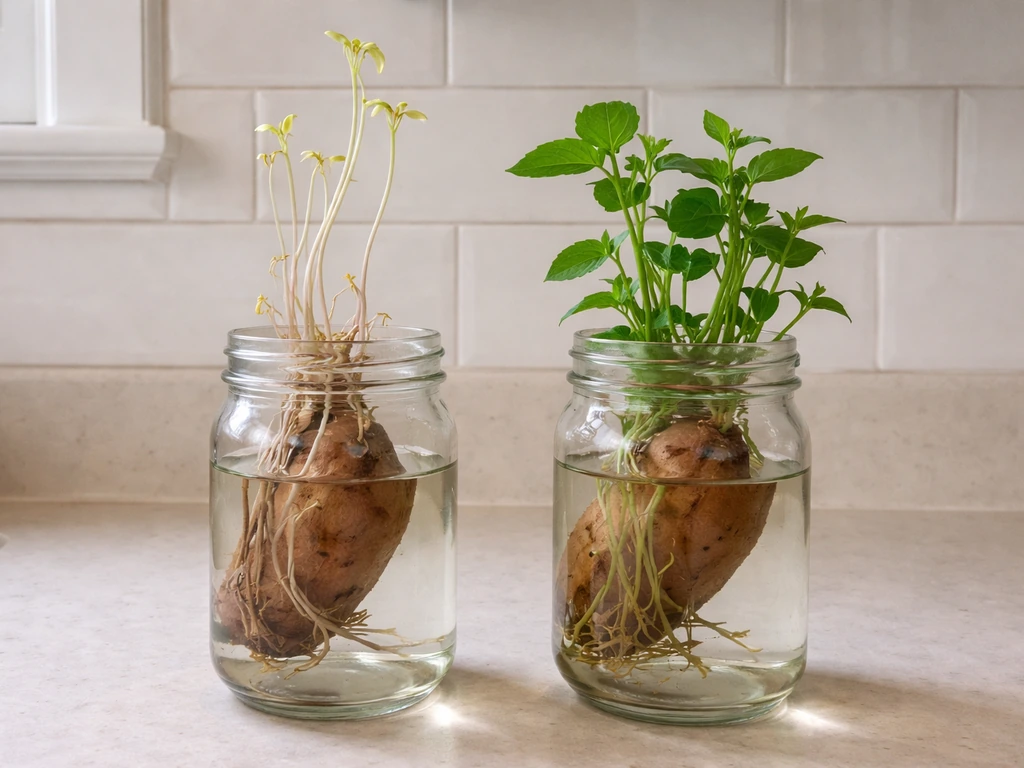
- Sprouts (slips) will emerge and grow upward. Roots will begin to develop from the base of each slip into the water.
- Once slips are 4 to 6 inches long and have visible white roots (usually 3 to 5 weeks total), they are ready to be twisted off and either transplanted to soil or moved to a hydro grow setup.
- For true Dioscorea yam setts: place cut setts in a shallow tray with just enough water to keep them moist (not submerged). Wait 1 to 2 weeks for shoots to emerge, then move to soil immediately.
Light, Temperature, and Routine Water Care
Sweet potatoes are tropical plants and they want warmth. The ideal sprouting temperature is 70 to 85°F. Anything below 60°F will slow or stall sprouting dramatically. I have left a tuber on a cold windowsill in January and waited five weeks with almost nothing to show for it. Move it somewhere genuinely warm, like the top of a refrigerator or a seedling heat mat set to 75°F, and things speed up considerably.
Light at the sprouting stage should be bright but indirect. Direct afternoon sun through glass can heat the water and accelerate bacterial growth. Once slips are growing and you transition to a hydro setup, aim for 14 to 16 hours of light per day. A full-spectrum LED grow light positioned 6 to 12 inches above the canopy handles this well indoors. Sweet potato vines grow fast and vigorously under good light, producing new leaves every few days.
Water changes are your most important routine task in the jar phase. Every 3 to 5 days, pour out the old water, rinse the jar, and refill with fresh water. In a DWC system, top off the reservoir with fresh water every 2 to 3 days and do a full reservoir change every 7 to 10 days. Check pH each time you change or top off. This is the same diligent water-change schedule you would follow for growing lucky bamboo in water, where neglecting water quality is the fastest way to lose the plant.
Nutrients: When to Add Them and What to Use
During the initial sprouting phase (tuber in jar), you do not need to add any nutrients. The tuber itself contains all the energy and minerals the emerging slips need. Adding fertilizer at this stage can actually accelerate algae growth and bacterial bloom in the water, which causes more problems than it solves.
Once slips are separated from the mother tuber and moved into a hydroponic setup, nutrients become necessary within the first week. Use a balanced hydroponic nutrient solution designed for leafy greens or root vegetables. A mild concentration works well to start: aim for an electrical conductivity (EC) of 1.2 to 2.0 mS/cm. Sweet potatoes prefer slightly lower nitrogen once the vine is established and you want to push tuber development, so look for a formula with a lower N-P-K nitrogen ratio in the later stages, or switch to a bloom/root formula after the first 4 weeks of vegetative growth.
This kind of nutrient management in a water-based grow system mirrors the strategies used in traditional water-based food cultivation. Ancient systems like the chinampas used to grow crops in Mesoamerica were essentially large-scale water-adjacent growing platforms, and they relied on nutrient-rich water to feed their plants, much like a modern hydro reservoir does.
Supplement with a silica additive if available. Silica strengthens cell walls and makes vines more resistant to pest damage and stress. Add it at the rate the product recommends, typically 0.5 to 1 mL per liter. Also keep an eye on iron levels if leaves start showing yellowing between veins (interveinal chlorosis), which indicates iron deficiency. A chelated iron supplement at 0.5 to 1 mL per gallon fixes this within a week.
Troubleshooting the Most Common Problems
Rot and mold on the tuber
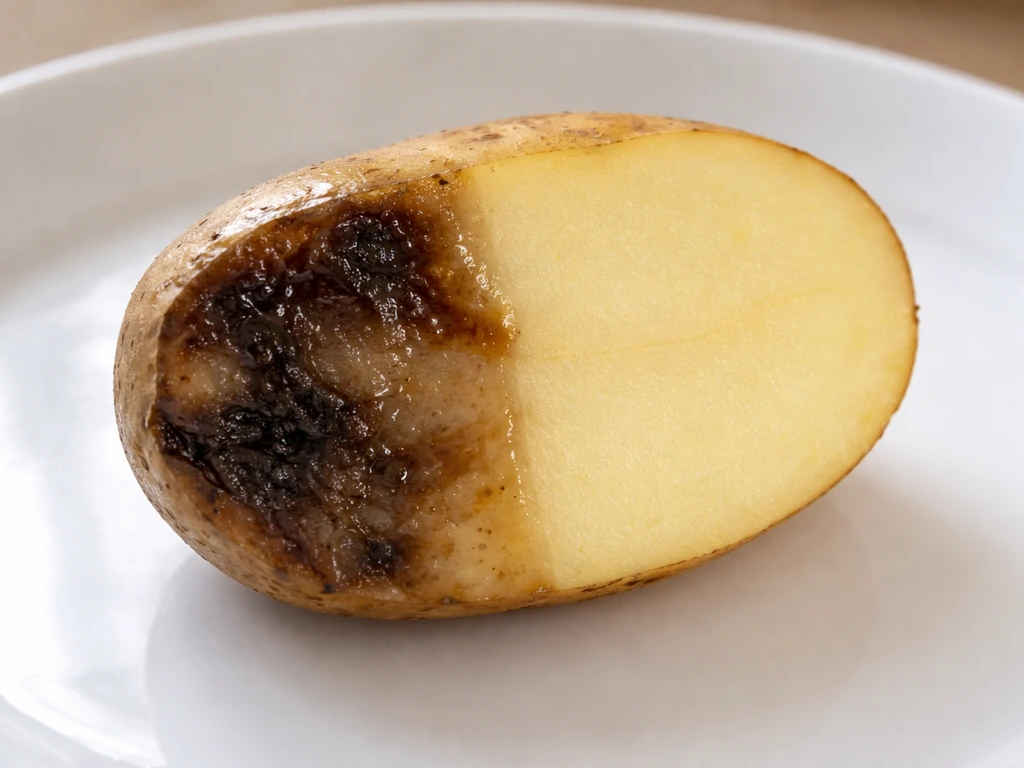
This is the number one failure mode. Rot usually shows up as soft, dark, or mushy patches on the submerged portion of the tuber, often with a sour smell. It is caused by bacteria in stagnant water, too much of the tuber being submerged, or a tuber that was already compromised when you started. Fix it by removing the tuber, cutting away any soft or discolored tissue with a clean knife, letting the cut surface air dry for a couple of hours, and restarting with fresh water. If more than half the tuber is affected, start with a new one. Going forward: change water every 3 days instead of 5, and make sure no more than the bottom third is submerged.
White fuzzy mold on the above-water portion
Surface mold usually appears when humidity is high and air circulation is poor. Move the jar to a spot with better airflow. A small fan running nearby helps. You can wipe visible mold off with a cloth dampened in a diluted hydrogen peroxide solution (3% peroxide mixed 1:10 with water). Do not let it drip into the reservoir.
No sprouting after 2 to 3 weeks
Check temperature first. If the ambient temperature is below 65°F, sprouting slows significantly. Add a seedling heat mat under the jar to bring the tuber itself to 72 to 78°F. Also consider that the tuber may have been treated with a sprout inhibitor. If you used a conventional grocery store sweet potato and it has been sitting in water for three weeks with no movement, start over with an organic one. Additionally, make sure the water is not covering the top portion of the tuber where eyes (buds) are located.
Weak, leggy vines with pale leaves
Insufficient light is almost always the cause. Move the setup to a brighter location or add a grow light. If the vines are in a hydroponic system, also check EC and pH. Pale leaves paired with slow growth in a DWC system often indicate pH is out of range (either too high or too low) preventing nutrient uptake, not an actual nutrient shortage. Get pH back to 5.8 to 6.2 and give it 5 days before adding more fertilizer.
Pests in a humid water-growing setup
Fungus gnats are the most common pest in water-adjacent setups. They lay eggs in any moist surface near the water. Since you are not using soil in the water phase, gnats are less problematic, but they can still appear on wet surfaces of the grow space. Yellow sticky traps catch adults. If you are using any grow media (like hydroton or perlite in a net pot), a thin layer of dry media on top discourages egg-laying. Spider mites and aphids can hit the above-water vines in indoor setups. Wipe leaves with neem oil solution (2 to 3 mL neem oil, 1 mL dish soap per liter of water), applied every 5 days for 3 cycles.
When to Transplant and What to Do Next
The water phase is a starting point, not always the finish line. Here is how to read the signals and decide when to move your plant on.
- Slips are 4 to 6 inches long with 3 or more visible white roots at least 1 inch long: ready to separate from the mother tuber and transplant to soil or a hydro media setup.
- You want actual tuber harvest: transplant slips to soil or a grow bag filled with a well-draining mix (loamy soil or a coco/perlite blend) within 6 to 8 weeks of starting slips. Tubers need room and some resistance from a growing medium to develop well.
- You want vine production or greens only: keep in a Kratky or DWC system indefinitely with regular nutrient and water changes. Sweet potato leaves are edible and nutritious, and the plant will produce them abundantly in water.
- True Dioscorea yam setts: transplant to soil as soon as the first shoot is 1 to 2 inches long. Do not try to continue them in water.
When transplanting slips to soil, harden them off over 3 to 5 days by moving them to a shaded outdoor spot for increasing periods before full sun exposure. Plant slips at a 45-degree angle with 2 to 3 nodes buried, in a mound or raised bed with loose, well-drained soil. Water in well and expect some wilting in the first day or two as the plant adjusts. This is normal.
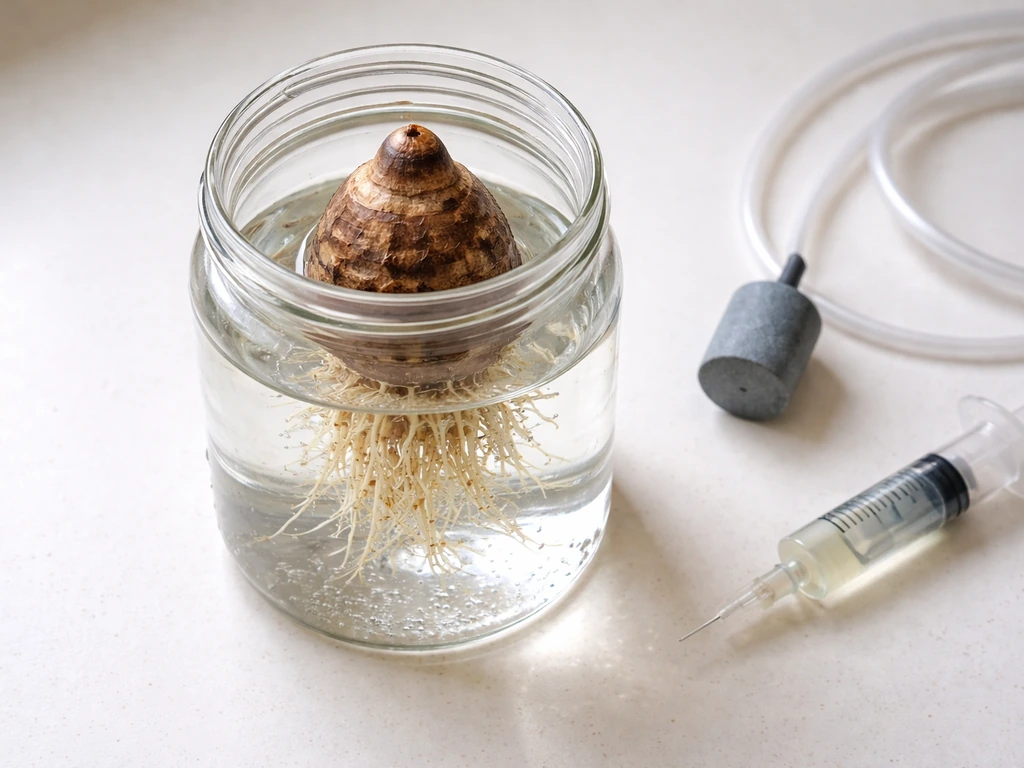
If you enjoy the water-culture approach and want to expand into other root vegetables and tropical plants, the process for growing taro in water follows a very similar slip-and-transfer method and is worth exploring once you have the sweet potato technique dialed in. Taro is another starchy tropical root that responds well to a water-start before transitioning to a grow medium.
The full timeline from tuber in water to transplant-ready slips is typically 3 to 6 weeks depending on temperature and tuber quality. From transplant to harvest of sweet potato tubers in soil is another 90 to 120 days. Plan accordingly, and you will have a clear, manageable grow schedule from first jar to final harvest.
FAQ
Can I just put a whole sweet potato in water, no cutting or prep?
You can start with the whole tuber, but it increases the chance of rot because more surface area stays wet. If you see any bruising or soft spots, remove them first, then keep only the bottom third submerged. For faster, cleaner results, use a medium tuber and suspend it so the sprout end stays dry above the water line.
How long should I wait before assuming the yam or sweet potato won’t sprout in water?
If your setup is near the 70 to 85°F range, you should usually see slip growth within 1 to 3 weeks. If it has not moved by about 3 to 4 weeks, the tuber was likely treated with a sprout inhibitor or already compromised, and restarting with an organic tuber is the best next step.
Do I need dark or covered water to prevent algae?
Dark containers help, but the bigger fix is water freshness and proper light. If the jar is exposed to strong sun, algae and bacteria both surge, even in a dark jar. Use bright indirect light for sprouting, and change water on schedule (every 3 to 5 days in the jar phase).
What water should I use, and can I use straight tap water?
Straight tap water often works, but dechlorination is important. Use filtered or let tap water sit for 24 hours so chlorine dissipates before filling the jar or reservoir, especially for hydro setups where pH and oxygen are tightly managed.
Should I add fertilizer during the initial jar sprouting stage?
Avoid it. The tuber provides everything needed for early slip formation, and early nutrient additions can trigger bacterial blooms and algae. Start nutrients only after you have rooted slips and move into your hydroponic reservoir, typically within the first week of that transition.
My slips are growing but they look pale and weak, what should I check first?
First check pH and EC in the hydro system. Pale leaves with slow growth often means nutrient uptake is blocked rather than a lack of fertilizer. Bring pH into about 5.8 to 6.2, then wait around 5 days before making more nutrient changes.
How do I tell the difference between rot and normal decay on the submerged area?
Rot usually progresses as soft, dark, or mushy tissue and may smell sour. Normal sprout development will not create a wet, spreading mush patch on the submerged portion. If you see softness, cut away discolored tissue with a clean knife, let the cut air dry for a couple of hours, and restart with fresh water.
Can I reuse water or keep topping off instead of full water changes?
In the jar method, topping off is a common mistake. Old water accumulates bacteria and sugars from the tuber, which accelerates rot. Do a full pour-out and refill every 3 to 5 days for the jar phase, and do full reservoir changes every 7 to 10 days in DWC/Kratky setups.
What if my slips break off while transferring to soil or hydro?
It happens, especially when slips are long. If a slip breaks, re-root the cutting by placing it so the bottom nodes are kept moist and oxygenated, using the same water culture approach. The key is avoiding contact with the water on any tissue that would otherwise rot, and keeping conditions warm and bright afterward.
Is it better to root slips in plain water or directly in hydro with nutrients?
Plain water is best for the initial root establishment period because it reduces variables and prevents nutrient-related issues before roots form. Once slips are separated and stable in a hydro setup, start nutrients within the first week and monitor EC and pH so you do not overload young plants.
Can I grow sweet potato vines in water but still harvest tubers?
Yes, but expect the tubers to be modest in full water culture. For a real tuber harvest, use the water phase only to produce slips, then move slips into soil or a well-draining grow medium. The article’s schedule reflects this tradeoff.
Do water-grown sweet potatoes have a different pest pattern than soil-grown ones?
They can still get above-water pests. Fungus gnats are less likely if you are not using soil, but they may appear on moist surfaces in the grow area. For vines, spider mites and aphids can show up indoors, so regular leaf checks and early wiping with neem oil help prevent outbreaks.
Why are my vines growing fast but I never see rooted slips?
Usually this comes down to either cold conditions or the tuber being wrongfully positioned. Keep the tuber body around 72 to 78°F using a heat mat if the room is cool, and ensure the sprout end is facing up while only the bottom third is submerged. Also confirm you are using an organic tuber if conventional ones failed to move.