Yes, you can grow reeds in a home pond, container wetland, or aquaponics-style setup, and they're genuinely rewarding once you understand their quirks. The short answer: start with rhizomes rather than seeds, keep the roots wet but not buried in deep water during establishment, give them full sun, and contain them from day one or they will take over. Here's everything you need to know to get it right.
How to Grow Reeds: Step-by-Step Pond and Container Guide

Marcus Holloway
9 Apr 2026
What 'reeds' actually means when you're growing aquatic plants
The word 'reed' gets used loosely, and picking the wrong species can mean very different growing conditions, containment needs, and legal headaches. In aquatic and pond-keeping contexts, three plants dominate the conversation:
- Phragmites australis (common reed): The tall, dramatic one — reaching 6 to 15 feet — with feathery plumes and thick, bamboo-like stems. It spreads aggressively via underground rhizomes that can run 10 feet or more in a single season. This is the species most people picture when they say 'reed.' It's also, in its non-native subspecies form, classified as invasive in most U.S. states.
- Juncus effusus (soft rush or common rush): Shorter, clump-forming, and far more manageable. Widely used in engineered wetlands, water gardens, and aquaponics filtration beds. This is the 'reed-like' plant I'd recommend to most home growers who want the aesthetic without the invasion risk.
- Typha latifolia (common cattail): Often lumped in with reeds. Similar growing conditions, rhizome-spreading habit, and it does well in shallow ponds and container wetlands. Worth knowing about as an alternative.
For most people growing in a home pond or water-based system, Juncus effusus is the practical choice: easier to manage, well-documented growing requirements, and useful for water filtration. If you want Phragmites for its dramatic height or specific ecological function, you can grow it, but you need to take the containment steps seriously, and you should verify which subspecies you're working with before you plant a single rhizome. The how to grow reeds question is really two different questions depending on which plant is in your hand.
What these plants need to thrive: light, water, substrate, and chemistry
Light
Reeds are full-sun plants. Both Phragmites and Juncus prefer at least 6 hours of direct sunlight per day, and more is better. Phragmites seedling establishment is specifically tied to high light conditions, studies confirm that germination and early growth are favored by warm temperatures and unshaded exposure. If you're growing indoors under artificial light, aim for 14 to 16 hours with a strong grow light positioned close to the tops of emerging shoots.
Water depth
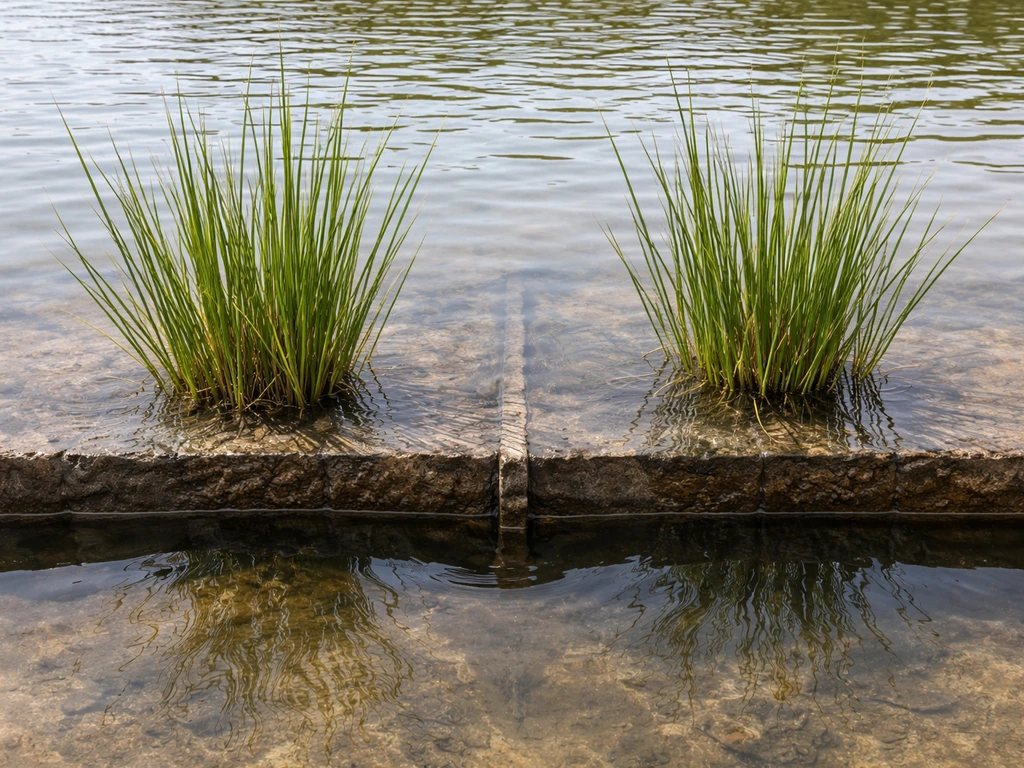
Getting the water depth right is probably the single most important factor in whether your reeds establish or just sit there rotting. Juncus effusus performs best at water depths of about -2 to 10 cm (meaning the crown can be slightly above or below the waterline), and tolerates standing water up to around 6 inches. Phragmites prefers moist-to-wet conditions at the surface but does not establish well in permanently flooded conditions, seeds and new rhizome growth both do better on moist, exposed soil or in very shallow water. As a general rule: set the plant crown so that it sits at or just below mean water level, roughly 0 to 6 inches below the surface for established plants.
Substrate
Reeds want something to anchor into, a clay-heavy, loamy, or native topsoil substrate works well. Pure gravel or aquatic sand alone won't give them enough nutrient base. For container or pond-basket setups, fill with a clay or loam mix and cap it with 2 to 3 inches of pea gravel to hold the soil in place and reduce washout. A topdressing of native topsoil mixed with a small amount of coarse sand also helps if your substrate is very silty and prone to cloud the water.
Water chemistry
For Juncus effusus: target a pH of 4.0 to 6.0, salinity under 14 ppt, and dissolved oxygen around 1 to 3.5 mg/L. These are slightly acidic, low-salinity conditions, if your tap water is very alkaline (pH 7.5+), it can stall growth noticeably. For Phragmites, low-to-moderate salinity is acceptable and it's more pH-tolerant, but it still struggles in heavily brackish or saline systems. If you're also experimenting with surface-covering aquatic plants in your setup, check out guidance on how to grow floating plants, they pair well with emergent reeds for a layered water-filtration approach.
| Parameter | Juncus effusus (Soft Rush) | Phragmites australis (Common Reed) |
|---|---|---|
| Preferred pH | 4.0 – 6.0 | Tolerant 5.5 – 8.0 |
| Salinity tolerance | < 14 ppt | Low to moderate (best < 5 ppt) |
| Water depth (establishment) | -2 to 10 cm | 0 to 5 cm (moist surface) |
| Water depth (mature) | Up to 6 inches (15 cm) | Up to 12 inches; prefers shallow margins |
| Light | Full sun preferred | Full sun required |
| Mature height | 1 – 4 feet | 6 – 15 feet |
| Spread habit | Clump-forming, rhizomes | Aggressive rhizome runners (up to 10 ft/season) |
Seeds vs rhizomes vs division: what actually works
I'll be direct here: rhizome division is the most reliable starting method for home growers, full stop. Seeds work, but they require very specific conditions and patience. Cuttings (stem cuttings) generally don't work well for reeds, these are not plants that root from above-ground tissue.
Starting from rhizomes or division
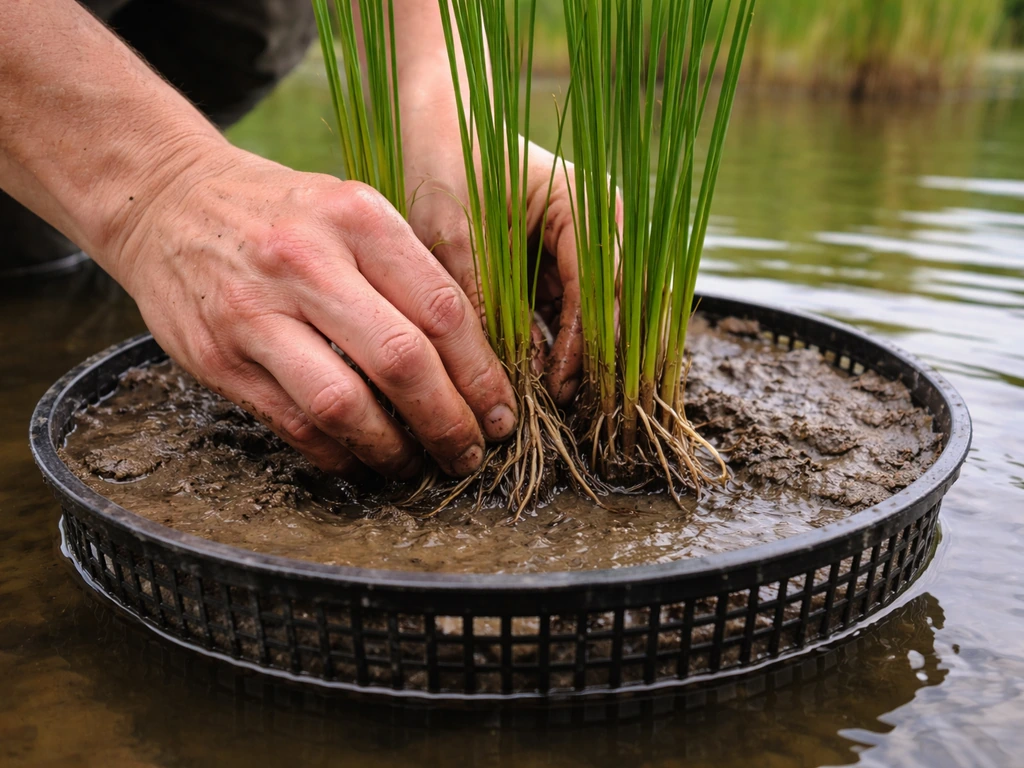
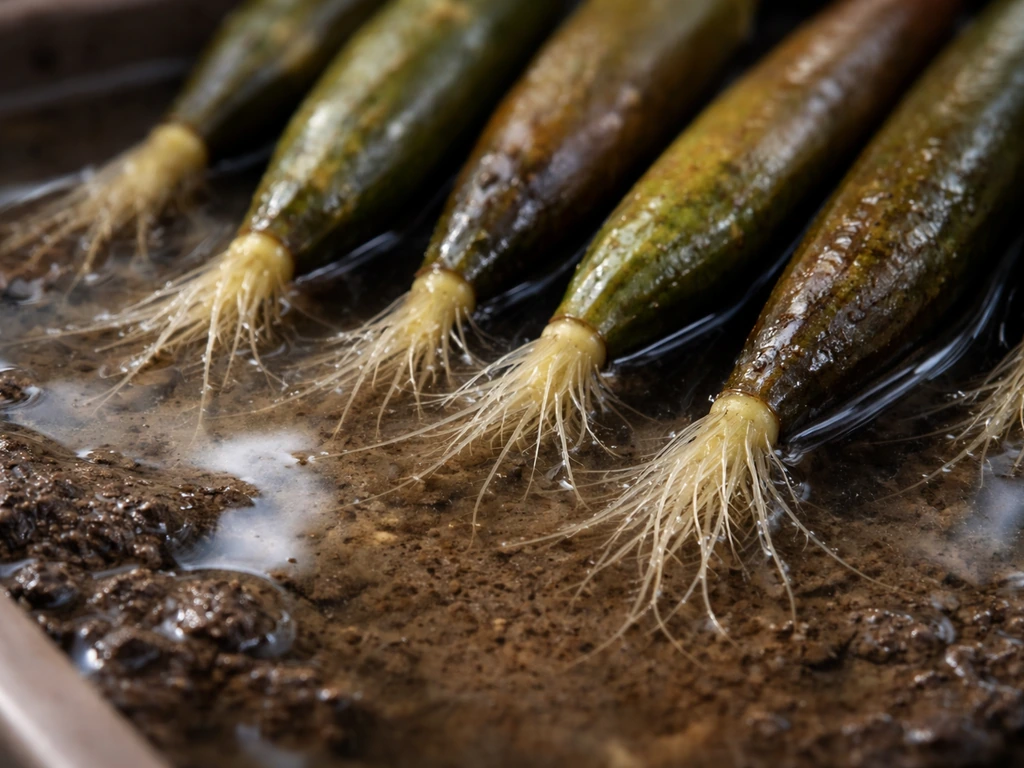
Dividing an existing clump or ordering live rhizome sections is the fastest, most forgiving path. For Juncus, division is the standard propagation method even for cultivated varieties. Dig up a healthy clump, separate it into smaller sections each with at least 3 to 5 actively growing shoots attached to a rhizome segment, and replant immediately. Don't let the roots dry out, if you're not planting within a few hours, keep them submerged in a bucket of water. Space new divisions 18 to 24 inches apart for restoration or garden plantings; you can go tighter (12 inches) in containers if you want faster fill.
Starting from seed
Seeds are viable but fussier. Phragmites australis seed germinates in roughly 2 to 4 weeks at temperatures between 10 and 30°C, the sweet spot is warm (20 to 28°C) and brightly lit. The critical mistake most people make is burying the seeds: don't. Press them onto the surface of moist potting mix or wetland soil and leave them exposed to light. Keep the surface consistently moist but not submerged during germination. Once seedlings reach 3 to 4 inches tall, gradually introduce shallow standing water. Juncus seeds follow similar rules, surface sow, bright light, consistent moisture.
Where to get planting material
- Native plant nurseries and wetland restoration suppliers (best quality, usually verified subspecies)
- Online aquatic plant retailers (check that Phragmites is labeled as native subspecies if that matters for your area)
- Dividing from an established planting in your own yard or a neighbor's pond (just confirm subspecies first)
- Seed suppliers with germination data provided (look for viability percentage and storage date)
How to plant reeds step by step

Option 1: Pond shoreline or natural wetland edge
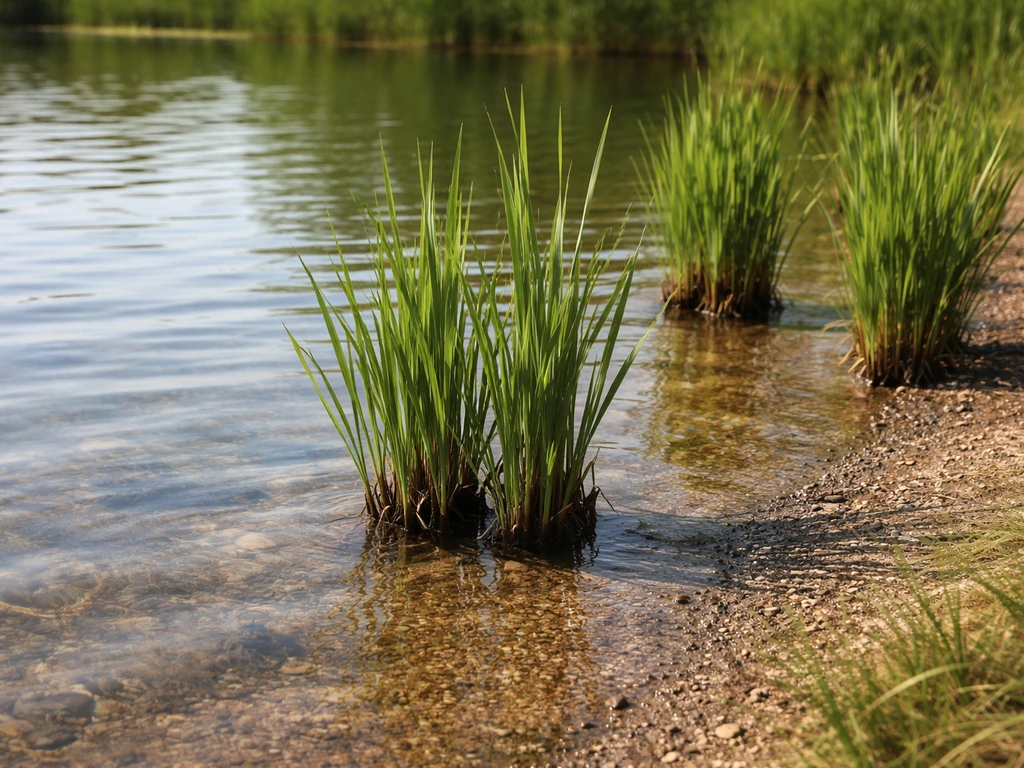
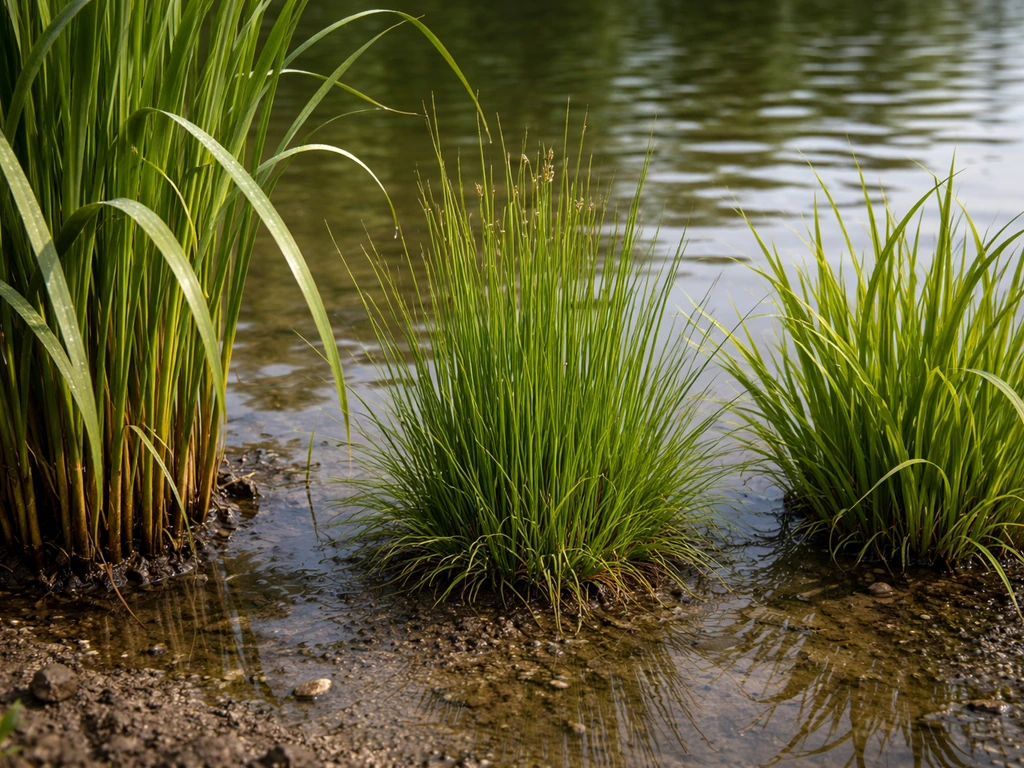
- Identify the target planting zone: aim for the shoreline area where the water depth is 0 to 6 inches at mean water level.
- Prepare the planting hole: dig into the substrate 6 to 8 inches deep, loosening compacted soil. If substrate is very sandy or nutrient-poor, mix in some native clay-rich topsoil.
- Set the rhizome or plug: place the crown at or just below mean water level so emerging shoots point upward. Backfill firmly around roots.
- Top with pea gravel if erosion is a concern — a 2-inch layer over the planting zone helps hold soil and discourage waterfowl from uprooting new plants.
- Water in immediately and monitor for the first two weeks. Don't let the waterline drop so low the roots dry out during establishment.
- Space plants 18 to 24 inches apart. They will fill in — give them room.
Option 2: Container, bucket, or aquatic planting basket
- Choose a container: mesh aquatic baskets (12 to 16 inches wide) or solid buckets/totes with drainage holes drilled at the target water level work well.
- Fill with aquatic soil or clay-heavy loam to within 3 inches of the rim.
- Plant the rhizome or division at the center, crown at substrate level or just below.
- Top with 2 to 3 inches of pea gravel to hold substrate in place and reduce algae on the soil surface.
- Submerge or partially submerge in your pond or water feature so the water level sits at or just above the gravel top layer.
- For indoor or aquaponics setups, place containers in a flood tray or reservoir and maintain water level with a float valve or manual top-off.
Option 3: Constructed wetland or hydroponic wetland bed
In a horizontal-flow constructed wetland or deep aquaponics grow bed, reeds are excellent biofilter plants. Fill the bed with 12 to 18 inches of pea gravel or coarse media, plant rhizome divisions at 12 to 18 inch spacing, and flood to just below the surface of the media. The roots will grow down into the saturated zone while the crowns stay above the waterline. This setup pairs naturally with fish systems, reeds pull nitrogen and phosphorus efficiently from nutrient-rich water. A PubMed-indexed constructed-wetlands study reported nutrient removal using emergent wetland plants such as Juncus, supporting the idea that reeds and Juncus can remediate nitrogen in wetland-style setups blank" rel="noopener noreferrer">reeds pull nitrogen and phosphorus efficiently from nutrient-rich water. If you're also growing other emergent or floating species in a layered system, you might find it useful to look at how other aquatic growers approach how to grow red root floaters as a surface companion plant.
Feeding, maintenance, and keeping the water level right
Nutrients
Reeds growing in a natural pond or aquaponics system rarely need extra fertilization, they're efficient scavengers of nitrogen and phosphorus already in the water. In fact, over-fertilizing causes real problems: applying heavy NPK fertilizers has been shown to increase foliar disease incidence and reduce root biomass in Juncus. Excess nitrogen also produces weak, floppy growth that's more susceptible to fungal issues. If you're growing in a nutrient-poor container with no fish or organic matter, a slow-release aquatic plant tablet pushed into the substrate near the roots once in spring is enough. Don't dump granular fertilizer on the surface, it dissolves into the water column and triggers algae blooms.
Water level management
This is where a lot of people go wrong. Raising the water level dramatically after planting can drown emerging shoots before they're established. Hold the water level steady for the first 4 to 6 weeks, then raise it gradually if you want deeper water over the roots. Fluctuating water levels actually help emergent plants stay vigorous long-term, a consistent, permanent flood without variation stresses them over time. For outdoor ponds, seasonal drawdown in late fall or winter mimics natural conditions and gives roots a rest period.
Pruning and managing growth
- Cut dead or brown stalks back to just above the waterline in late winter or early spring before new shoots emerge.
- Do not cut living green stems during the growing season — this stresses the plant and opens entry points for rot.
- Divide clumps every 2 to 3 years when growth becomes dense and the center of the clump starts to die out.
- For Phragmites in a pond: physically cut and remove all above-ground biomass at least once per season to reduce spread pressure. Bag and dispose of cuttings — don't compost, as viable fragments can resprout.
- Juncus clumps that have outgrown their containers can be lifted, divided, and replanted — treat it like dividing ornamental grasses.
When things go wrong: troubleshooting common failures
Slow growth or no new shoots
First, check your light. Reeds planted in partial shade just sit there. If full sun isn't available, growth will be minimal. Second, check water chemistry, pH above 7.5 locks out nutrients for Juncus and can stall establishment. Third, confirm you haven't buried the crown too deep. The crown should be at or near the water surface, not 6 inches down in cold, anaerobic substrate.
Yellowing leaves
Yellow foliage on reeds is usually a pH or nutrient signal. In alkaline water (pH above 7), iron and manganese become less available and leaves yellow from the tips. Bring pH down with peat moss additions to the substrate or acidifying amendments. If the water is correct and leaves are yellowing at the base while new growth is green, it's normal senescence, just trim off the dead material.
Dieback or rotting crowns
Crown rot almost always comes from one of two things: the crown is permanently submerged too deep (more than 6 inches for Juncus, more than a few inches for Phragmites during establishment), or the substrate is anaerobic and compacted with no drainage. Fix: lift the plant, trim rotted material with clean scissors, let the crown air for a few hours, then replant at the correct depth in fresh substrate.
Algae overgrowth
Algae and reeds compete for nutrients, and if your reed planting is young and sparse, algae often wins initially. Avoid adding extra fertilizer (which feeds algae more than established reeds), increase planting density, and consider adding a fast-growing floating plant like duckweed or water lettuce to shade the surface while your reeds fill in. Once the reed canopy closes, shade from the stems and leaves naturally suppresses most algae.
Pests and disease
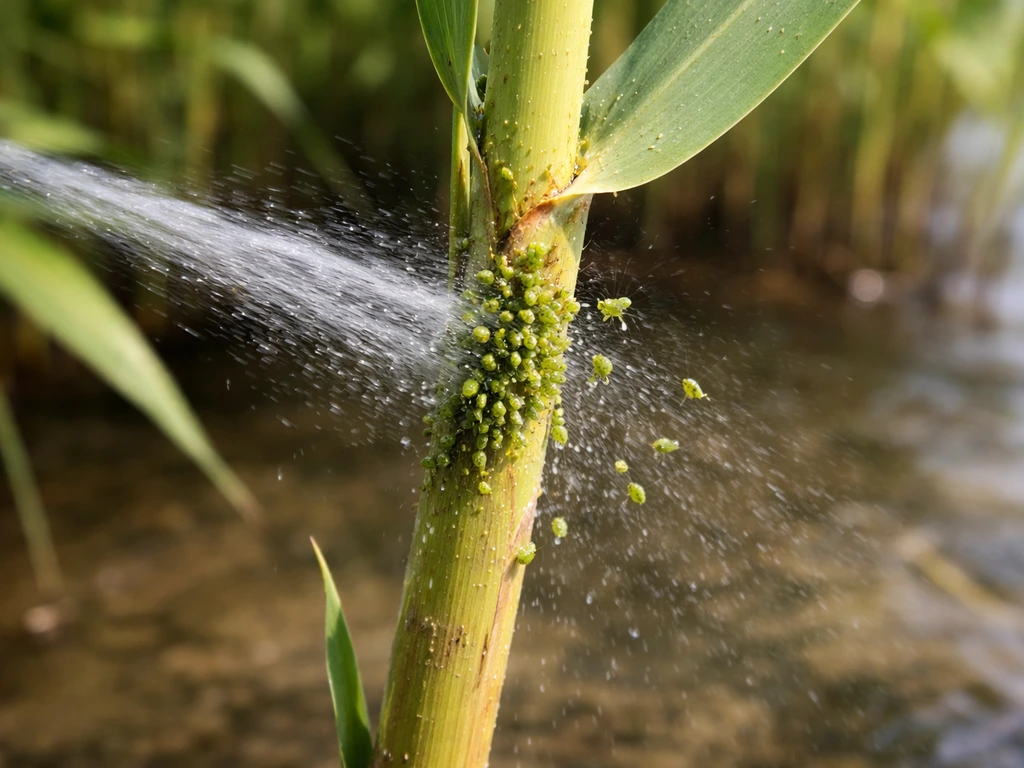
Aphids and reed stem borers are the most common pest issues on Phragmites. Knock aphids off with a strong water spray and introduce beneficial insects if possible, avoid systemic insecticides near water. Fungal leaf spots usually appear when plants are overcrowded, over-fertilized with nitrogen-heavy products, or in low-airflow conditions. Thin dense clumps, reduce fertilizer, and cut back affected stems at the base.
Containment, invasive spread, and staying on the right side of the law
I can't stress this enough: if you're growing Phragmites australis, the non-native invasive subspecies spreads at a rate of around 30 feet per year via rhizomes under the right conditions, and individual runners can extend 10 feet or more in a single growing season. That's not an exaggeration, it's why this plant is on most state invasive species lists and why some states require permits for any management activity in public waterways. Before you plant, identify which subspecies you have. Native North American Phragmites (subsp. americanus) is far less aggressive; the introduced European strain (subsp. australis) is the problem. Look at stem color, leaf sheath characteristics, and ligule length, or send a sample to your local extension office.
Even Juncus effusus, which is far more manageable, can escape containers and colonize pond margins if not watched. For containment in any setup, use these methods:
- Grow in solid containers with no drainage holes at the bottom, or in solid-sided tubs set into the pond — rhizomes cannot escape through solid walls.
- For in-ground plantings, install a root barrier (12 to 18 inches deep, solid HDPE sheeting) around the planting zone before you plant.
- Inspect the planting zone perimeter every spring before new growth begins and cut or pull any rhizomes that have escaped the barrier.
- Never dispose of clippings, rhizomes, or seeds near a natural waterway — bag everything and send it to general waste, not compost.
- Check local regulations before growing invasive Phragmites: some states require permits for planting, moving, or even controlling it in or near public waters.
If you're dealing with invasive Phragmites on a property you've acquired and need to remove it before replanting with something better, know that chemical control in state waters requires an Aquatic Plant Management permit in many states, and mechanical removal can trigger similar permitting requirements. Call your state's DNR or department of agriculture before you start. Removing invasive Phragmites without a replanting plan also creates bare ground that the plant quickly recolonizes, always have native species ready to fill the space. This is the same principle that applies when growing other marginal water plants, such as understanding propagation timing when you study how to grow mangrove propagule, timing your replacement planting matters enormously for preventing re-invasion.
Harvesting reeds and keeping the stand going year after year
Reeds are perennial, so the goal isn't really 'harvest and replant' the way you'd think about annual vegetables, it's more about sustainable management of an ongoing stand. That said, there are legitimate reasons to harvest: using dried Phragmites stems for thatching, basketry, or mulch; cutting Juncus for floral arrangements or wetland restoration plugs; or dividing clumps to start new containers.
When and how to harvest stems
Cut stems in late fall after they've turned brown and dried naturally on the plant. At this point the plant has drawn nutrients back into the rhizomes for winter storage, so cutting doesn't deplete the root system. Leave the bottom 6 to 12 inches of stem above the waterline to protect the crown from cold and allow gas exchange in the rhizome zone. Don't harvest more than one-third of the stand at once, leaving two-thirds intact protects root biomass and spring regrowth.
Dividing and propagating new plants
Spring is the ideal time to divide, just as new shoots are beginning to emerge from the rhizomes, typically when soil temperatures hit around 50 to 55°F. Dig up the edge of an established clump rather than the center (the center is often the oldest, least vigorous part). Cut rhizome sections 6 to 8 inches long with at least two growth nodes each. Replant divisions immediately in prepared substrate at the correct depth, or hold them in shallow water for up to 48 hours before planting. This approach scales well, one established container of Juncus can easily yield 6 to 10 new plugs per division cycle.
If you're building out a larger water garden or pond system with multiple plant zones, thinking through how different emergent and floating species interact is worth the time. For example, understanding how woody water plants anchor and propagate can inform your overall wetland design, reading about approaches like how to grow mangroves in freshwater can help you think through layered, multi-species systems that are more stable and self-sustaining than a single-species reed bed.
Signs your stand is healthy and productive
- New shoots emerge in early spring from established rhizomes (good root vigor)
- Stems are upright, not flopping or yellowing by midsummer
- The stand is filling in evenly rather than dying in the center
- Water clarity around the planting zone is good (reeds are actively filtering nutrients)
- No significant dieback patches or large areas of standing dead stems within an actively growing stand
Get the species right, start with rhizome divisions, nail the water depth and light, contain the roots from day one, and these plants will reward you with a dense, productive stand that does real work in your water system for years. The most common failures all come down to the same few mistakes: too little light, wrong water depth, or skipping containment. Fix those three things and you're most of the way there.
FAQ
Why do my reeds grow but never fill in densely?
If you see tall, hollow looking shoots but the stand does not thicken, the most common cause is under-planting or crowns kept too deep. Recheck spacing, make sure the crown is at or just below the water surface, and give full sun before adding fertilizer.
Can I grow reeds in a container without a pond, and what changes?
Yes, you can start with container wetland baskets, but the key is avoiding “drying out at the edges.” Use a clay-loam base capped with pea gravel, keep the crown at the correct depth, and ensure the whole basket stays uniformly wet, not alternating between dry and flooded.
What should I do if the crown is buried too deep?
If you accidentally planted too deep, do not wait for a full season. Lift the clump carefully, trim off any soft or blackened crown tissue with clean scissors, air-dry the crown for a few hours, then replant at the correct depth (not far below the waterline).
My tap water is alkaline. Will my reeds still grow?
Reeds are relatively tolerant, but for Juncus the biggest stall factor is high pH water, especially if it stays above 7.5. If your water is alkaline, amend the substrate (peat moss or other acidifying media mixed into the top layer) rather than trying to adjust pH only in the water.
How long will it take before algae reduces after planting reeds?
In a natural pond, don’t expect instant clarity. Algae usually wins while the reed stand is still sparse, but once the canopy closes, nutrient competition shifts. Add plants at a higher initial density and avoid any new nitrogen-heavy additions during early establishment.
Should I cut back reeds for winter, and when?
For winter, the safest approach is to let stems brown naturally and only cut in late fall after the plant has pulled nutrients back into the rhizomes. Keep a portion of the stem above the waterline, about 6 to 12 inches, to protect the crown and maintain gas exchange in the rhizome zone.
Will stem cuttings work to grow more reeds?
The most reliable long-term propagation method is rhizome division, because many “reed-like” plants do not root from cut stem pieces. If you try stem cuttings anyway, treat them as experimental and expect poor success compared to divisions.
How do I fertilize reeds in an aquaponics or fish tank?
In fish ponds or aquaponics, avoid applying granular fertilizer near reeds. If you must supplement in nutrient-poor setups, use a slow-release plant tablet placed in the substrate near roots, and wait until spring, not mid-summer.
What’s the best first step for aphids or stem borers on reeds?
If your reeds are getting aphids, a strong water spray often knocks them down without chemicals. If the problem persists, improve airflow and spacing first, because crowded, over-fed plants also attract and support more pest pressure.
What containment measures actually prevent reeds from escaping into the pond margin?
Containment depends on the species and how the system drains. For Juncus, containers and basket systems reduce spread, but you still need to prevent rhizomes escaping at waterline gaps. For Phragmites, containment must be treated as a major project, including careful management around any overflow, pumps, or seasonal drawdown.
How can I tell whether yellow reed leaves mean nutrient trouble or normal aging?
Yellowing from the tips is often an issue of water chemistry, not age. If yellowing starts at the tips in alkaline conditions, address pH first and consider iron availability via substrate amendments, then only trim after you confirm new growth is healthy.
When is the best time to divide and replant reed clumps?
Repotting timing matters. Divide in spring when shoots begin to emerge, when soil or media temperatures are around 50 to 55°F. Dividing during peak summer heat or during cold establishment tends to slow regrowth.