If you're already comfortable with hydroponic and aquarium-style systems, alocasia corm propagation in water will feel familiar. You're essentially creating a small, controlled aquatic propagation chamber. The principles are the same: oxygen availability, clean water, stable temperature, and the right amount of light. This guide walks you through the whole process, from picking the right corm all the way to transitioning your new plant into a semi-hydro or soil setup.
Picking and prepping healthy corms
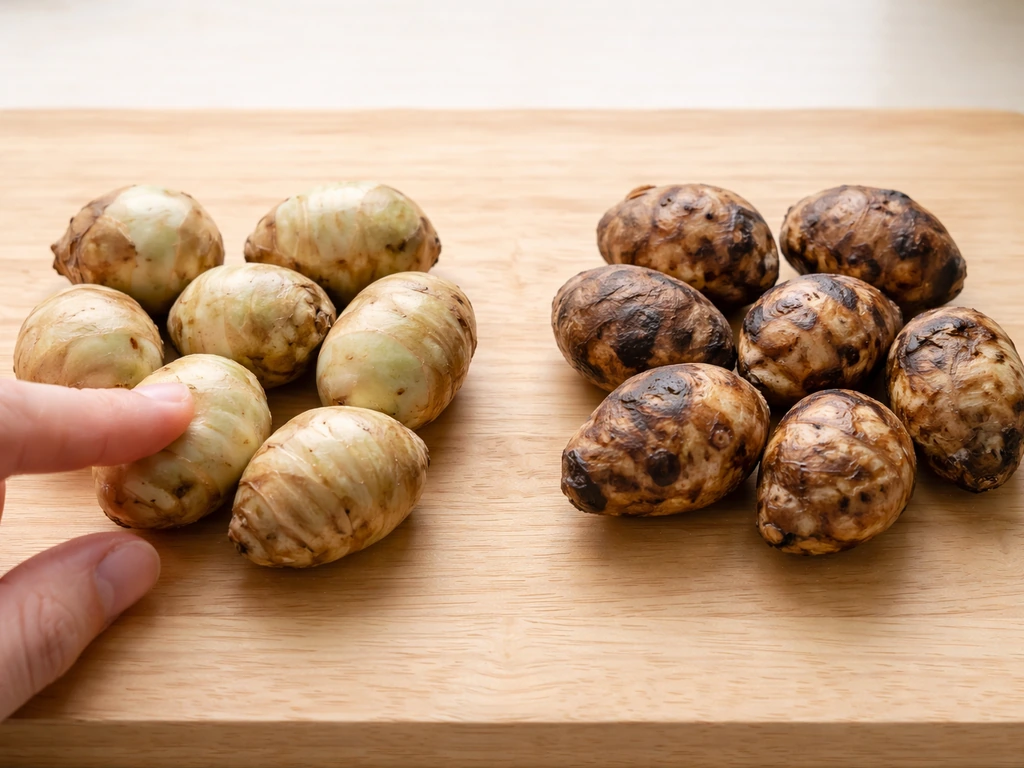
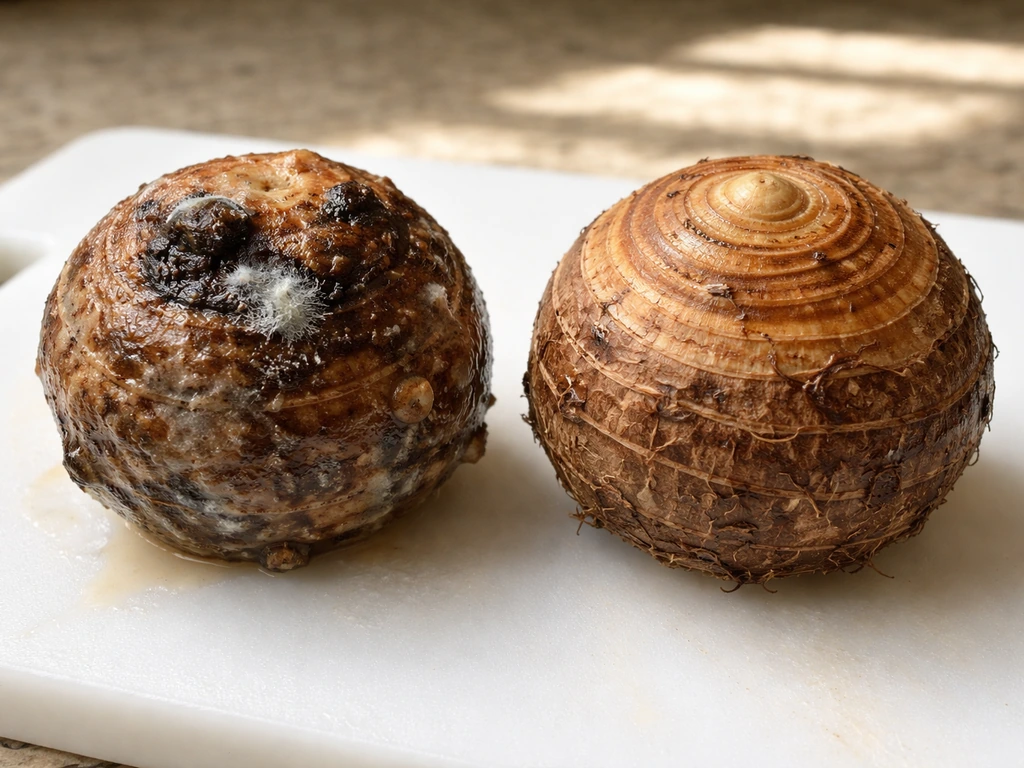
Before anything touches water, you need to inspect every corm carefully. The most important check is firmness. A healthy corm feels solid and dense when you press it. If there's any give, softness, or mushy spots, that corm is already carrying rot and will almost certainly fail in water. Soft spots indicate internal degradation, and water speeds that up dramatically. Discard any corm that fails the squeeze test, even if it looks fine on the outside.
Color is the secondary check. Healthy corms are usually pale to light tan or greenish. Dark patches, white fuzzy growth (mold), or a slimy exterior are all red flags. Mold on the surface can sometimes appear when corms have been stored cold for too long or arrived late in poor packaging. If you see surface mold but the corm is still firm underneath, you may be able to salvage it, but you need to sanitize it before it goes anywhere near your water setup.
For prep, trim away any excess root mass and leave just the clean corm. You don't need trailing roots attached at this stage, and extra organic material just adds rot risk in a water environment. If a corm has a small area of surface damage or dried rot, trim it back to clean tissue with a sterilized blade, then treat the cut surface. [A dilute 3% hydrogen peroxide solution works well here](https://www2.
gov. bc. ca/assets/gov/farming-natural-resources-and-industry/forestry/tree-seed/tree-seed-publications/seedhandlingguidebook_hi. pdf): mix about 10 mL of 3% H2O2 per 1 liter of lukewarm water, dip the corm briefly, then rinse it thoroughly with clean lukewarm water.
After the dip, let the cut surface air dry and form a light callous for an hour or two before placing it in your water setup. Don't skip the drying step, it's what keeps fresh cuts from becoming new entry points for rot.
While you're getting corms ready, it's also a good time to sanitize your containers. Rinse any vessel with a 1-part bleach to 9-parts water solution and let it soak for 5 to 10 minutes, then rinse thoroughly before use. Pathogens left over from previous grows can tank a new propagation batch fast.
Container choice, water depth, and aeration
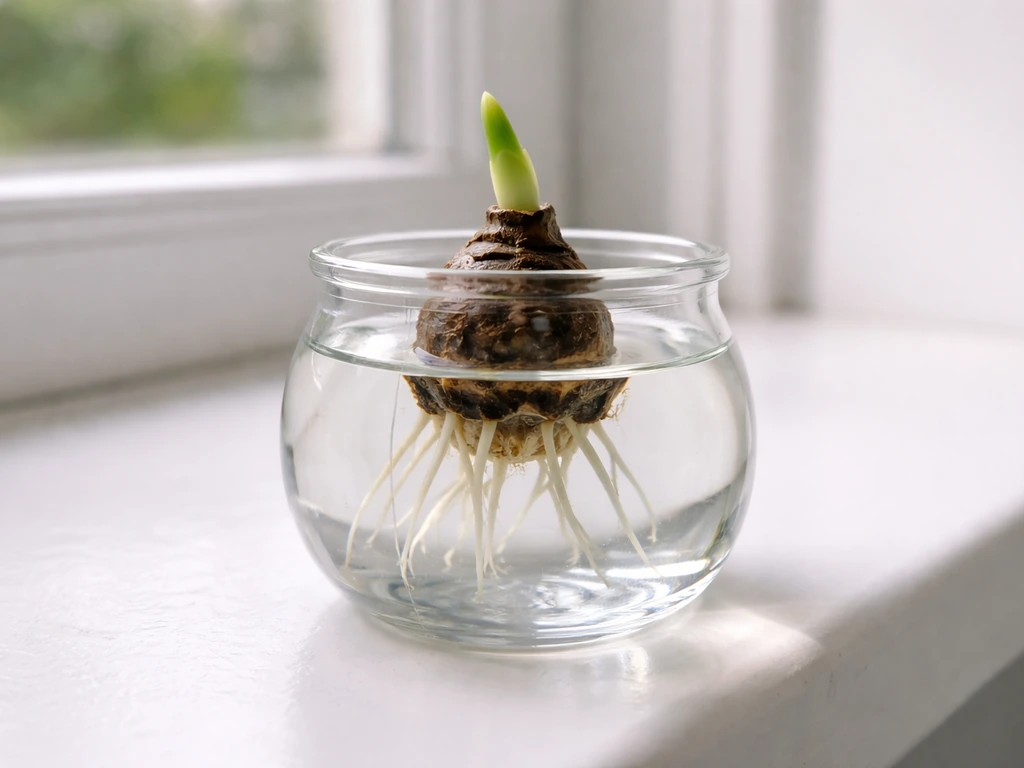
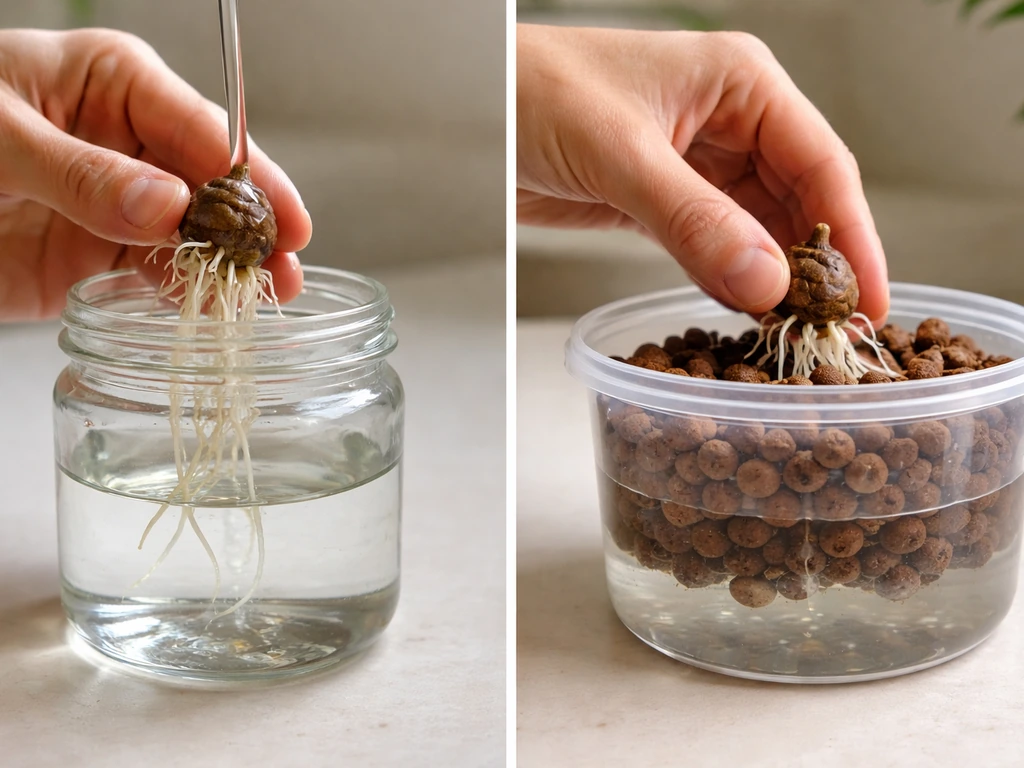
Container size and shape matter more than most people think. A shot-glass-sized vessel is actually ideal for single corm propagation. The small volume means you're not drowning the corm, water changes are fast, and the confined space helps you control the environment precisely. Clear glass or clear plastic is best because you can monitor root development and water quality without disturbing anything.
Water depth is critical. The goal is to touch the base of the corm to the water surface without submerging the whole thing. Think of it like a half-submerged float, bottom in, top out. One reliable method is to suspend the corm horizontally using a small plastic mesh basket or a piece of plastic with holes cut in it, sitting the corm about 1 inch above the water line so only the very bottom makes contact. This keeps the bulk of the corm in humid air rather than sitting in stagnant water, which dramatically cuts your rot risk.
Oxygenation is the biggest factor separating successful water propagation from failure. Stagnant water depletes oxygen fast, and once it does, anaerobic bacteria take over and rot the corm from the bottom up. You have two practical options here: run a small aquarium air stone continuously in your container, or change the water daily.
An airstone, also called an air bubble diffuser, is a device that diffuses air into aquarium water to provide aeration and oxygenation through gas exchange at the surface run a small aquarium air stone continuously in your container. If you already work with aquarium or hydroponic systems, adding a micro air stone is the obvious choice.
It keeps oxygen levels up constantly and you don't have to think about it. Daily water changes work too, but they require more discipline, and missing a day in warm conditions can be enough to tip a borderline corm into rot. For most growers reading this, an air stone is the better call.
Step-by-step: sprouting alocasia corms in water
- Inspect and select only firm, blemish-free corms. Discard anything soft or mushy.
- Trim excess root material from the corm base so you're working with a clean, compact corm.
- If there are any surface cuts or minor damage, treat with a dilute 3% hydrogen peroxide dip (10 mL per 1 L of water), rinse well, and let the cut area air dry for 1 to 2 hours.
- Sanitize your container with a 1: 9 bleach-to-water solution, soak 5 to 10 minutes, then rinse completely.
- Fill your vessel with room-temperature, chlorine-free water. If you're using tap water, let it sit uncovered for 24 hours first to off-gas chlorine, or use filtered water.
- Position the corm so only its base touches the water surface. Use a mesh support or a toothpick-and-rubber-band suspension trick if needed to hold it at the right height.
- Place an aquarium air stone in the vessel and run it continuously. Alternatively, plan to change the water every 1 to 2 days.
- Move the vessel to a warm, bright spot (more on exact targets in the next section).
- Check the corm daily. Look for root emergence (usually from the bottom) and early shoot development (from the top or side). Change water every 2 to 3 days minimum, or immediately if it becomes discolored or cloudy.
- When roots reach 1 to 2 inches long and a shoot is clearly visible and growing, the corm is ready to transition out of water.
This method is similar in principle to how to grow corms in water for other species, and a lot of the same oxygen and water-freshness rules apply across the board. The main thing that makes alocasia corms specifically tricky is their sensitivity to anaerobic conditions, so the oxygenation step is non-negotiable.
Light, temperature, and water quality targets
Temperature is the biggest driver of how fast you'll see results. For sprouting, aim for 77 to 86°F (25 to 30°C) in the root zone. That's warm, but it's the sweet spot where corms break dormancy and push roots quickly. Once you see active vegetative growth, you can drop back to 72 to 79°F (22 to 26°C) for ongoing development. If your space runs cooler than 72°F, expect slow or stalled progress. A simple aquarium heater set to the right temperature works well in a larger vessel, or you can use a seedling heat mat under the container.
For light, alocasia corms don't need intense light to sprout, and direct sun can warm the water past safe levels and encourage algae. Bright indirect light is the target: around 400 to 800 foot-candles (roughly 80 to 160 µmol) is plenty to get things moving. A 12 to 14 hour photoperiod under a grow light works well if you don't have a good natural light source. Keep the vessel away from direct south- or west-facing windows unless you're filtering the light.
Humidity around the corm matters too, especially if the top portion of the corm is sitting in open air above the water line. Target 60 to 80% relative humidity in the propagation space. A simple plastic dome or loose plastic bag over the vessel holds moisture in. If you use a dome, open it daily for at least 15 to 20 minutes to exchange air. A sealed, stagnant dome creates the same problem as stagnant water: it breeds mold and fungal growth.
| Parameter | Target for Sprouting | Target for Vegetative Growth |
|---|
| Water/root zone temperature | 77–86°F (25–30°C) | 72–79°F (22–26°C) |
| Ambient humidity | 60–80% RH | 60–80% RH |
| Light intensity | 400–800 FC (80–160 µmol) | 800–1500 FC (160–300 µmol) |
| Photoperiod | 12–14 hours | 12–16 hours |
| Water change frequency | Every 1–3 days | Every 2–5 days (if still in water) |
| Aeration | Air stone running continuously | Air stone or regular water changes |
Water quality is straightforward: use chlorine-free water, keep it clean and clear, and don't let it sit long enough to go murky. If you notice the water turning yellow or cloudy before your scheduled change, change it immediately. Some growers add a small amount of diluted liquid fertilizer once roots appear, but during the early sprouting phase, keep it plain and clean. Introducing nutrients too early just feeds potential pathogens without meaningfully helping the corm.
Troubleshooting rot, mold, and stalled sprouting
Corm is turning soft or mushy
This is the most common failure, and it almost always comes back to oxygen depletion or the corm being too submerged. If you catch softness early, remove the corm from the water, trim back all soft tissue to firm material with a clean blade, then do the hydrogen peroxide dip again (10 mL of 3% H2O2 per 1 L water, brief soak, rinse thoroughly). Let it callous for an hour, then return it to the water with better positioning or added aeration. If the softness has taken over more than half the corm, it's not going to recover. Cut your losses and start with a fresh one.
Mold on the surface
White fuzzy growth on the above-water portion of the corm usually means there's not enough air circulation around the setup. A Reddit thread in r/alocasia notes that white fuzzy growth on the above-water portion usually points to insufficient air circulation, and it recommends adjusting ventilation around the setup to reduce mold and rot white fuzzy growth on the above-water portion of the corm.
Open your humidity dome more frequently, or switch to a loose plastic bag instead. Wipe the mold off gently, do a light hydrogen peroxide rinse on the affected area, and make sure air is moving around the vessel. This type of surface mold is different from rot, it's a humidity and ventilation problem rather than an oxygen-in-water problem, but if you ignore it, it will spread into the corm tissue.
Corm isn't sprouting after 3 or 4 weeks
First, check your temperature. If the water is below 75°F, you're likely too cold for reliable germination. Warm it up and give it another week. If temperature is fine, try the dry-shock method: pull the corm out, let it dry completely at room temperature for 24 hours, then re-soak it in warm water and return it to your setup. Some dormant corms respond to this cycle by breaking dormancy. It sounds counterintuitive, but it mimics the wet-dry cycle that corms experience naturally in the ground.
Water going cloudy too fast
Cloudy water within a day or two usually means bacterial load is high. This happens with very small containers that can't dilute waste products, with temperatures that are too warm (above 88°F accelerates bacterial growth), or with organic debris in the water. Rinse the corm and vessel at every water change, not just the water. If cloudiness persists, add a small aquarium air stone and increase your change frequency temporarily.
It's worth noting that the rot-and-recovery workflow here is similar to what you'd use for other tropical plants grown in water. If you've ever worked through a dumb cane water propagation failure, the trim-sanitize-recallous approach will feel familiar. The main difference with alocasia is just how fast things can go wrong if you let the water stagnate.
Moving sprouts from water to soil or semi-hydro
Once roots are 1 to 2 inches long and a shoot is clearly emerging and showing green, you have a viable seedling ready to move. Don't wait too long at this stage. Roots that develop in water are adapted to a water environment and the longer they sit, the harder the transition to a drier medium. Move them when they're young and still flexible.
Transitioning to semi-hydro (LECA or similar)
Semi-hydro is actually one of the easiest transitions for alocasia because you can maintain a small reservoir at the bottom of the container during the adjustment period. Alocasia are water-lovers by nature, so keeping that reservoir prevents dehydration stress while the roots adapt to the new medium. The key is to keep roots mostly above the waterline in the LECA rather than fully submerged, so they're wicking moisture rather than drowning in it.
Before placing the seedling in LECA, rinse the water-grown roots gently under clean water to remove any biofilm. This is the same "clean roots, clean start" principle that makes semi-hydro transitions more successful in general: you don't want to carry over any bacterial or fungal load into the new medium. After rinsing, nestle the corm and roots into pre-rinsed, pre-soaked LECA, position it so the roots can reach the reservoir but the corm sits above the water level, and then monitor closely for the first two weeks. An air stone in the reservoir during this adjustment phase can be a decisive factor in preventing root rot while the plant adjusts.
If you want to explore how other tropicals handle this kind of water-to-semi-hydro workflow, growing cannas in water follows some similar principles for rhizomatous tropical plants, including the importance of the reservoir approach during establishment.
Transitioning to soil
If you're going the soil route, use a well-draining, chunky aroid mix (something like 60% perlite or pumice to 40% coco coir works well). Plant the seedling at the same depth it was sitting in the water vessel, so the base of the corm is just at or slightly below the surface. Water it in well, then let the top inch of soil dry out before watering again. The roots need time to adapt from free water to soil moisture, so overwatering in the first few weeks is a real risk.
During the first two weeks in soil, keep humidity high around the plant (a humidity tent or dome works) and keep it out of direct sun. This reduces transpiration stress while the root system settles in. Once you see new leaf growth pushing out, you know the root system is functioning and you can start treating it like a normal established alocasia.
The approach of maintaining a humid, stable transition environment is one you'll see repeated across many water-propagated tropicals. Whether you're working with alocasia corms or propagating a croton plant in water, the transition window is where most losses happen, so slowing things down and staying attentive pays off.
Your ongoing routine at a glance
Here's the practical maintenance rhythm to keep in mind from start to finish:
- Daily: Check the corm for softness, mold, or cloudiness. Open any humidity dome for air exchange.
- Every 1 to 3 days: Change the water, rinse the vessel and the corm base, refill with fresh chlorine-free water at room temperature.
- Weekly: Check your light intensity and temperature readings. Adjust positioning if algae is forming in the vessel (too much light) or sprouting is stalling (too cool).
- At 3 to 4 weeks with no progress: Try the 24-hour dry-shock method, then resume normal setup.
- When roots hit 1 to 2 inches: Prepare your transition medium (LECA or soil), rinse roots, and transplant promptly.
One thing worth mentioning: if you find yourself getting interested in water-based propagation of other aroids alongside your alocasia, growing cryptocoryne is a natural next step for this kind of setup, since they thrive in similar aquatic propagation conditions and look great growing alongside tropical foliage plants.
You can also expand your hydroponic propagation skills by looking at how other bulb or corm-type plants handle water environments. For example, growing camote tops in water is another beginner-friendly water propagation method that reinforces the same fundamentals: clean water, good oxygen, right temperature, and a fast transition once roots establish.
And if you're curious how aquatic plants handle some of the same clean-water and light-management challenges in a fully submerged context, growing cabomba or water caltrop cultivation are worth reading through to strengthen your intuition for aquatic plant systems in general.
The bottom line: alocasia corm propagation in water works reliably when you treat it like the aquatic system it actually is. Keep the water oxygenated, keep it clean, hold the right temperature, and don't let the corm sit fully submerged. Do those things consistently and you'll have roots in a couple of weeks and a healthy new plant shortly after.