Growing hydroids at home is genuinely doable, and the results are fascinating. Hydroids are small colonial marine invertebrates (class Hydrozoa) that anchor to hard surfaces and extend delicate feeding polyps into the water column to catch tiny prey. If you keep a saltwater aquarium or have access to natural seawater, you already have most of what you need to establish a thriving hydroid culture. The key is picking the right species, setting up a small dedicated vessel with steady flow and light, and feeding consistently. This guide walks you through every step.
How to Grow Hydroids at Home in Your Aquarium

Marcus Holloway
16 Apr 2026
What hydroids are and which species are easiest to keep
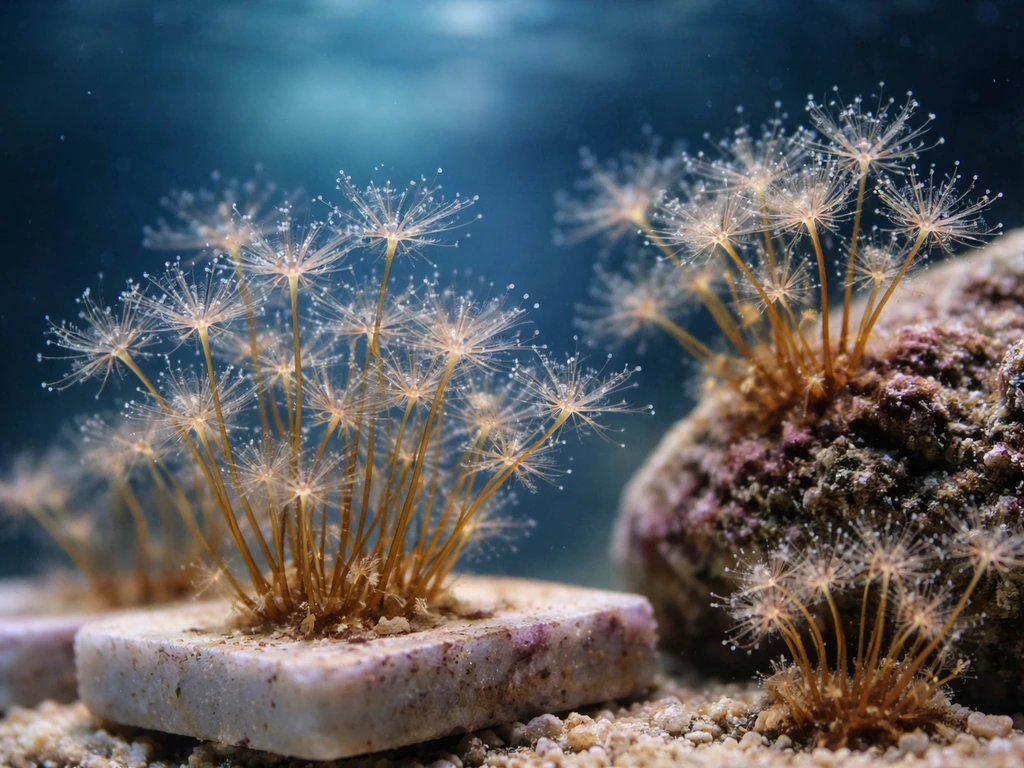
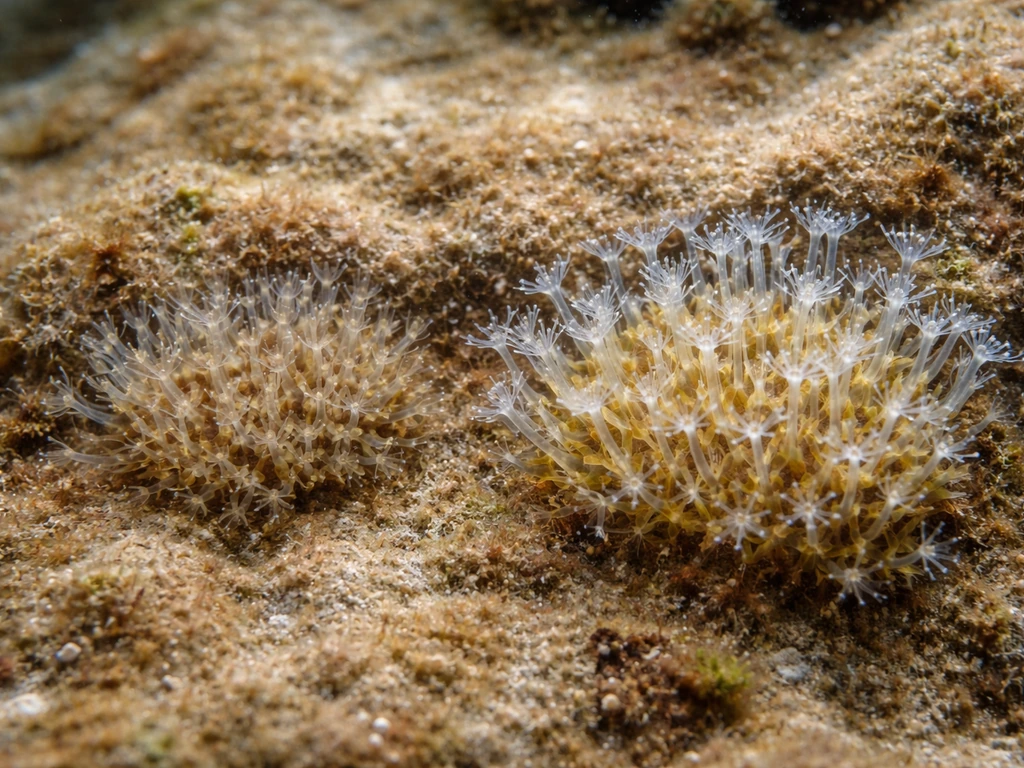
Hydroids are the polyp-stage colonies of hydrozoans. They attach to substrates like rocks, shells, and glass, and form tree-like or bushy structures. Each tiny polyp has a mouth ringed with tentacles that sting and capture microscopic prey. They are not plants, but they grow in a somewhat plant-like way: branching outward from a holdfast, spreading across available surfaces when conditions suit them.
For home cultivation, three genera are worth focusing on. Obelia is arguably the most beginner-friendly. Obelia dichotoma is widespread along U.S. coastlines, forms attractive branching colonies, and tolerates a reasonable range of conditions. It is also one of the easier species to identify and source. Tubularia hydroids are a second great option: colonies look like pink tufts or balls on long flexible stems, giving the appearance of tiny flowers waving in the current. They are visually striking and commonly recognized in the reef hobby. Hydractinia echinata is a third option for those who want the best-documented husbandry protocol. It has been cultured extensively in laboratory settings, so its requirements are well understood. All three are colonial, marine, and manageable at a small scale.
If you are just starting, go with Obelia or Tubularia. They are more forgiving, easier to source from the wild or from fellow hobbyists, and rewarding to watch under even a basic hand lens.
Setting up a home water system for hydroids
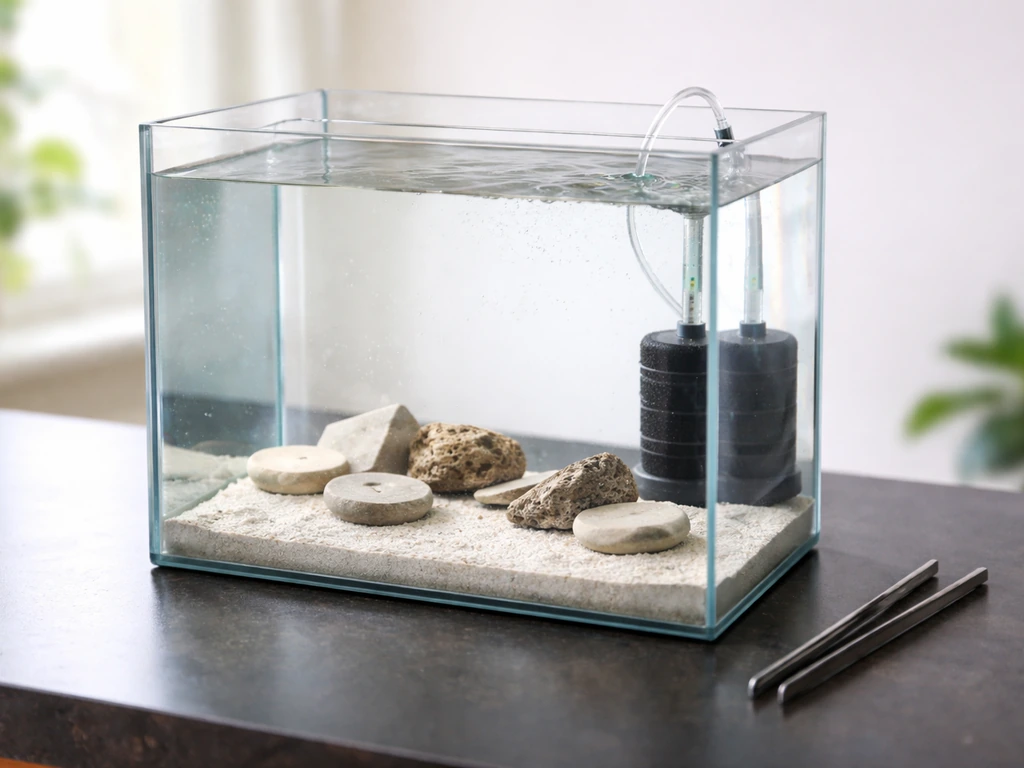
You do not need a large or expensive setup. A 5 to 10 gallon aquarium or a dedicated small vessel works well. I have had success running cultures in purpose-built containers, which keeps them isolated from the rest of a reef system and gives you total control over conditions. If you want a minimal-footprint approach, growing hydroids in a water bottle is a genuinely viable method for a starter culture before scaling up.
Container and surface setup
Use a glass or acrylic container you can see into clearly. Place small tiles, glass microscope slides, or smooth rocks on the bottom as settlement surfaces. Hydroids need something hard to grip. Biofilm matters here: surfaces that have been conditioned in saltwater for a few days develop a thin microbial film that encourages planula larvae to settle and attach. Do not scrub your tiles before introducing hydroid material. Surface wettability also plays a role, and hydrophilic surfaces like glass and polycarbonate consistently produce better settlement results than rougher plastics.
Water flow and lighting
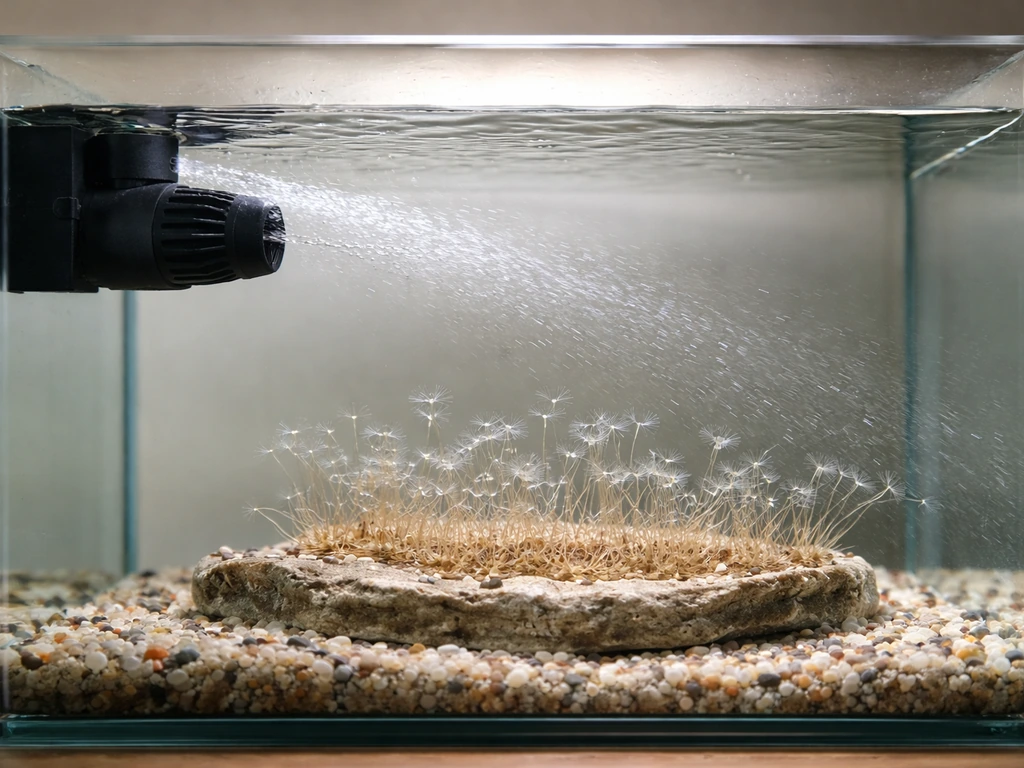
Flow is non-negotiable. Hydroids are filter feeders, and without steady water movement they cannot capture food or flush away metabolic waste. A small powerhead or even a bubbler producing gentle but consistent circulation is sufficient. Aim for low-to-moderate flow, not a strong torrent. Hydroids naturally prefer areas where flow delivers food but is not so strong it tears colonies apart. Position your powerhead to create a circular current rather than a direct blast at your settlement tiles.
Lighting does not need to be intense. Hydroids are not photosynthetic, so they have no minimum light requirement for their own metabolism. That said, ambient light on a 10 to 12 hour cycle helps maintain a natural rhythm and supports any incidental microalgae that contribute to water stability. A standard LED aquarium light running on a timer works well. Avoid direct intense light that heats the water.
Obtaining hydroid stock and starting cultures at home
There are three realistic ways to get your starter material: collect from the wild, source from another hobbyist or aquarium club, or order from a marine biology supply company. Wild collection is effective if you live near a coast. Look for hydroids on pier pilings, dock ropes, shells, and rocky surfaces in the low intertidal zone. Obelia colonies look like tiny feathery branching threads, often pale or translucent. Tubularia looks like clusters of pink-tipped stalks.
Once you have material, use the substrate-transfer method: take a small piece of colony bearing active feeding polyps and gently secure it to a clean tile or microscope slide in your vessel. You can use a small rubber band, a tiny dab of aquarium-safe epoxy near the base, or simply wedge it against the substrate. The colony will anchor itself within a day or two if conditions are right. Avoid touching the polyp heads directly.
If you are working with planula larvae (which some suppliers provide and which colonies release naturally), transfer them gently with a pipette into your vessel over pre-conditioned tiles. Keep the water very still for the first 24 hours after adding planulae to allow settlement. Biofilm-coated glass slides have shown nearly complete settlement efficiency in controlled studies when combined with the right chemical cues, so do not underestimate the value of conditioning your surfaces in advance. In a hydroid literature review on initial larval settlement, surface molecular components and surface chemistry effects are assessed as key influences on planula settlement across taxa Biofilm-coated glass slides have shown nearly complete settlement efficiency in controlled studies when combined with the right chemical cues.
Water parameters hydroids need
Getting the water right is where most home cultures succeed or fail. Hydroids are marine animals and need stable saltwater chemistry. Here are the core parameters to hit and maintain:
| Parameter | Target Range | Notes |
|---|---|---|
| Salinity | 33 to 35 PSU (SG 1.024–1.026) | Hydractinia cultures have been maintained at 34 PSU; avoid sharp swings |
| Temperature | 12 to 18°C (54 to 64°F) for cold-water species; up to 22°C for warmer-water types | Acute temperature spikes cause measurable tissue recession; stability matters more than hitting an exact number |
| Dissolved Oxygen | 6.5 to 8 mg/L | Oxygen drops are an early warning sign of system trouble; monitor regularly |
| Ammonia / Nitrite | 0 ppm | Nitrogenous waste suppresses growth; cycle your system before adding hydroids |
| Nitrate | Below 20 ppm | Elevated nitrate signals overfeeding or insufficient water changes |
| pH | 7.9 to 8.3 | Maintain with water changes and alkalinity; do not let it drift below 7.8 |
Filtration should be gentle mechanical filtration (a sponge filter is ideal) combined with regular water changes. Avoid powerful protein skimmers that can shred delicate polyp colonies. The sponge filter also provides biological filtration to process ammonia and nitrite without generating strong turbulence.
Dissolved oxygen deserves its own emphasis. Low DO often precedes visible colony decline by several days, so checking it once a week gives you an early warning before damage becomes obvious. A basic DO meter or colorimetric test kit is a worthwhile addition to your toolkit.
Feeding and nutrient management for hydroids
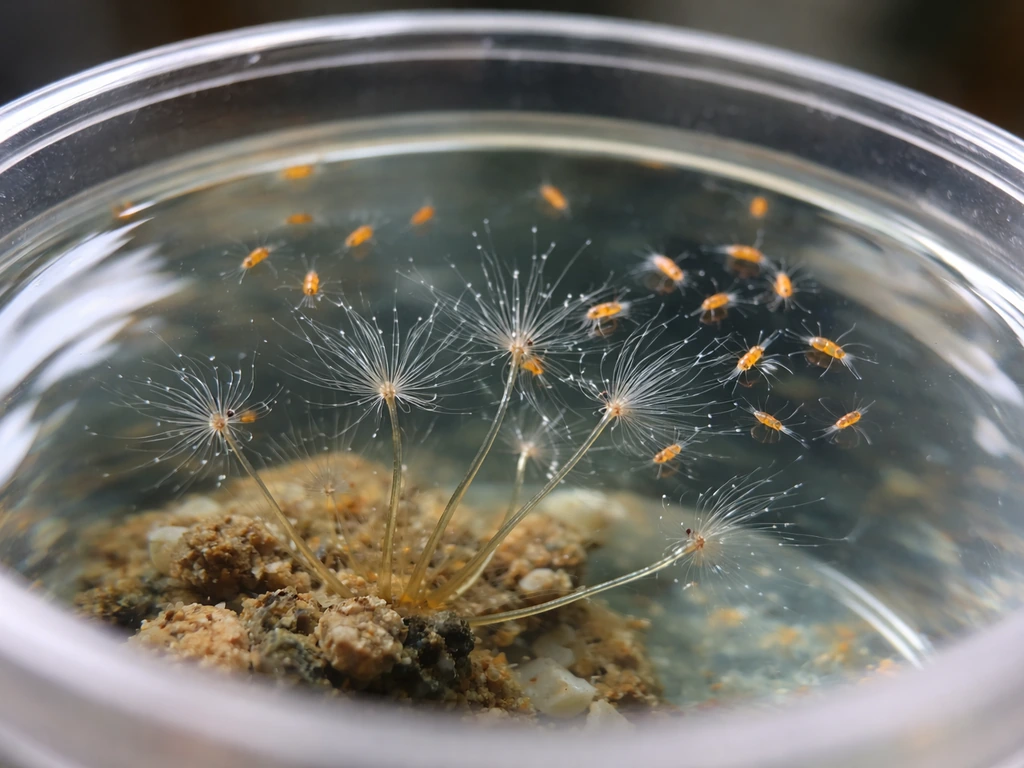
Hydroids are carnivores. They eat zooplankton, larvae, and other tiny swimming organisms that drift into their tentacles. In captivity, newly hatched Artemia salina (brine shrimp) nauplii are the standard food and they work well. Hatch your own Artemia from dry cysts using a small hatching cone and a bubbler. You want nauplii at the two-day-old stage, which is when they are large enough to trigger a feeding response but still small enough for the polyps to handle.
Feed once per day. This is enough to support active colony growth without creating water quality issues from leftover food. For newly settled primary polyps that have just developed their first tentacles, offer freshly smashed or blended Artemia rather than whole nauplii. The smaller particle size makes it accessible to young polyps before their tentacles are fully functional. Transition to whole live nauplii once the colony is visibly growing.
When feeding, turn off the powerhead for 10 to 15 minutes and introduce Artemia with a pipette near the colony, not directly onto it. Once the feeding window is over, turn flow back on and remove uneaten food with a turkey baster to prevent ammonia spikes. Research on Hydractinia growth under food stress confirms that colony size and vitality decrease measurably when feeding is inconsistent, so do not skip days.
You can supplement Artemia with commercially available copepod cultures or rotifers if your colonies are not responding well to brine shrimp alone. Some hobbyists also dose small amounts of phytoplankton to support any incidental filter feeders and to maintain the natural microbial balance of the water.
Maintenance routine: what to do every week
Consistency is what separates thriving cultures from ones that crash. Build a simple weekly routine and stick to it. Over weeks, detritus accumulates at the bottom of the vessel from feeding, and if it is not removed it will drive ammonia and nitrite up and create poor conditions that stress colonies.
- Daily: Feed once with Artemia nauplii; remove uneaten food with a turkey baster 15 minutes after feeding; check that flow is running and polyps are extended.
- Every 3 to 4 days: Test ammonia, nitrite, nitrate, and salinity. Adjust as needed with top-offs of RO/DI water (for evaporation) or saltwater water changes (for chemistry drift).
- Weekly: Perform a 20 to 30% water change using temperature-matched, pre-mixed saltwater. Use a small siphon to remove detritus from the bottom of the vessel during the water change.
- Weekly: Check dissolved oxygen levels and pH. If DO is below 6 mg/L, increase surface agitation or aeration.
- Bi-weekly: Inspect the sponge filter and rinse it gently in removed tank water (never tap water) to restore flow without killing beneficial bacteria.
- Monthly: Inspect settlement tiles and container walls for unwanted hitchhiker organisms. Use a scraper on glass walls if algae is blocking visibility or competing for space.
One thing I have learned the hard way: do not let water changes slip past two weeks. It seems manageable to delay, but water quality degrades fast in a small vessel with daily feeding, and hydroids are the first thing to show the stress. Keep a simple log on the side of the container with the date of the last water change. It takes two seconds and saves a lot of trouble.
Troubleshooting common growth failures and how to fix them
Even with a good setup, things go sideways sometimes. Here are the most common problems and what to do about each one.
No growth after introduction
If your starter colony or planulae show no new polyp growth within 5 to 7 days, check three things first: temperature (is it within the target range?), ammonia/nitrite (even low levels suppress growth), and flow (is water actually moving past the colony?). If all three look fine, the issue is often that the substrate was too clean. Remove the settlement tile, condition it in saltwater for 3 to 5 more days to develop biofilm, and try re-introducing the colony. Biofilm chemistry is a genuine settlement trigger that many beginners overlook.
Tissue recession and polyp retraction
Polyps that retract and stay retracted, or hydroid stems that turn pale and start dissolving from the tips, indicate acute stress. The most common causes are a temperature spike, a salinity swing, or ammonia elevation. Test everything immediately. Do an emergency 30% water change with properly matched water. If you have been using tap water for top-offs, switch to RO/DI water: even small amounts of chloramine or copper can trigger retraction. Hydroids exposed to temperature spikes beyond their tolerance range show measurable tissue recession, and recovery requires getting parameters back into range quickly and then keeping them stable for at least a week.
Colony looks sparse or stops expanding
A colony that was growing but has plateaued usually needs more food. Increase feeding to twice daily for a week and see if expansion resumes. Also check that your Artemia are actually viable, meaning they are swimming actively when you introduce them. Dead or lethargic nauplii are much less effective at triggering the feeding response in polyps. If your brine shrimp hatching rate has dropped, refresh your cysts and hatch a new batch.
Pest organisms competing with hydroids
In a vessel that has been running for a few weeks, flatworms, nudibranchs, and other hitchhiker organisms can appear and prey on hydroid colonies. Inspect tiles carefully under magnification. A turkey baster is useful for removing small invaders. If a tile is heavily infested, pull it out and dip it in a separate saltwater bath for 10 to 15 minutes, which often dislodges soft-bodied pests without harming the hydroid colony itself.
Water quality keeps crashing despite water changes
If ammonia or nitrite keeps spiking despite regular water changes, your bioload from feeding is outpacing your biological filtration. Reduce feeding slightly and make sure you are removing all uneaten food after every feeding event. If the sponge filter looks clogged or dark brown, it needs to be rinsed. Also confirm your vessel was fully cycled before you introduced hydroids. Rushing this step is the single most common reason new cultures crash in the first two weeks.
Expanding your setup and exploring similar aquatic cultures
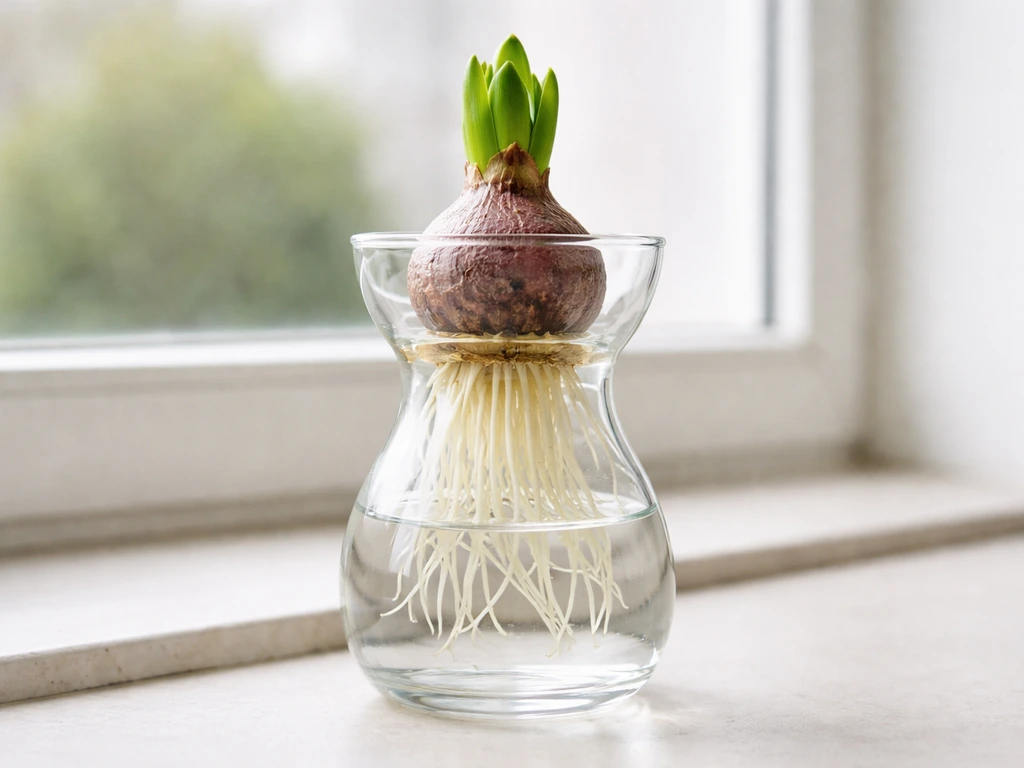
Once you have a stable hydroid culture going, the natural next step is expanding to a larger vessel or experimenting with additional species. The skills you develop managing water chemistry and feeding schedules transfer directly to other aquatic cultivation projects. For example, if you enjoy the meditative quality of watching organisms grow in water, growing a hyacinth bulb in water is a relaxing parallel project that uses similar vessel setups without the saltwater chemistry demands.
If you are interested in growing other organisms in water-based systems with minimal substrate, growing paperwhites in water is another popular approach that hobbyists on this site explore alongside aquatic invertebrate cultivation. And if you want a gravel-anchored approach that parallels how hydroids grip firm surfaces, growing paperwhites in gravel demonstrates how surface texture and anchor points matter for organism establishment, a principle that applies directly to your hydroid settlement tiles.
For those who want to push further into marine microorganism cultivation, growing Haematococcus pluvialis is a rewarding next project: it is a green microalga cultivated in water-based systems, and a thriving Haematococcus culture can actually serve as a live food supplement to support the copepods and rotifers that you might also be feeding to your hydroids.
The biggest thing holding most people back from growing hydroids is the assumption that it requires lab-grade equipment. It does not. A small vessel, steady flow, stable salt water, and daily Artemia feedings are genuinely sufficient to establish and maintain a colony. Start small, be consistent, and troubleshoot methodically when something goes wrong. The learning curve flattens quickly once you have run through one full growth cycle.
FAQ
What salinity range should I keep when I’m growing hydroids?
Target stable salinity for marine livestock, then avoid sudden swings. If you need to correct salinity, do it slowly over several hours, and only with fully aerated water that matches temperature and chemistry, because hydroid retraction often follows abrupt osmotic changes before you notice a visible decline.
What should I do if I accidentally miss a day of feeding?
If you miss a feeding, do not “catch up” by overfeeding. Instead, return to the normal schedule and reduce remaining food immediately with a pipette or turkey baster. Overfeeding can spike ammonia faster than it helps the colony, especially in small vessels.
My hydroids look pale and weak, what order should I troubleshoot things in?
Use temperature stability as your first control point, then flow. If hydroids are pale or declining, check ammonia and nitrite next, because those can quietly accumulate while temperature seems okay. Only after those basics are confirmed should you increase feeding or adjust lighting.
Can I use regular tap water for top-offs if I use dechlorinator?
Yes, but only if the water source is dechlorinated and copper-free, and it does not introduce unknown additives. Many people top off with RO/DI and keep a separate mixing container, then match salinity and temperature before adding to the culture vessel to prevent hidden metals or disinfectant residues from stressing the colony.
What can I do if the hydroid colony won’t attach to the tile?
If your hydroids are not anchoring, the most common fix is to recondition the settlement surface. Remove the tile, let it sit in saltwater with gentle aeration for several more days to build a stronger biofilm, then reattach the colony to a clean, slightly hydrophilic surface (glass or polycarbonate).
How do I tell if my hydroids are actually growing, not just surviving?
Do not measure success only by polyp count. Look for branching or extension over multiple days, tentacles actively opening to capture drifting food, and improved colony density on the same surface area. A colony can look “alive” while still failing to grow if feeding or water movement is off.
How often should I remove detritus from the bottom of a hydroid culture?
Large, visible detritus is not the only warning sign, and biofilms can build unevenly. Lightly siphon the bottom during water changes if debris accumulates, but avoid blasting the settlement tiles. If the sponge filter is going dark or the tank water turns cloudy, you likely need rinsing and more frequent maintenance.
Will planulae spread to other parts of my aquarium, or start unwanted colonies?
Some species release planulae that may settle elsewhere and become nuisance colonies. If you want to keep one species isolated, remove or physically block nearby settlement surfaces when larvae are active, and treat all new tiles as separate from the main culture until you confirm identity.
What’s the best way to clean up uneaten Artemia without harming the polyps?
A turkey baster can work, but the safest approach is to first turn off flow, then remove food residue right after the feeding window and before reintroducing circulation. Avoid touching polyp heads, and use very small volumes delivered away from the colony so you do not mechanically stress tissues.
How do I handle persistent pests like flatworms when they keep coming back?
If flatworms or similar pests keep returning, you likely have an ongoing source on the tile surface. Pull suspect tiles and run a separate pest-treatment dip only on those tiles, then inspect the entire vessel under magnification before reintroducing. Also review food practices, because leftover food and decaying material can support pest populations.
Should I increase water change frequency if my ammonia trend is rising?
Water changes can be done more frequently than the article suggests if your vessel is small and feeding is heavy. A practical decision aid is to match water parameters and do smaller, more frequent changes when ammonia trends upward, rather than waiting for a bigger emergency change.