Yes, you can grow kangkong fully in water with no soil at all. Kangkong (Ipomoea aquatica, also called water spinach) is literally a semi-aquatic plant that grows wild in ponds and along riverbanks, so keeping it in water is not some experimental trick. Ipomoea aquatica is described as a blank" rel="noopener noreferrer">semi-aquatic tropical plant commonly grown for tender shoots. It's actually one of the easiest leafy greens to root and grow hydroponically, and you can go from a stem cutting to your first harvest in under three weeks. Here is exactly how to do it.
How to Grow Kangkong in Water: Step-by-Step Guide

Marcus Holloway
10 Apr 2026
What kangkong is and why water-growing makes total sense
Kangkong is a fast-growing tropical leafy green with hollow, water-filled stems. That hollow stem is part of why it thrives in water: the plant is biologically adapted to float, root into wet substrate, and keep pushing out shoots. In its natural habitat it does exactly what you're trying to do in your container. The stems contact water, roots form within days, and the plant just keeps going.
This makes kangkong an ideal candidate for both simple stem-in-water rooting and more structured hydroponic setups. If you're curious how it compares to growing it in the ground, it helps to understand how to grow kangkong in soil first, because the plant's needs don't change, only the delivery method does. In soil it still wants warmth and moisture. In water, you're just removing the soil middleman and providing nutrients directly to the roots.
One thing to know upfront: kangkong does not perform below 70°F (21°C). At cooler temperatures, rooting slows dramatically and stems can rot before they anchor. Keep this in mind if you're setting up indoors in a cool room or in a shaded outdoor spot.
What you actually need to get started
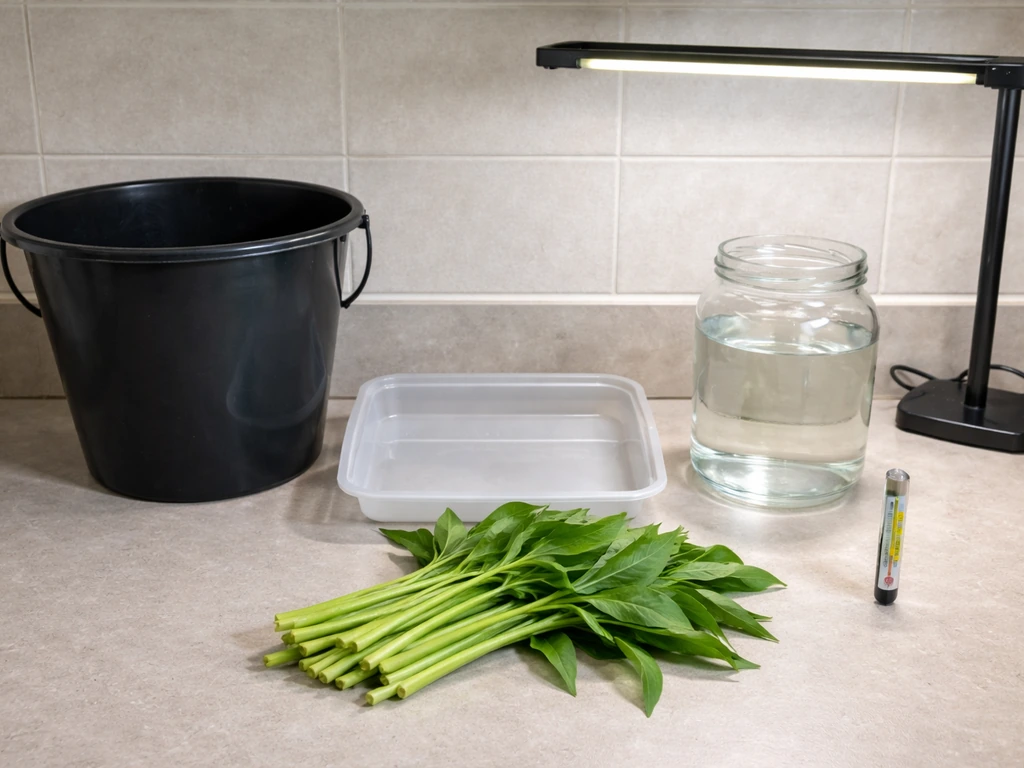
You don't need a complicated system to start. For a basic stem-in-water setup, a wide-mouthed jar, a bucket, or a shallow tray is enough. For a more productive, ongoing setup that gives you consistent harvests, a simple deep water culture (DWC) container works beautifully. DWC suspends plants in a floating raft (often cut from low-density polystyrene foam or HDPE board) with roots hanging down into an oxygenated nutrient solution. That's the setup I'd recommend if you want more than just a few cuttings sitting in a glass.
- Container: an opaque bucket (5-gallon works well), a deep tray, or a shallow pond basin. Opaque is important to block light and prevent algae.
- Floating raft or net cups: cut a polystyrene foam board to fit your container with holes drilled or cut for net cups, or wedge stems directly through foam.
- Air pump and air stone: keeps dissolved oxygen (DO) high, which protects roots and promotes fast growth.
- Hydroponic nutrient solution: a complete liquid fertilizer balanced for leafy greens, mixed into water at the recommended rate.
- pH meter and EC meter (or a combo pen): non-negotiable once you add nutrients.
- pH up and pH down solutions: small bottles, used to adjust solution pH after mixing nutrients.
- Grow light (if indoors): a basic LED panel rated for leafy greens.
- Kangkong stem cuttings: fresh stems from a market, a garden, or cuttings from your own plant.
A note on sourcing cuttings: fresh kangkong stems from an Asian grocery store work surprisingly well if they haven't been sitting in dry cold storage for too long. Look for stems that still feel firm and have a few nodes visible. If the cut end looks brown and dried out, trim it back until you see green.
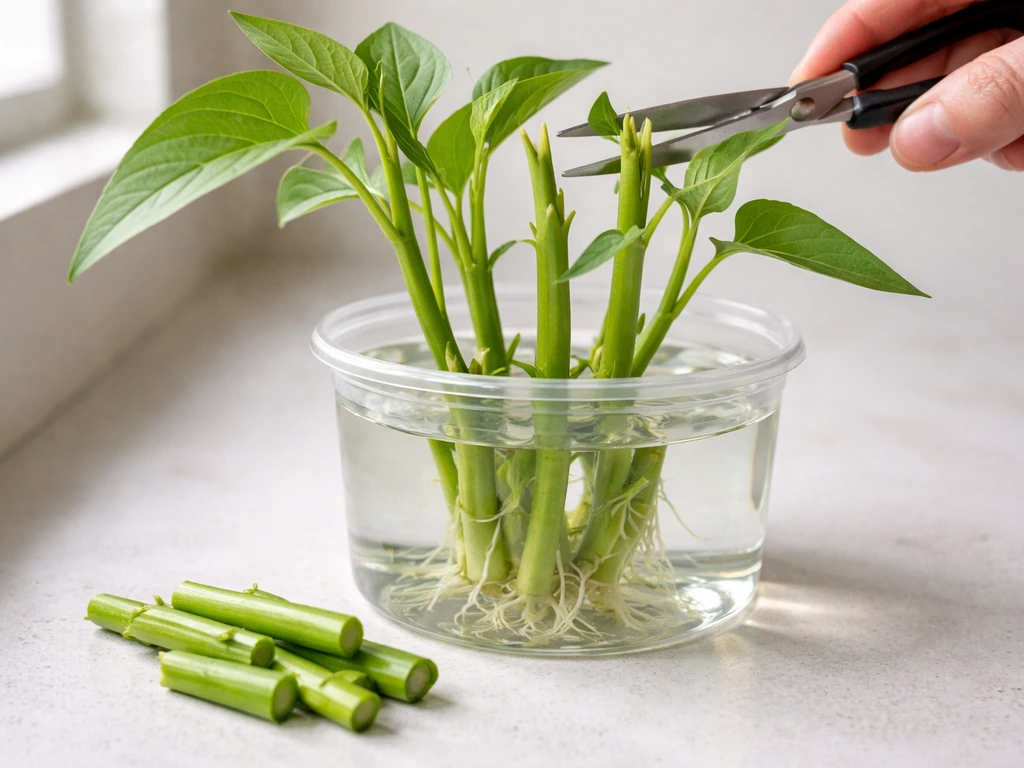
How to root kangkong from stem cuttings in water
This is the quickest entry point and the method I always recommend to beginners. Take cuttings that are roughly 8 to 12 inches long. Each cutting should have at least two nodes (the slight bumps or joints along the stem where leaves attach), because that's where roots emerge. Strip off the lower leaves, leaving only the top two or three, so submerged leaf matter doesn't rot and foul your water.
- Cut your stems to 8–12 inches, trimming the base at a slight angle to expose more surface area.
- Remove all leaves from the bottom half of the stem. Keep two or three leaves at the top.
- Fill your container with plain water or very lightly diluted nutrient solution (around 25% of full strength at this stage).
- Place stems so the bottom 3–4 inches are submerged, with at least one node underwater. You can prop them through holes in a foam raft or lean them against the container edge.
- Keep water temperature between 75–85°F (24–29°C). This is the single biggest rooting variable.
- Place in bright indirect light or under a grow light. Avoid direct harsh sun at this stage.
- Check after 3 days. Under warm conditions, white root nubs will appear at the nodes within 3–5 days.
I've had cuttings show visible roots in as little as 2.5 days in a warm kitchen with indirect light. I've also had the same cuttings sit for 10 days and barely do anything when the room temperature dropped to around 65°F at night. Temperature matters more than anything else at this stage. If you can, sit your rooting container on a seedling heat mat.
This basic rooting approach is similar to what works for other tropical plants you might be experimenting with. If you've tried how to grow panikoorka in water, you'll recognize the same logic: tropical, semi-succulent stems root fast in warm water and slow right down in cool conditions.
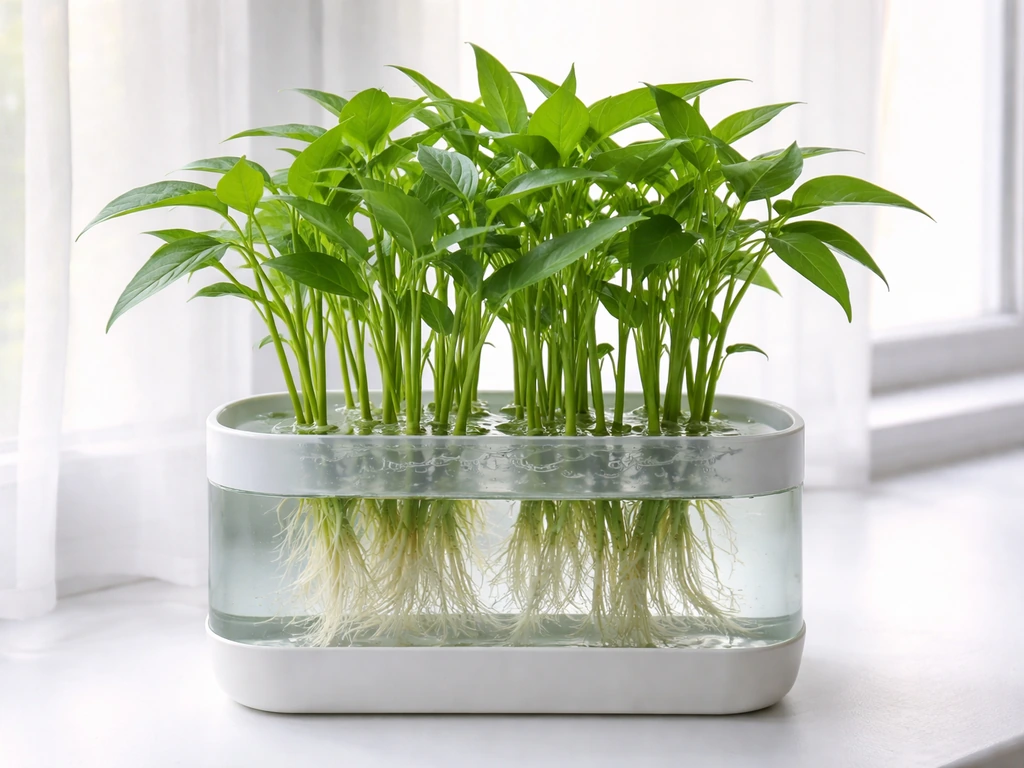
Step-by-step: setting up your full soil-free growing container

Once your cuttings have a visible root system (roots at least 1–2 inches long and branching slightly), it's time to move them into a proper growing setup. Here's the full process for a DWC-style container that will carry them through to harvest.
- Fill your opaque container with water. For a 5-gallon bucket, you'll use roughly 4 gallons of solution once the raft is in place.
- Mix your complete hydroponic nutrient solution according to package directions for leafy greens, targeting an EC of 1.0–1.8 mS/cm for young plants. You can push to 1.8–2.2 mS/cm once the plant is actively growing.
- Check and adjust pH. Target a range of 5.8–6.5. Kangkong can tolerate a wider pH band (5.3–8.5 biologically), but you'll get the best nutrient uptake in the 5.8–6.5 window. Add pH down or pH up drop by drop, stir, and recheck.
- Connect your air pump and air stone. Run it continuously. Drop it to the bottom of the container.
- Cut your foam raft to fit the container top with a small gap around the edge for airflow. Cut or drill holes sized for your net cups.
- Place rooted cuttings into net cups or through raft holes so roots hang into the solution and the stem is supported just above water level.
- The air stone will create surface agitation that splashes the lower roots and keeps DO high. Roots should never sit in totally still, stagnant water.
- Top up the container with fresh nutrient solution every 2–3 days as water evaporates. Do a full water change every 7–10 days to prevent salt buildup and nutrient imbalances.
Kangkong grows fast once rooted. You should see new leaf growth within the first week of transfer. Shoots will extend noticeably every day in warm conditions, which is one of the most satisfying things about this plant. By the time you're around 3 weeks in from a fresh cutting, you'll have your first harvest.
If you enjoy this kind of water-based growing, you might also want to explore how to grow kumara in water, which uses a similar propagation approach for a starchy tropical root crop. The technique is transferable.
Light, water temperature, and water quality: the three things to actually monitor
Light
Kangkong is a tropical plant that wants a lot of light. Outdoors in the tropics, it gets full sun. Indoors, target a PPFD of 200–400 µmol/m²/s at canopy level with 14–16 hours of light per day. Give the plant at least 6–8 hours of darkness. Running lights 24 hours straight doesn't help and can actually stress the plant. A simple timer set to 16 hours on, 8 hours off is a reliable starting point.
If you don't have a light meter, use the practical rule: your LED panel should be close enough that the leaves look bright and healthy, but not so close that newer leaves look bleached or curl. Most budget LED panels for leafy greens work well at 12–18 inches above the canopy.
Water temperature
Keep your nutrient solution between 65–75°F (18–24°C). This is cooler than the air temperature you want for the plant, and that's intentional: root zone temperature and air temperature are managed separately. Warm water holds less dissolved oxygen, so if your solution temperature climbs above 75°F, your DO drops and root health suffers. This is one of the most common silent killers in DWC systems.
Water quality targets at a glance
| Parameter | Target Range | Notes |
|---|---|---|
| pH | 5.8–6.5 | Check daily when starting out; adjust with pH up/down |
| EC (nutrient strength) | 1.0–1.8 mS/cm (seedling/rooting), 1.8–2.2 mS/cm (active growth) | Lower EC for young plants to avoid burning |
| Dissolved oxygen (DO) | >6 mg/L | Run air stone continuously; cooler water holds more DO |
| Water/solution temperature | 65–75°F (18–24°C) | Keep below 75°F to maintain adequate DO |
| Air temperature (canopy) | 75–90°F (24–32°C) | Kangkong loves warmth above the waterline |
A basic pH/EC combo pen costs under $20 and is worth every cent. You cannot reliably eyeball pH drift or nutrient concentration. Checking once a day when you're new to this, then every two to three days once you have a feel for how your system behaves, is a reasonable routine.
Feeding kangkong and stopping problems before they start
Nutrients
Plain water alone will root your cuttings, but it won't grow a productive plant. Once roots are established, your plant needs a complete nutrient solution. This means a balanced formula with nitrogen, phosphorus, potassium, calcium, magnesium, sulfur, and micronutrients. A two-part or three-part hydroponic nutrient kit designed for leafy greens is the easiest option. Mix it to the EC targets in the table above. Kangkong is not a heavy feeder compared to fruiting crops, so don't be tempted to overfeed. High EC causes tip burn and root damage.
Top up with plain water between changes to compensate for evaporation, and do a full reservoir change every 7–10 days to prevent salt accumulation. This is the same principle behind keeping bamboo growing in a water vase healthy: stagnant, chemically imbalanced water causes problems that fresh water prevents.
Root rot and stem rot
Root rot is the most common failure in water-based systems, and Pythium is the most likely culprit. Pythium is a water-borne pathogen that thrives in warm, low-oxygen, stagnant conditions. Brown slimy roots, mushy stem bases, and sudden wilting despite full water are all signs of it. Prevention is easier than treatment: run your air stone non-stop, keep water temperature below 75°F, change your reservoir on schedule, and use an opaque container to prevent algae (algae signals low oxygen conditions that also favor Pythium). If you catch root rot early, remove affected stems, do a full water change with fresh nutrient solution, and increase aeration. If it's advanced, that cutting is likely lost.
Yellowing leaves
Yellow leaves on kangkong in a water system almost always come down to one of three things: pH drift that locks out nutrients, EC that's too low (the plant is hungry), or dissolved oxygen that's too low (roots can't absorb nutrients even if they're present). Check all three. If pH is above 7.0, bring it down. If EC has dropped below 1.0, top up with nutrient solution rather than plain water. If DO is low, check that your air pump is working and add a second air stone if needed. A partial water change of 30–40% with fresh nutrient solution often fixes yellowing quickly when the root cause isn't obvious.
Algae buildup
Green algae growing on your container walls or in your solution means light is getting in. Algae competes with your plant for nutrients and oxygen and makes root health worse over time. Fix it by switching to an opaque container or wrapping your current container in black plastic or foil. Make sure your raft covers the water surface fully with minimal gaps.
Once algae is established, a full drain, scrub, and rinse of the container during a scheduled water change clears it. This same principle applies to other water-growing projects: when I was figuring out how to grow lucky bamboo in pebbles in a glass vase, algae on the glass was the first sign that light exposure needed to be controlled.
Weak or slow growth
If your kangkong is sitting still and not putting out new shoots after two weeks in the full growing setup, temperature is usually the issue. Check your air temperature at canopy level. If it's below 70°F, move the setup somewhere warmer or add a small heat mat under the reservoir. Weak, leggy, pale growth with stretched internodes usually signals insufficient light. Move your grow light closer or extend your photoperiod to 16 hours.
Harvesting and keeping your setup going
Start harvesting when stems reach 10–14 inches from the base of the plant. Cut the top 4–6 inches of each stem, leaving at least two leaf nodes on the remaining stem. Those nodes will each push out two new shoots, which means every harvest multiplies your future yield. You can harvest every 10–14 days once the plant is established. This cut-and-come-again approach is what makes kangkong so productive in a water system.
For a more scalable approach to indoor water-based cultivation, it's worth looking at what a full system looks like, including pump timing, raft spacing, and nutrient management. Growing kangkong hydroponics covers the larger setup side of things if you want to move beyond a single bucket.
What to adjust if growth stalls after a few weeks
If your plant starts strong and then slows down, the most likely causes are nutrient imbalance from salt accumulation, a pH that has drifted out of range, or roots that have outgrown the container and are getting compacted or poorly oxygenated. Start with a full reservoir change, recheck pH and EC, and confirm your air stone is still working and positioned at the bottom. If roots look dense and matted, thin them gently by removing dead brown root mass with clean scissors.
A stalled plant that has multiple stems can also be rejuvenated by taking new cuttings from the healthiest shoots and starting a fresh container alongside the original. You now have rooted cuttings ready to transfer in under a week. Kangkong regenerates fast enough that a rolling restart is genuinely easy to do, and it's the approach that experienced growers use to keep production continuous. If you find yourself interested in other plants that sprout similarly well from simple water propagation, growing monggo seeds in water follows a comparable beginner-friendly process, and so does sprouting coconut in water for longer-term tropical projects.
The bottom line: kangkong is one of the most forgiving plants you can grow in water, and once you understand the four variables (temperature, light, pH, dissolved oxygen), you'll rarely have a failure. Get a rooted cutting into a warm, lit, oxygenated nutrient solution at the right pH, and this plant will do the rest.
FAQ
What water should I use, tap water or filtered water?
Use dechlorinated water if your tap has chlorine or chloramine, because it can stress roots and disrupt nutrient uptake. Let tap water sit uncovered 24 hours for chlorine (not reliably for chloramine), or use a simple carbon filter. Then set pH and EC to your targets with your nutrient mix.
Do I need an air pump and air stone if I’m only rooting cuttings in a jar?
For plain-water rooting, aeration is helpful but not always mandatory. If you see slimy bases, slow root growth, or warm water, add an air stone and keep the solution cooler (below 75°F). Once you move to DWC for ongoing growth, aeration becomes critical.
How much nutrient should I start with, should I begin at full strength?
Start at a moderate EC and ramp up gradually once you see active new leaf growth. Jumping straight to high EC often causes tip burn or root damage, especially in new DWC setups where the roots are still adapting.
Can I grow kangkong in a clear container if I keep it out of direct sunlight?
Clear containers usually encourage algae even under indirect light, and algae can lower dissolved oxygen. If you only have clear plastic, wrap it in opaque material, or use a sleeve to block light reaching the nutrient solution and inner walls.
How do I prevent leaf rot if some leaves are touching the water?
Keep all submerged tissue leaf-free. Strip lower leaves so only the top leaves remain above the waterline, and trim any leaf that falls into the solution. Leaf rot creates organic buildup that feeds microbes linked to root problems.
What should I do if my pH keeps drifting up or down quickly?
Frequent pH swings usually mean you are topping off with plain water too often or your reservoir is too small. Use a daily pH check while learning, top up with nutrient solution (not just water) when EC drops, and perform the full reservoir change on schedule.
My plant looks pale and growing slowly, could it be light or temperature?
Check temperature first if nights are near or below 70°F. Then assess light quality by watching for stretched internodes and weak stems. If light is insufficient, moving the grow light closer or extending to 16 hours of light helps more than increasing nutrients.
How can I tell if yellow leaves are nutrient lockout versus oxygen problems?
Nutrient lockout (often pH issues) usually comes with uneven yellowing and leaves that don’t rebound after adjusting pH and EC. Low oxygen often shows faster decline, sometimes with brown slimy roots or sudden wilting. Confirm by checking pH, EC, and whether your air stone is actually producing bubbles at the bottom.
Can I keep harvesting indefinitely from the same roots?
You can keep producing, but production usually declines over time due to salt buildup and root aging. Plan on periodic reservoir refreshes and occasional cut-and-restart if growth slows and roots become dense or matted. Many growers run a rolling restart using new cuttings from the best shoots.
Is kangkong safe to eat right after adjusting the nutrient solution?
Yes, but avoid harvesting during major disruption. If you had a pH or EC correction, wait until plants resume normal growth, then harvest. Also rinse harvested stems briefly with clean water before eating.
What’s the best way to store extra cuttings while waiting to set up the system?
Keep cuttings in a cool place with the cut ends trimmed and lightly misted, or store them wrapped in a damp paper towel in the fridge for short periods. Long cold storage reduces rooting speed, so aim to set up hydroponics within a day or two for best results.