Pechay is one of the easiest and most rewarding crops you can grow hydroponically. You can use the same hydroponic principles, systems, and nutrient controls to learn how to grow methi hydroponically, too. From seed to harvest in as little as 30 to 45 days, it thrives in almost every beginner-friendly hydroponic setup and produces dense, crisp leaves that taste noticeably better than store-bought. The key is getting the nutrient solution, temperature, and light dialed in early, because pechay is sensitive to heat and stress in ways that will tank your harvest if you ignore them. This same kind of hydroponic setup and temperature and nutrient control can also guide you on how to grow aloe vera hydroponically. This guide walks you through the whole process, from picking the right variety to staggering harvests for a continuous supply.
How to Grow Pechay in Hydroponics: Step by Step Guide

Best Pechay Varieties for Hydroponics
Not all pechay varieties behave the same in a hydroponic system. The ones that do best are compact, fast-maturing, and bolt-resistant, which matters a lot when you're growing indoors or in a warm climate where temperatures can spike.
- Mei Qing Choy (Shanghai Green): Probably the most popular choice for hydroponics. Small, jade-green heads, ready in 35 to 45 days, and notably more heat-tolerant than full-size varieties. The compact size fits tight net cup spacing perfectly.
- Baby Pak Choi: Matures around 45 to 50 days and can be harvested as a cut-and-come-again crop for several weeks. It handles moderate warmth reasonably well and produces consistently in DWC and NFT systems.
- White Stem Pechay (Philippine-type): The standard pechay you'll find in Filipino markets. Grows fast, has broad flat leaves and thick white stems, and is ideal for warm indoor grows. Slightly more prone to bolting under heat stress than Mei Qing Choy.
- Joi Choi: A full-size hybrid with thick white stalks and dark leaves. Takes 45 to 55 days but produces a heavier yield per plant. Good for DWC or raft systems where you have more space.
- Dwarf or miniature varieties: Any variety labeled "mini" or "dwarf" is excellent for vertical systems or small setups because the reduced canopy size means you can pack more plants per square foot.
My honest recommendation for beginners: start with Mei Qing Choy or Baby Pak Choi. Both are forgiving, fast, and give you visible progress within two weeks of transplant, which keeps motivation high when you're still learning the system.
Choosing a Hydroponic System for Pechay
Pechay is a light feeder with shallow roots, which makes it compatible with almost every major hydroponic method. The choice mostly comes down to your budget, space, and how hands-on you want to be.
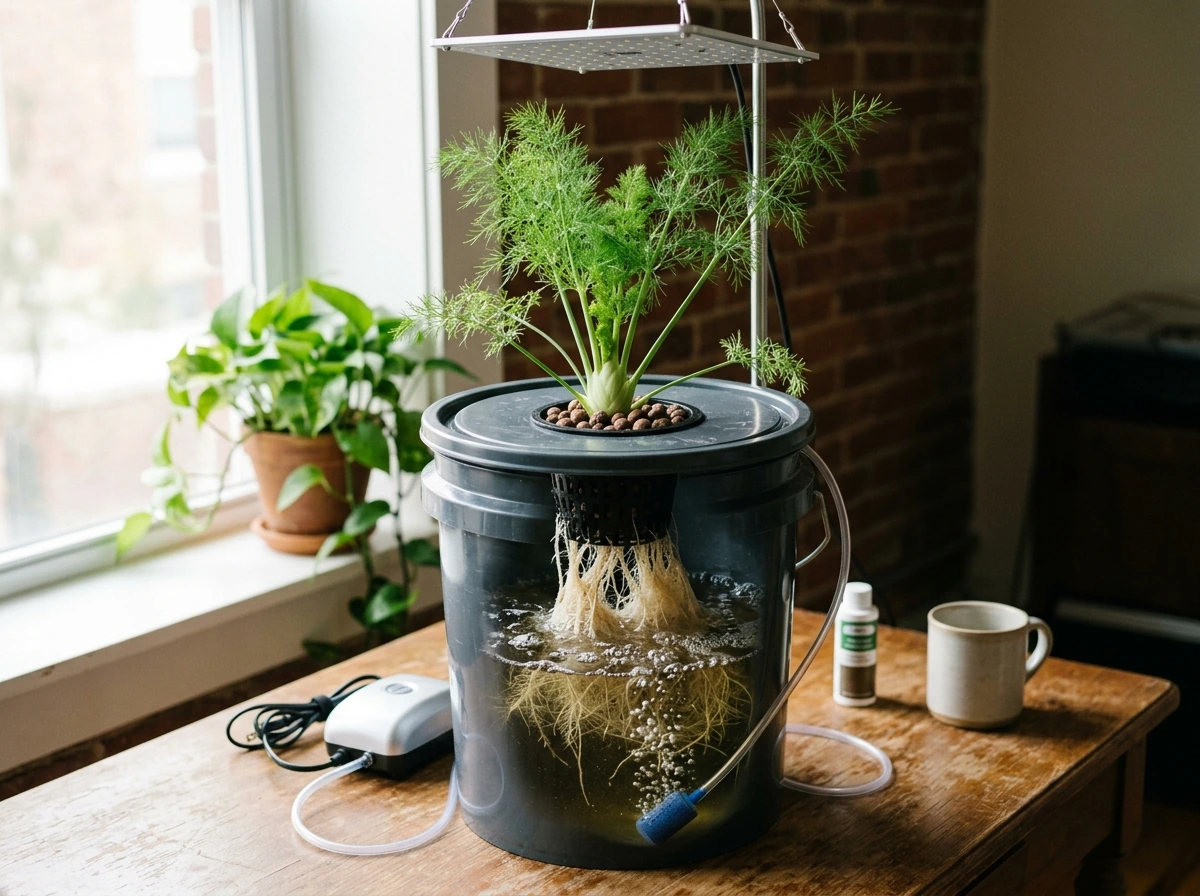
Deep Water Culture (DWC)
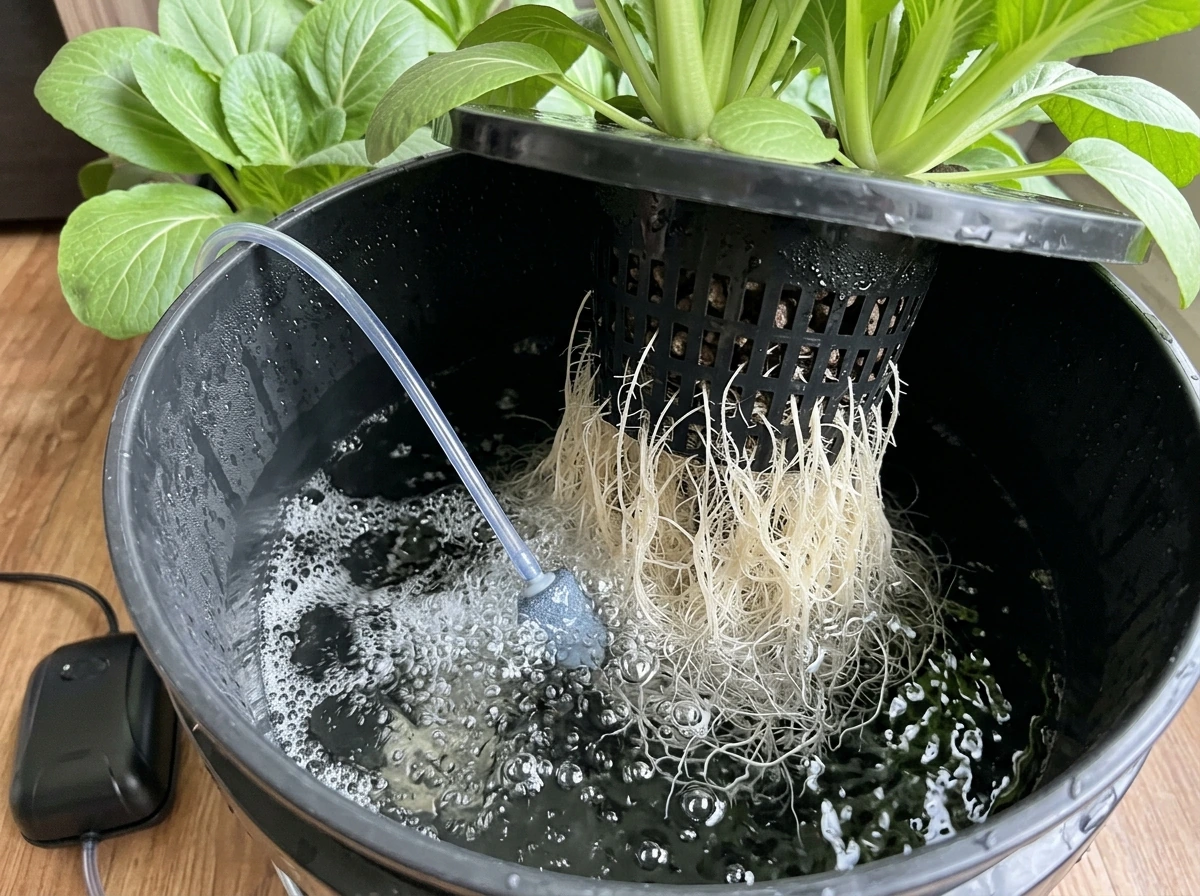
DWC is the easiest starting point. You suspend net cups in a lid over a nutrient reservoir, and an air pump oxygenates the solution continuously. Pechay roots hang directly in the water, and growth is fast because the roots have constant access to oxygen and nutrients. The main risk is reservoir temperature: if the water gets above 72°F (22°C), you'll start seeing root problems. If you want a deeper look at hydroponic how to grow from setup to troubleshooting, the hydroponic how to grow guide covers the basics of choosing systems, managing nutrients, and keeping roots healthy. Keep a thermometer in the reservoir and use a small aquarium chiller if your space runs warm.
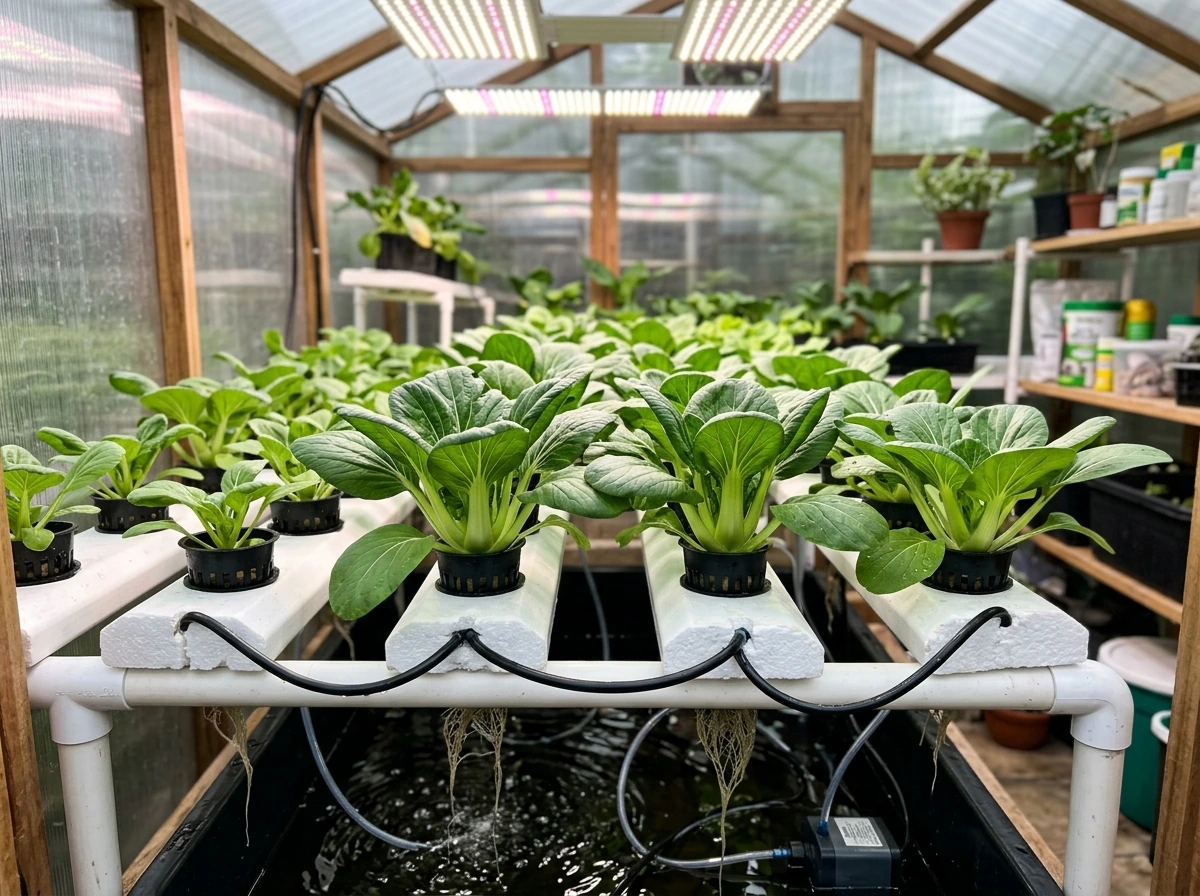
Nutrient Film Technique (NFT)
NFT runs a thin film of nutrient solution along sloped channels, and roots sit partially exposed to air. It uses less water than DWC, is easy to scale with additional channels, and gives excellent results for leafy greens like pechay. The downside is that pump failures are catastrophic, since roots dry out within hours. Always have a backup pump on hand.
Raft (Kratky/Float) Systems
Raft systems float a polystyrene sheet of plants across a shallow nutrient pond. This is extremely popular for commercial pechay production in the Philippines and Southeast Asia because it's low-cost, low-tech, and scalable. You can build a basic raft system with a plastic container, styrofoam sheet, and net cups. Passive versions (the Kratky method) need no pump at all, making them ideal for off-grid setups or beginners who want to minimize equipment.
Vertical Systems
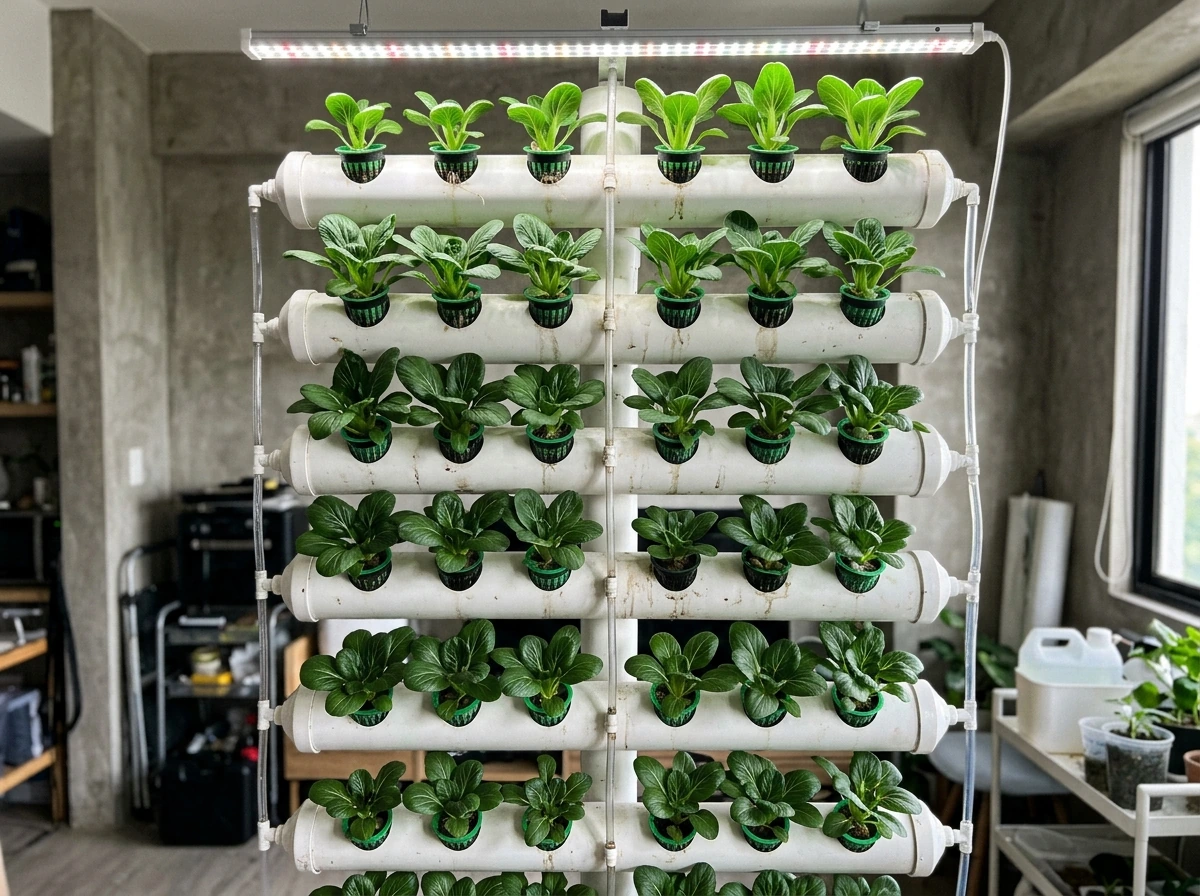
Vertical towers or stacked channels work great for pechay because the plants are small and don't shade each other much. They maximize yield per square foot, which is useful in small indoor spaces. The trade-off is that irrigation needs to be even across all levels, top to bottom, and you'll need to rotate plants periodically if you're using vertical towers under a single overhead light.
| System | Difficulty | Cost | Water Use | Best For |
|---|---|---|---|---|
| DWC | Beginner | Low | Moderate | Small indoor setups, fastest growth |
| NFT | Intermediate | Moderate | Low | Scaling up, commercial runs |
| Raft / Kratky | Beginner | Very Low | Moderate | Low-budget, outdoor or tropical grows |
| Vertical Tower | Intermediate | Moderate–High | Low | Space-limited indoor grows |
Step-by-Step Grow Plan: Seed to Harvest
Stage 1: Germination (Days 1–5)
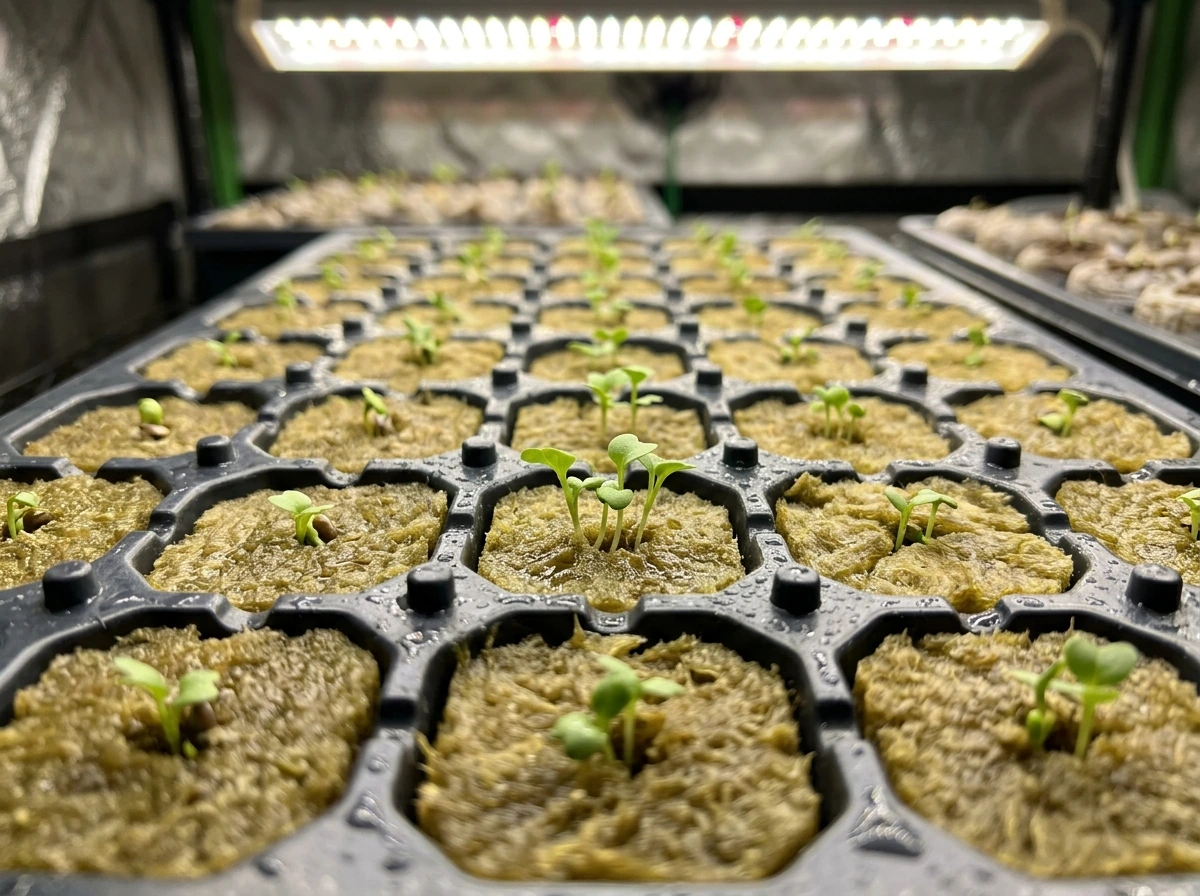
Pechay seeds germinate quickly, usually within 2 to 4 days at 70 to 75°F (21 to 24°C). Sow them in rockwool cubes, oasis foam cubes, or coco coir plugs. Drop one to two seeds per cube, water with plain pH-adjusted water (pH 5.8 to 6.2), and cover loosely with plastic wrap or a humidity dome. Keep them in a warm, dim spot, not under full light yet. Once you see the seed leaves (cotyledons) push up, remove the cover immediately to prevent damping-off.
Stage 2: Seedling (Days 5–12)
Move seedlings under light as soon as they emerge. At this stage, run a dilute nutrient solution at EC 0.8 to 1.0 mS/cm. Full-strength nutrients at this point will burn the roots. Keep the light at 14 to 16 hours per day and make sure seedlings are getting good air circulation to build strong stems. Thin to one plant per cube if both seeds germinated.
Stage 3: Transplant (Day 10–14)
Transplant once seedlings have 2 to 3 true leaves and roots are just starting to peek out the bottom of the plug. Set the plug into a net cup (2-inch or 3-inch cups work well for pechay) and place in your system. Handle the roots gently. Transition to your full vegetative nutrient solution: EC 1.2 to 1.8 mS/cm, pH 5.8 to 6.5.
Stage 4: Vegetative Growth (Days 14–35)
This is where pechay really takes off. You'll see new leaves every few days. Maintain consistent nutrient levels, keep water temperature below 72°F, and make sure there's good airflow across the canopy. At around day 21, check if outer leaves are large enough for a first cut-and-come-again harvest if you're growing Baby Pak Choi or similar varieties.
Stage 5: Harvest (Days 30–50)
Whole-head harvest typically happens between 30 and 50 days depending on variety and conditions. Cut at the base with a clean blade. For cut-and-come-again, trim outer leaves and leave the growing center intact. The plant will continue producing for 2 to 3 additional weeks if conditions stay good.
Nutrient Solution: What to Feed and When
Pechay is a light feeder, which is actually good news because over-feeding is one of the most common beginner mistakes. Here's a practical nutrient approach you can use with any commercial two-part or three-part hydroponic nutrient line.
EC, pH, and Temperature Targets
| Growth Stage | EC (mS/cm) | pH Range | Solution Temp (°F) |
|---|---|---|---|
| Germination | 0.0 (plain water) | 5.8–6.2 | 70–75 |
| Seedling (days 5–12) | 0.8–1.0 | 5.8–6.2 | 68–72 |
| Vegetative (post-transplant) | 1.2–1.8 | 5.8–6.5 | 65–72 |
| Pre-harvest (last 5 days) | 1.0–1.4 | 6.0–6.5 | 65–70 |
Keep solution temperature under 72°F (22°C) as a hard rule. For hydroponic leafy greens, OSU Extension provides an EC and pH target framework writers can adapt, including guidance suited to crops like pechay EC and pH target framework for leafy greens. Warmer water holds less dissolved oxygen and dramatically increases root rot risk. If you're in a warm climate, a frozen water bottle in the reservoir is a short-term fix, but a small aquarium chiller is the proper solution for consistent results.
A Simple Nutrient Recipe
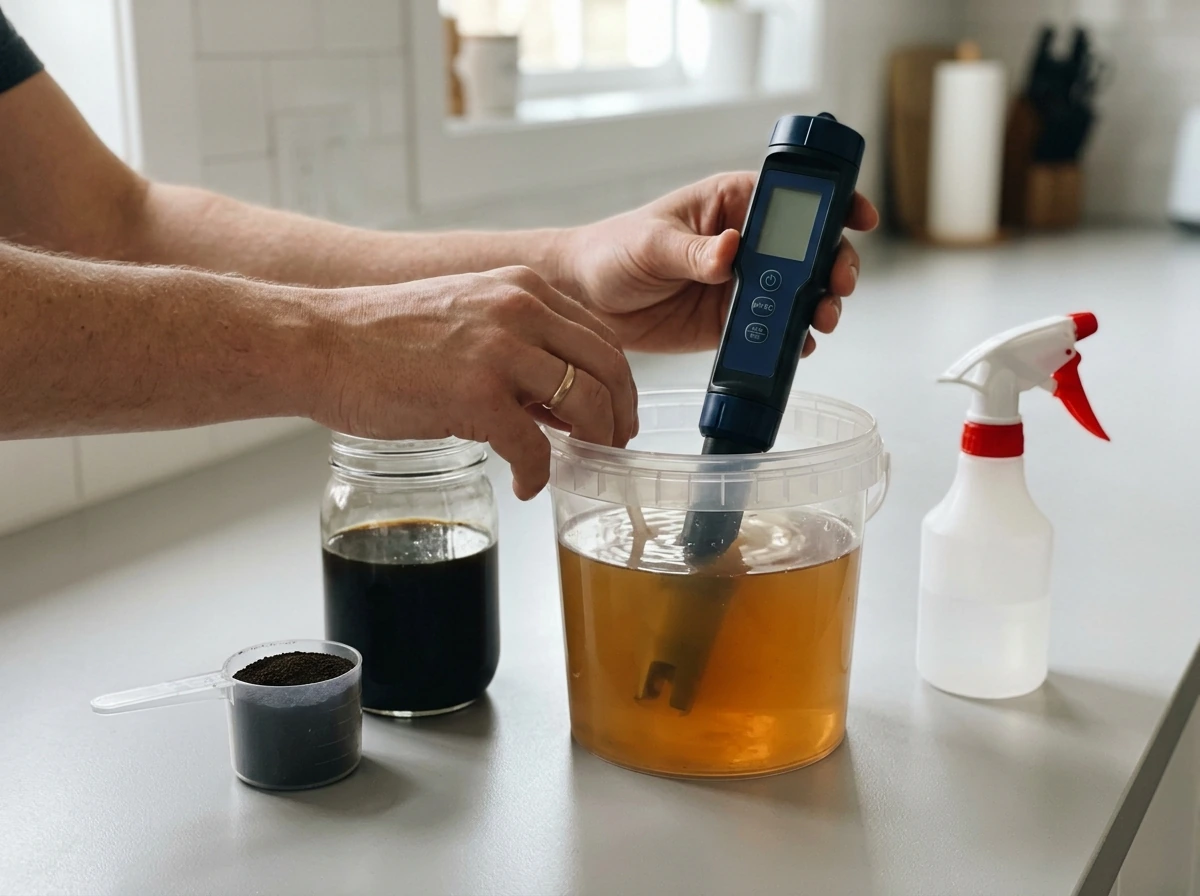
If you're mixing from concentrate, a standard leafy greens formula works well: higher nitrogen for leaf growth, moderate potassium, low phosphorus. A typical ratio to target is N-P-K around 3-1-2 by ratio. Using a premixed leafy greens formula (like General Hydroponics FloraSeries, MaxiGro, or any Philippine-market leafy greens fertilizer), follow the manufacturer's seedling dose for weeks 1 to 2 and step up to the vegetative dose from week 2 onward. Check EC after mixing and adjust with water (to dilute) or more nutrient (to raise) before adding to the system.
Feeding and Reservoir Management Schedule
- Check pH and EC every day during the first two weeks. Daily swings are normal but should stay within your target range.
- Top off the reservoir with pH-adjusted plain water (not fresh nutrient mix) when the level drops by 10 to 20 percent. Plants drink more water than nutrients, so topping off with plain water prevents EC from creeping up.
- Do a full reservoir change every 7 to 10 days to prevent nutrient salt buildup and pathogen accumulation.
- In the last 5 days before harvest, drop EC slightly to 1.0 to 1.4 and let the plants use up remaining nutrients. This improves leaf texture and flavor.
Light, Spacing, and Managing Growth
Lighting
Pechay needs moderate light intensity, not the high-wattage power that fruiting crops demand. A PPFD of 150 to 250 μmol/m²/s is ideal for fast, dense growth. Full-spectrum LED grow lights are the best practical choice for indoor grows because they run cool, use less electricity, and can be hung close to the canopy without heat stress. T5 fluorescent tubes also work well for seedlings and small setups. Run lights 14 to 16 hours per day and give plants 8 to 10 hours of darkness. Pechay is a long-day plant when it comes to bolting, meaning extended light can trigger it to flower, especially under heat stress. Keeping the photoperiod at 14 to 16 hours with good temperature control is the right balance.
Spacing
This is where I've made mistakes. Crowding pechay causes soft, etiolated leaves and creates high humidity pockets that invite fungal problems. Space plants at 6 to 8 inches (15 to 20 cm) apart for standard varieties. Baby or dwarf varieties can go as close as 4 to 6 inches. If you're using a raft system, 6-inch spacing works well for a mix of yield per plant and total plant count.
Airflow and Humidity
Run a small fan to move air across the canopy. This does two things: it strengthens stems (the slight mechanical stress from airflow triggers the plant to build stronger cell walls) and it prevents the humid stagnant air that leads to tip burn and fungal disease. Aim for 50 to 70 percent relative humidity. Above 80 percent consistently is where problems start.
Temperature Management
The ideal air temperature range for pechay is 60 to 70°F (15 to 21°C). This is where you get the densest heads and best flavor. At temperatures above 75°F (24°C), leaves become narrower, heads are less dense, and bolting risk goes up significantly. If you're growing in a tropical climate (like the Philippines, where pechay is hugely popular), growing indoors with a fan and managing your grow room temperature is more important than almost any other variable.
Troubleshooting Common Pechay Problems
Yellowing Leaves
Yellow leaves are the most common complaint. The cause depends on where the yellowing appears. Older (lower) leaves turning yellow first usually means nitrogen deficiency, which typically means your EC is too low or you haven't changed the reservoir recently. New (upper) leaves yellowing while lower leaves stay green often points to iron or manganese deficiency caused by pH being too high (above 6.8). Check pH first, always, because no amount of extra nutrients will fix an absorption issue caused by wrong pH.
Tip Burn
Tip burn shows up as brown, crispy edges on inner leaves, and it's not a pest or disease. It's a calcium uptake issue caused by poor airflow and high humidity rather than actual calcium deficiency in the solution. The inner leaves can't transpire effectively, so calcium (which moves through the plant with water flow) never reaches the leaf tips. Fix it by improving airflow with a fan, reducing humidity, and making sure your EC isn't excessively high (which slows water uptake).
Bolting
Bolting (the plant suddenly sending up a flower stalk) ends your harvest early. It's triggered by heat, extended photoperiods, or plant stress. Pechay is sensitive to temperature, and even a few days above 80°F can kick off the bolting response. If you see a central stalk starting to elongate and the leaves get more pointed and sparse, the plant is bolting. You can harvest immediately and use what you have, but there's no reversing it. Prevention is the only fix: keep temperatures cool (60 to 70°F), limit photoperiod to 14 to 16 hours, and don't stress plants with extreme pH swings or nutrient deficiencies.
Root Issues: Brown or Slimy Roots
Healthy pechay roots should be white to off-white. If roots are turning brown, slimy, or have a bad smell, you're dealing with root rot, usually caused by Pythium. This is almost always a temperature and oxygenation problem. UNH Extension explains that hydroponic systems must provide oxygen to the root zone, and that root rot can occur when root-zone oxygen is insufficient almost always a temperature and oxygenation problem. Warm water (above 72°F) combined with insufficient aeration is the perfect environment for Pythium. Fix: lower the reservoir temperature immediately, increase air pump output, and do a full reservoir change. You can also add beneficial bacteria products (like Hydroguard) to outcompete pathogens. In severe cases, remove affected plants so they don't spread the problem.
Slow or Stunted Growth
If your pechay looks stuck and isn't putting out new leaves every few days, check these in order: pH (most common cause), EC (too low or too high), light intensity (not enough), and root health. Stunted growth with dark green, thick leaves often means EC is too high. Pale stunted growth usually means light is inadequate or pH is off.
Pests and Algae
Aphids and whiteflies are the most common insect pests on pechay. Inspect the undersides of leaves every few days, especially if growing outdoors or in a greenhouse. For small infestations, a strong spray of water or diluted neem oil solution is effective. Fungus gnats are common when growing media stays too wet. Algae growing in the reservoir or on exposed net cups is a sign that light is reaching the nutrient solution. Cover all reservoir surfaces with opaque material, black plastic, or foil tape. Algae compete with your plants for oxygen and nutrients and contribute to biofilm buildup.
Harvesting, Storage, and Running a Continuous Supply
When and How to Harvest
Harvest pechay when heads feel firm and leaves are full-sized but before any flower stalk starts to develop. If you want to grow flowers hydroponically, the same basics apply, but you will adjust lighting and nutrient strength for the specific bloom type how to grow flowers hydroponically. For most varieties, this is between 30 and 50 days from transplant. The outer leaves should be dark green and crisp. If you wait too long, leaves become tougher, slightly bitter, and quality drops fast. Harvest in the morning when the plants are fully turgid and temperatures are lower: the leaves will stay crispier longer after cutting.
For whole-head harvest, cut cleanly at the base of the stem with a sharp, clean knife or scissors. For cut-and-come-again, remove outer leaves from the outside in, leaving the inner growing tip intact. Cut at the base of individual leaf stems, not halfway up the leaf.
Post-Harvest Storage
- Do not wash before storing. Moisture accelerates spoilage.
- Wrap loosely in a dry paper towel and place inside a perforated plastic bag or produce bag.
- Store in the crisper drawer of your refrigerator at 32 to 40°F (0 to 4°C).
- Pechay stays fresh for 4 to 7 days under these conditions. It does not freeze well.
- For hydroponic-grown pechay without soil, shake off any excess moisture from roots before bagging if selling or giving away whole plants.
Staggering Harvests for a Continuous Supply
The best part about pechay in hydroponics is how easy it is to run a perpetual harvest once you have the system dialed in. The strategy is simple: start a new batch of seeds every 10 to 14 days. By the time your first batch is ready to harvest, your second batch is already in the system growing, and your third batch is just germinating. This is called a staggered or succession planting schedule, and it gives you fresh pechay every week or two without any gaps.
- Divide your growing system into sections or use separate trays for different batches.
- Label each batch with the transplant date so you always know how far along each group is.
- Start seeds every 10 to 14 days in a dedicated germination tray kept separate from your main system.
- After harvest, rinse the net cups and growing media, clean the reservoir or channel, and replant immediately with the next ready seedlings.
- Do a thorough system flush and clean every 3 to 4 harvest cycles to prevent biofilm and pathogen buildup.
Once you have two or three staggered batches running, the system basically runs itself on a weekly rhythm. This approach is also how most small commercial pechay producers in the Philippines operate their raft systems, and it scales smoothly whether you have a 10-plant hobby setup or a 200-plant grow.
If you want to go further, pairing a pechay hydroponic system with a small fish component (an aquaponics loop) is a natural next step for this kind of setup and something worth exploring once your hydroponic runs are consistent. The nutrient cycling in aquaponics suits fast-growing leafy greens like pechay very well.
FAQ
What water pH should I use if I’m starting from plain water in a new hydroponic pechay setup?
Aim to adjust the water to a target range that matches the stage you’re in (seedlings typically around pH 5.8 to 6.2, later vegetative typically up to about 6.5). If you always start with neutral tap water, recheck pH after mixing nutrients and again after 1 to 2 hours, because some salts can drift pH before the system stabilizes.
How do I know if my EC is truly off, or if it only looks off because of evaporation?
If the reservoir level drops noticeably between checks, top up with water first to bring the level back, then remeasure EC. Evaporation concentrates salts, so EC can rise even if the nutrient strength was correct initially. For frequent top-ups, keep a simple schedule for when you measure EC and when you do partial reservoir changes.
Can I grow pechay hydroponically without rockwool, oasis foam, or coco coir plugs?
Yes, but you still need a medium that holds moisture around the seed until roots form. Many beginners switch to inert options like perlite-based cubes or net cups with a wet starter, but pechay seeds can dry out quickly. If you skip a proper germination medium, use a humidity dome and ensure the bottom of the root zone stays consistently moist and oxygenated.
What should I do if seedlings look healthy but start slowing down right after transplant?
This is often transplant shock from handling roots too roughly or from jumping EC too high too fast. Make sure roots are placed gently, then start with the seedling nutrient EC (around 0.8 to 1.0) for a short recovery period before stepping to vegetative EC (about 1.2 to 1.8). Also confirm light is not too intense immediately after transplant, especially with LEDs hung close.
How much airflow is enough, and where should I place the fan in my pechay setup?
You want gentle, constant movement across the leaf canopy, not a strong wind tunnel. Place the fan so air travels horizontally across plants, which helps reduce stagnant humid pockets and supports calcium transport that prevents inner leaf tip burn. If you see leaves drying at the edges, reduce fan strength or increase distance.
Is it better to run lights continuously or take a longer dark period for pechay?
Use a daily photoperiod around 14 to 16 hours and provide 8 to 10 hours of darkness. Continuous light can increase bolting risk, especially when combined with warmth. If you’re trying to correct slow growth, first adjust temperature and nutrient strength, rather than extending the light cycle far beyond the recommended window.
How can I prevent bolting in warm weather beyond just keeping temperature below 75°F (24°C)?
In hot conditions, also reduce stress drivers, like letting EC swing widely or letting pH drift high. Keep reservoir temperature controlled (your 72°F rule is important), run consistent airflow, and avoid periods where plants are underfed or intermittently deprived of oxygen. If your room spikes for a few hours, prioritize protecting roots and keeping the photoperiod at 14 to 16 hours rather than pushing it longer.
What reservoir change schedule should I follow for pechay?
For short cycles (about 30 to 50 days), many growers do partial changes instead of waiting for a full tank reset. A practical approach is to do a partial reservoir change when EC or pH drifts persistently, or when you’ve added nutrients several times without refreshing. If you notice root issues or persistent yellowing that doesn’t match pH, do a full change and clean the reservoir surfaces.
My pechay leaves are yellow, but EC and pH seem “okay.” What else can cause yellowing?
Check whether the yellowing is starting on the lower leaves or the newest leaves. If lower leaves yellow first, it can still be nutrition related, even if EC looks acceptable, because nutrient ratios might be off for nitrogen. If newer leaves yellow, verify pH isn’t creeping above about 6.8 and confirm light intensity is adequate, because weak light can mask or mimic deficiency symptoms by slowing growth and reducing nutrient uptake.
What causes algae in the reservoir, and does it harm pechay if levels seem low?
Algae appears when light reaches the nutrient solution and exposed parts like net cups. Even small algae blooms can contribute to biofilm formation, which reduces available oxygen and can interfere with nutrient delivery. Cover all reservoir surfaces with opaque material and limit gaps where light can penetrate, then consider a thorough reservoir clean if algae keeps returning.
How do I troubleshoot root rot early, before plants fully decline?
Watch for early warning signs like off-color roots (browning), sliminess, or a noticeable bad smell from the reservoir. If you see these, immediately lower reservoir temperature to your target range, increase aeration (air pump output), and do a full reservoir change. Removing severely affected plants early helps prevent spread, especially if you suspect Pythium.
Can I reuse nutrient solution for the next pechay batch to save money?
It’s usually not recommended once a batch has run, especially if you saw any root problems, algae, or pH/EC instability. Pechay is sensitive to heat and stress, and leftover solution can have shifted ion balance and microbial load. If you insist on reuse, treat it as partial refresh only, and rebaseline EC, pH, and reservoir cleanliness before transplanting new seedlings.
What’s the best harvest method to keep cut-and-come-again pechay producing longer?
For cut-and-come-again, remove outer leaves from the outside in, leaving the central growing point untouched. Cut individual leaf stems at their base rather than trimming mid-leaf, and harvest in the morning when plants are fully turgid. If you wait until outer leaves are tough or flower initiation begins, regrowth speed drops and quality degrades faster.
When should I thin to one plant per cube, and what spacing should I use in NFT or raft systems?
Thin as soon as you confirm which seedlings are strongest, typically when both sprouted seedlings are large enough to distinguish (right around the early true-leaf stage). Use spacing targets appropriate to your variety, standard pechay about 6 to 8 inches apart, baby varieties closer. In NFT or raft, maintain spacing so roots are not overcrowded and airflow can reach the canopy, because crowding increases humidity pockets and soft growth.